
Refrigerated crescent roll dough is a game-changer for home cooks – its versatility and convenience make it a hero ingredient for all kinds of dishes. With a can of these buttery, flaky rolls, you can create everything from sweet desserts to savory dinners in a snap.
Whether you’re assembling a hearty breakfast bake, whipping up appetizers for a party, crafting an easy family main dish, or baking desserts and snacks to satisfy your sweet tooth, crescent rolls provide a quick shortcut without sacrificing flavor.
Below are 20 unique crescent roll recipes (each from a different source) that showcase just how creative you can get with this simple dough. Get ready to be inspired by these ideas – they’re proof that with crescent rolls, the possibilities are endless!

Key Takeaways:
Using crescent roll dough opens up a world of culinary creativity, from breakfasts to desserts. Key benefits include:
- Speed and Ease: Crescent dough is a ready-to-use shortcut, enabling quick prep times (many of the above recipes come together in 10–30 minutes). You get fresh-baked results with minimal effort, perfect for busy days or last-minute entertaining.
- Versatility: These recipes show how versatile crescent rolls are – they can be sweet or savory, used as crusts, wraps, or layers, and adapt to countless flavor profiles (Mexican, Italian, American classics, etc.). One dough = endless possibilities (breakfast casseroles, appetizers, mains, and desserts!).
- Crowd-Pleasing Flavor: The dough’s buttery, flaky texture enhances any filling. It brings comfort-food appeal that makes even veggie-heavy or simple recipes taste indulgent. From the youngest picky eaters to seasoned foodies, almost everyone loves that crescent roll flavor and texture.
- Make-Ahead Friendly: Many crescent-based dishes can be prepared partially or wholly in advance (e.g., bake crusts ahead, assemble and refrigerate, etc.), which is great for meal planning and stress-free hosting.
- Room for Creativity: You can easily customize these recipes – swap fillings, add spices, get creative with shapes (rings, braids, bites). Crescent dough is very forgiving, inviting even novice cooks to experiment and succeed.
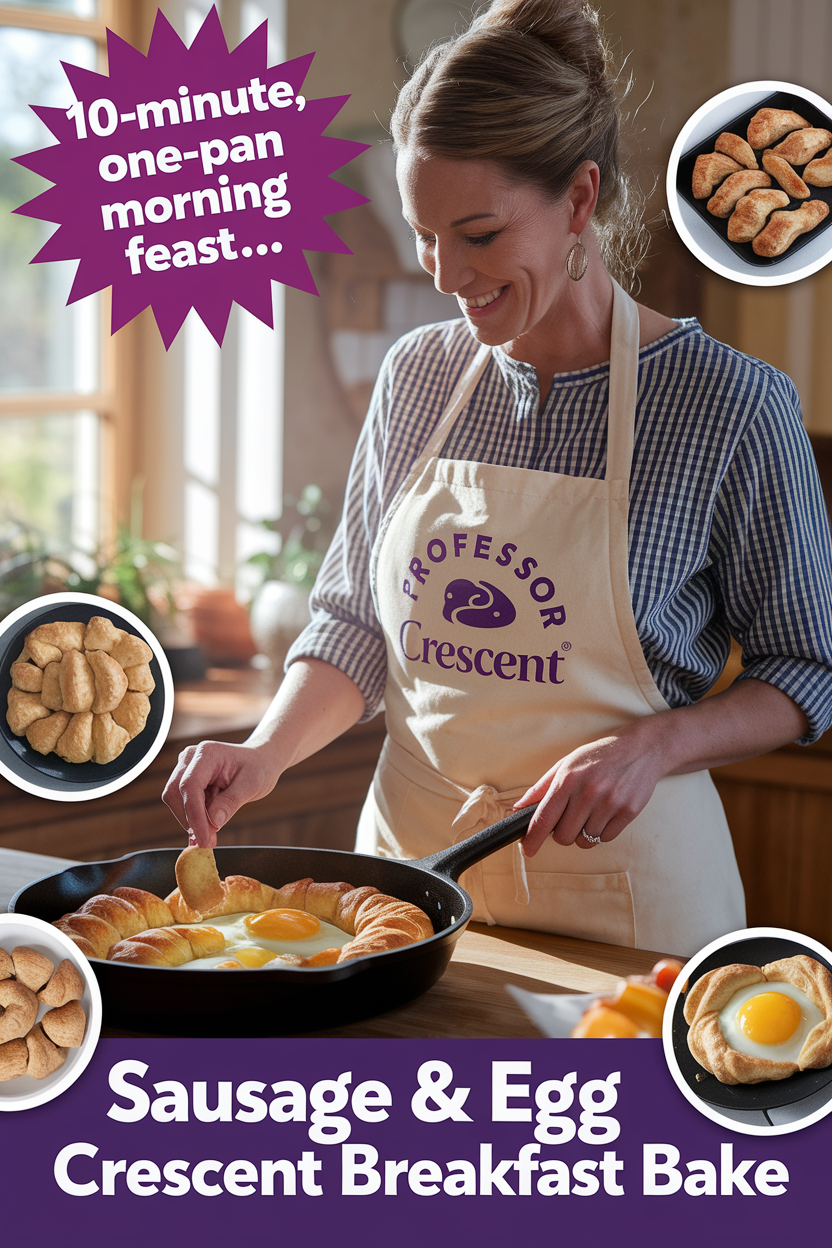
1. Sausage & Egg Crescent Breakfast Bake
Description: A savory breakfast casserole that layers buttery crescent rolls with crumbled sausage, fluffy eggs, and melted cheese (Crescent Roll Breakfast Casserole – Joyous Apron).
Baked to golden perfection, it’s an all-in-one breakfast that’s hearty and flavorful. This dish stands out because it combines all your morning favorites (eggs, meat, and bread) into a single, fuss-free bake.
Why It’s Great:
This casserole is a one-pan wonder with only ~10 minutes of prep (Crescent Roll Breakfast Casserole – Joyous Apron). It’s easy to assemble (the oven does most of the work) and feeds a crowd, making it ideal for brunch gatherings.
The crescent roll base soaks up the egg mixture, turning light and fluffy while the top gets slightly crisp, giving each bite a mix of textures (Crescent Roll Breakfast Casserole – Joyous Apron).
It’s also very portable and reheats well, so you can enjoy leftovers on busy weekdays (Crescent Roll Breakfast Casserole – Joyous Apron).
Suitable For:
Perfect for weekend brunches, holiday mornings, and busy families. Great for “make-ahead” breakfast planners and anyone who wants a comforting morning meal without the morning hassle.
Tips & Tricks:
- Brown the sausage ahead of time and drain excess grease to prevent a heavy, oily casserole.
- Beat the eggs with a bit of milk for a creamier custard that the crescents will soak in.
- Spray or grease the baking dish well to ensure easy serving and cleanup.
- Let the casserole rest for 5–10 minutes after baking to set – this makes cutting into squares cleaner.
- Feel free to add diced veggies (like bell peppers or onions) for extra flavor and nutrients.
Possible Improvements:
- Swap the sausage with bacon, ham, or plant-based crumbles to change up the protein.
- Use sharp cheddar, Monterey Jack, or your favorite cheese blend to personalize the taste.
- Add herbs or spices (such as chives, black pepper, or a dash of hot sauce) to the egg mixture for an extra kick.
- For a lighter version, use turkey sausage and egg whites – it will still bake up deliciously.
Read the full recipe here: Joyous Apron – Crescent Roll Breakfast Casserole (Crescent Roll Breakfast Casserole – Joyous Apron) (Crescent Roll Breakfast Casserole – Joyous Apron)
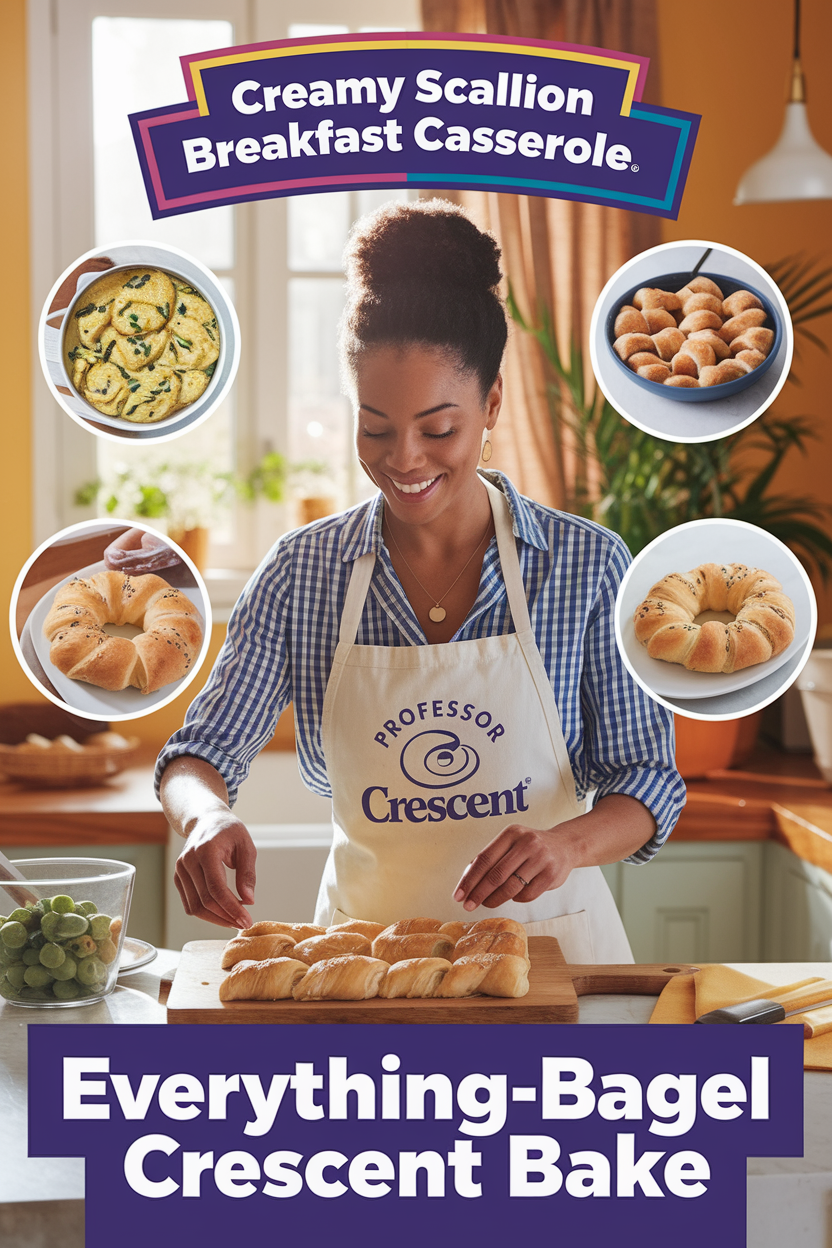
2. Everything-Bagel Crescent Bake – Creamy Scallion Breakfast Casserole
Description: Imagine an everything bagel in casserole form!
This clever dish wraps crescent roll dough around scallion cream cheese (like a stuffed crescent roll), then bakes it in a savory egg custard seasoned with “everything bagel” toppings (Best Crescent Roll Breakfast Casserole – How To Make Crescent Roll Breakfast Casserole).
The result is a frittata-like breakfast bake with a surprise creamy center in each slice. It’s essentially your eggs and bagels all in one, delivering big deli flavor with minimal effort.
Why It’s Great:
Combines the comfort of a strata with the flavors of a New York bagel – truly the best of both worlds (Best Crescent Roll Breakfast Casserole – How To Make Crescent Roll Breakfast Casserole).
It’s fun and easy to make: simply stuff and roll the crescents, pour over an egg mixture, and bake (Best Crescent Roll Breakfast Casserole – How To Make Crescent Roll Breakfast Casserole).
The everything bagel seasoning on top adds crunch and garlicky, toasty notes, while the pockets of cream cheese keep each bite moist and tangy.
With eggs, milk, and cheese in the custard, it’s a rich and hearty dish that looks impressive at brunch (everyone gets their own crescent roll slice baked right in!) (Best Crescent Roll Breakfast Casserole – How To Make Crescent Roll Breakfast Casserole).
Suitable For:
Excellent for brunch lovers and bagel aficionados. Suitable for holiday breakfasts, potluck brunches, or any morning when you want something a little special. Great for those who enjoy bold flavors (hello, garlic and onion) and creative twists on classic breakfast foods.
Tips & Tricks:
- Use cold cream cheese when filling the crescents so it stays in place and doesn’t melt out during baking (Best Crescent Roll Breakfast Casserole – How To Make Crescent Roll Breakfast Casserole).
- Can’t find everything seasoning? Mix your own with sesame seeds, garlic flakes, onion flakes, poppy seeds, and salt (Best Crescent Roll Breakfast Casserole – How To Make Crescent Roll Breakfast Casserole).
- Arrange the stuffed crescents in the dish with equal spacing – they’ll puff up as they bake in the egg custard.
- Grease your baking dish generously (butter or spray) to prevent sticking (Best Crescent Roll Breakfast Casserole – How To Make Crescent Roll Breakfast Casserole).
- If you like some heat, stir a little diced jalapeño or pepper jack cheese into the egg mixture for a kick.
Possible Improvements:
- Try different cream cheese flavors (garden veggie, jalapeño, etc.) for a fun twist (Best Crescent Roll Breakfast Casserole – How To Make Crescent Roll Breakfast Casserole).
- Swap Gouda cheese with cheddar or pepper jack in the custard to suit your taste (Best Crescent Roll Breakfast Casserole – How To Make Crescent Roll Breakfast Casserole).
- Add cooked bacon or smoked salmon pieces on top of the cream cheese before rolling for an even more indulgent “everything bagel” experience.
- To make it lighter, use light cream cheese and whole milk (skipping the heavy cream) – it will be a bit less rich but still tasty.
Read the full recipe here: Delish – Crescent Roll Breakfast Casserole (Everything Bagel Style) (Best Crescent Roll Breakfast Casserole – How To Make Crescent Roll Breakfast Casserole) (Best Crescent Roll Breakfast Casserole – How To Make Crescent Roll Breakfast Casserole)
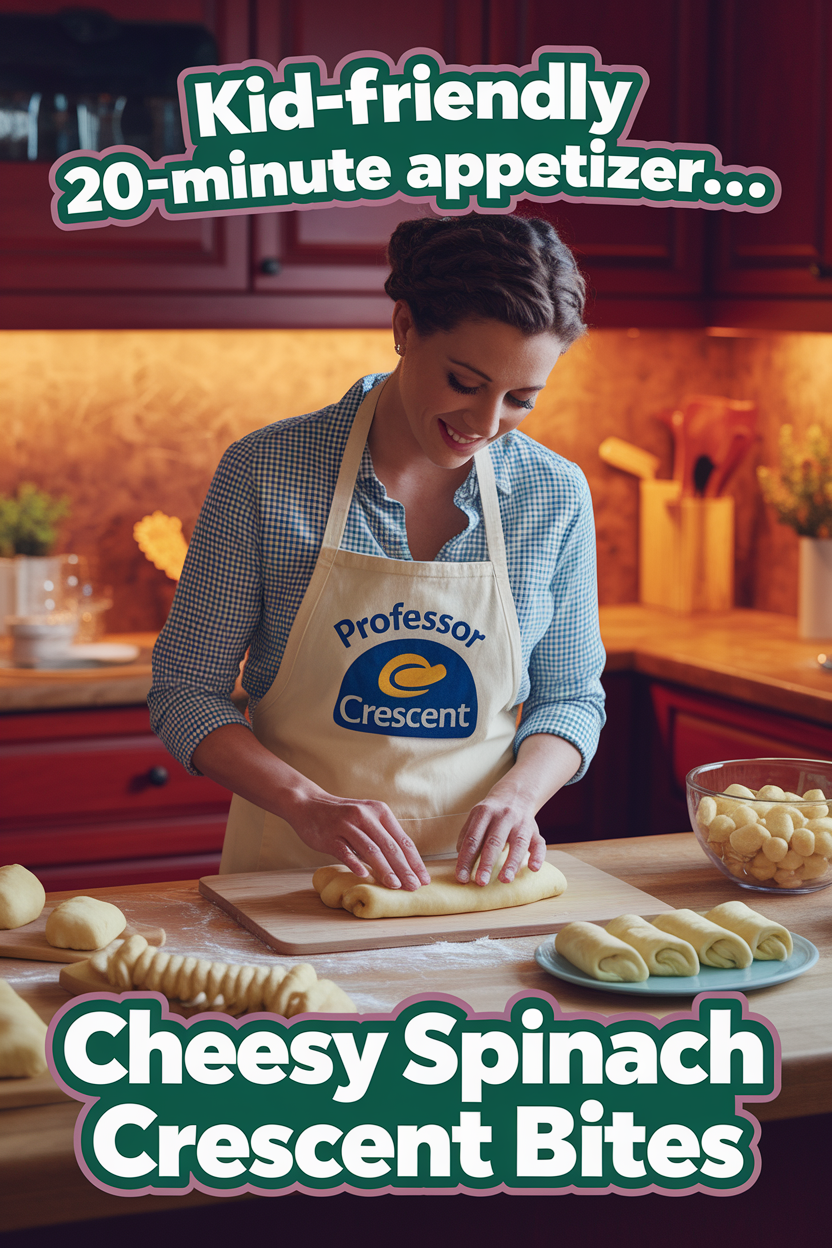
3. Cheesy Spinach Crescent Bites – Kid-Friendly 20-Minute Appetizer
Description: Bite-sized crescent roll “packages” filled with a creamy spinach and cheese mixture.
These warm appetizers feature a flaky golden exterior and a gooey, savory spinach filling made with cream cheese, mozzarella, and Parmesan (Spinach Crescent Roll Appetizers – Kid-Friendly Party Food!).
They’re essentially mini spinach pies wrapped in crescent dough – easy to eat and beloved by both kids and adults. The dish stands out as a sneaky way to get your greens in while indulging in a cheesy, buttery treat.
Why It’s Great:
It’s super quick and simple – about 10 minutes to prep and ~12 minutes to bake (Spinach Crescent Roll Appetizers – Kid-Friendly Party Food!), so you can whip these up anytime.
With frozen spinach and a few dairy staples, you create a snack that’s finger-friendly and delicious. They are versatile (great for parties, lunches, or after-school snacks) and crowd-pleasing – even picky eaters enjoy the creamy filling wrapped in that buttery crescent crust (Spinach Crescent Roll Appetizers – Kid-Friendly Party Food!).
Plus, the filling is customizable and you can change it up each time (making boredom impossible). The flaky dough makes the perfect vehicle for the cheesy spinach, yielding a handheld bite that’s both indulgent and a bit nutritious!
Suitable For:
Perfect for family gatherings, game nights, and as a starter for dinner parties. Ideal for vegetarian guests since it’s meat-free, and for kids who might not eat plain veggies but will devour these. Also a hit with busy cooks looking for a quick appetizer with gourmet flair.
Tips & Tricks:
- Thaw and drain frozen spinach very well (squeeze out excess water) to avoid a soggy filling (Spinach Crescent Roll Appetizers – Kid-Friendly Party Food!).
- Cut each crescent triangle in half for smaller bites – this makes more, smaller portions that bake evenly (Spinach Crescent Roll Appetizers – Kid-Friendly Party Food!).
- Use parchment paper on your baking sheet to prevent sticking and make cleanup easy.
- Seal the edges of the dough firmly when folding the “packages” so the cheese doesn’t leak out. A little beaten egg white brushed on the seams acts like glue (Spinach Crescent Roll Appetizers – Kid-Friendly Party Food!).
- These are best served warm. If making ahead, reheat in the oven for a few minutes to crisp them back up.
Possible Improvements:
- Mix in some artichoke hearts to the spinach filling for a spinach-artichoke vibe (like a spinach dip in a crescent).
- Swap mozzarella for feta cheese and add dill for a Greek-inspired flavor profile.
- For a meatier version, include finely chopped ham or cooked bacon bits in the filling.
- Try a sweet variation: skip garlic/onion powder and instead fill crescents with sweetened cream cheese and spinach for a unique brunch pastry. (It sounds odd, but a touch of honey or fig jam with spinach and cheese can be delightful!)
Read the full recipe here: A Mom’s Impression – Spinach Crescent Roll Appetizers (Spinach Crescent Roll Appetizers – Kid-Friendly Party Food!) (Spinach Crescent Roll Appetizers – Kid-Friendly Party Food!)
4. Everything Bagel Pigs in a Blanket – 4-Ingredient Party Appetizer
Description: A fun twist on the classic pigs in a blanket. Here, juicy little smoked sausages (cocktail wieners) are wrapped in buttery crescent roll dough and baked until puffed and golden.
What makes these unique is a sprinkle of Everything Bagel seasoning on top, adding garlic, onion, and sesame crunch to each bite (Pigs in a Blanket Recipe – Crazy for Crust).
With only a few ingredients, you get an appetizer that’s savory, addictive, and gone in seconds!

Why It’s Great:
This recipe is incredibly easy – it uses just 2 main ingredients (crescent dough and mini sausages) or 4 total ingredients if you include the seasoning and an optional egg wash (Pigs in a Blanket Recipe – Crazy for Crust).
It’s nearly foolproof (even kids can help make them) and consistently one of the first things to disappear at parties (Pigs in a Blanket Recipe – Crazy for Crust).
Despite the simplicity, the flavor payoff is big: the everything bagel seasoning elevates the taste with almost no extra work (Pigs in a Blanket Recipe – Crazy for Crust).
Plus, these bites are portable, dippable, and perfect for any occasion – truly a crowd-pleaser that appeals to both kids and adults (Pigs in a Blanket Recipe – Crazy for Crust) (Pigs in a Blanket Recipe – Crazy for Crust).
Suitable For:
Ideal for game day gatherings, birthday parties, holiday appetizers, or even an easy snack for kids’ playdates. Great for busy hosts (prep can be done in minutes) and picky eaters who like simple, familiar flavors. Essentially, anyone who loves comfort food classics will adore these mini crescent dogs.
Tips & Tricks:
- Pat the little hot dogs dry with a paper towel before wrapping, so the dough sticks and bakes up nicely (moisture can make the dough soggy).
- If you don’t have everything seasoning, you can top with just sesame seeds or poppy seeds, or even a pinch of garlic powder and salt.
- An egg wash (beaten egg brushed on the dough) will help the seasoning adhere and give a beautiful glossy finish (Pigs in a Blanket Recipe – Crazy for Crust).
- Bake on parchment-lined pans and watch closely – they go from golden to browned quickly. About 12–15 minutes at 375°F is usually perfect.
- Serve with a variety of dipping sauces (yellow mustard, honey mustard, cheese dip, ketchup) to please different palates.
Possible Improvements:
- Add a small slice of cheese inside each blanket with the hot dog for an extra gooey surprise.
- Use flavored sausages (like cheese-filled lil’ smokies or spicy sausages) to mix it up.
- Make a vegetarian version using veggie cocktail sausages or even strips of roasted bell pepper for a fun twist.
- For a buttery finish, brush the tops with a little melted butter right when they come out of the oven (it can help the seasoning flavor pop).
Read the full recipe here: Crazy for Crust – Pigs in a Blanket with Everything Seasoning (Pigs in a Blanket Recipe – Crazy for Crust) (Pigs in a Blanket Recipe – Crazy for Crust)
5. Pepperoni Pizza Crescent Rolls – Quick & Cheesy Snack Bites
Description: All the flavors of a classic pepperoni pizza rolled up in a neat crescent roll package. These snacks feature a flaky crescent exterior filled with spicy pepperoni slices and ooey-gooey mozzarella (from a melty string cheese) (Pepperoni Crescent Rolls – Dang That’s Sweet).
Sprinkled with a touch of Parmesan and Italian herbs on top, they bake into savory rolls that taste like mini pizza slices. They’re fun, handheld bites perfect for after-school nibbling or party appetizers.

Why It’s Great:
Craving pizza but short on time? These come together in minutes using just a few ingredients (a tube of dough, some pepperoni, and cheese) (Pepperoni Crescent Rolls – Dang That’s Sweet).
They’re a fantastic way to satisfy pizza cravings without making dough from scratch. Using store-bought crescent rolls is a major time-saver and still delivers that soft, bready “crust” for the filling (Pepperoni Crescent Rolls – Dang That’s Sweet).
The result is kid-approved and adult-loved – the kitchen smells like your favorite pizzeria as they bake (Pepperoni Crescent Rolls – Dang That’s Sweet).
They’re also versatile: you can serve them as a snack, appetizer, or pair with a salad for a quick meal. And because they’re individually portioned, they’re easy to serve and great for groups.
Suitable For:
Perfect for kids and teenagers as an after-school snack or lunchbox treat. Great for game day spreads and casual party appetizers. Also a hit with busy parents and college students – basically, anyone who loves pizza (so, everyone!).
Tips & Tricks:
- Use half a string cheese per roll (as many recipes do) – it fits nicely and provides that melty core (Pepperoni Crescent Rolls – Dang That’s Sweet).
- Place about 4–6 pepperoni slices per crescent, and you can add a teaspoon of pizza sauce inside if you want a saucier bite (just don’t overdo it or it may leak).
- Before baking, brush the tops with a little beaten egg or olive oil and sprinkle Italian seasoning and Parmesan for extra flavor and a pretty finish (Pepperoni Crescent Rolls – Dang That’s Sweet).
- Bake until golden brown – about 12 minutes at 375°F. You’ll know they’re done when the cheese just starts to ooze at the edges.
- Serve with warm marinara sauce or ranch on the side for dipping, to enhance the pizza experience.
Possible Improvements:
- Swap pepperoni for other fillings: try diced ham and pineapple for a “Hawaiian” crescent, or spinach and mini pepperoni for a supreme.
- Make it vegetarian by using just cheese and maybe some sliced olives or bell peppers.
- Spice it up with a pinch of red chili flakes inside each roll for those who like heat.
- Experiment with different cheeses – provolone or cheddar can work well too, or use a sprinkle of garlic powder and cheddar for a “garlic bread” vibe.
Read the full recipe here: Dang That’s Sweet – Pepperoni Crescent Rolls (Pepperoni Crescent Rolls – Dang That’s Sweet) (Pepperoni Crescent Rolls – Dang That’s Sweet)
6. Buffalo Chicken Crescent Pinwheels – Spicy 30-Minute Party Bites
Description: These pinwheel-style appetizers pack all the zesty goodness of Buffalo chicken into flaky crescent dough spirals.
Shredded chicken is mixed with Buffalo hot sauce, cream cheese, and mozzarella, plus a touch of ranch seasoning, then rolled up in crescent dough and sliced into rounds (Buffalo Chicken Crescent Rollups – It’s Always Autumn) (Buffalo Chicken Crescent Rollups – It’s Always Autumn).
Baked until golden, each bite is spicy, creamy, and tangy – reminiscent of Buffalo chicken dip wrapped in a buttery crust. They’re easy to grab and absolutely loaded with flavor.

Why It’s Great:
It transforms a popular party dip (Buffalo chicken) into a mess-free finger food – no chips needed! They’re easy to prepare and ready in just over half an hour (Buffalo Chicken Crescent Rollups – It’s Always Autumn).
The combination of hot sauce and ranch-seasoned cheese is a proven crowd favorite, offering that classic Buffalo wing taste without any frying.
Using crescent roll dough means minimal effort (just roll, slice, bake), but you still get an impressive-looking appetizer with a pretty spiral presentation.
These roll-ups are rich, ooey-gooey, and satisfying, especially when served warm. And because they’re baked, not fried, they’re a slightly lighter way to enjoy Buffalo chicken.
Suitable For:
Perfect for game day parties, Super Bowl spreads, and any gathering where bold, spicy flavors are welcome.
Great for Buffalo wing lovers looking for a creative twist, and party hosts who want make-ahead-friendly appetizers (you can assemble and slice them, then bake when needed).
Spicy food fans and anyone who loves a good kick of heat will gravitate to these.
Tips & Tricks:
- Use pre-cooked shredded chicken (rotisserie chicken works great) to save time. Ensure it’s finely shredded so the mixture spreads easily.
- Mixing the filling with a hand mixer can help distribute the cream cheese and sauce evenly (Buffalo Chicken Crescent Rollups – It’s Always Autumn).
- When rolling up the dough, start from the long side and roll tightly like a jelly roll to get a firm log (Buffalo Chicken Crescent Rollups – It’s Always Autumn). Chill the filled roll for 10–15 minutes in the fridge before slicing – this firms it up and yields cleaner cuts.
- Bake until the pinwheels are nicely browned and bubbly. Under-baking can leave the center doughy, so make sure they have color (Buffalo Chicken Crescent Rollups – It’s Always Autumn).
- Serve with a side of ranch or blue cheese dressing for dipping – it complements the Buffalo spice perfectly.
Possible Improvements:
- Stir in some crumbled blue cheese into the filling for an extra tang and authentic Buffalo wing experience.
- Use crescent dough sheets if available (no perforations) to make rolling easier and avoid having to press seams together (Buffalo Chicken Crescent Rollups – It’s Always Autumn).
- If you prefer milder heat, use less hot sauce and more ranch dressing or cream cheese to tone it down. Conversely, add a dash of cayenne for extra fire.
- Make it low-carb by using the filling in lettuce wraps or stuffed mushrooms instead (for those skipping dough).
Read the full recipe here: It’s Always Autumn – Buffalo Chicken Crescent Rollups (Buffalo Chicken Crescent Rollups – It’s Always Autumn) (Buffalo Chicken Crescent Rollups – It’s Always Autumn)
7. Fig Jam Baked Brie in Crescents – 3-Ingredient Showstopper
Description: A wheel of creamy brie cheese spread with sweet fig jam, wrapped lovingly in a sheet of crescent roll dough, and baked until golden brown and molten inside.
This elegant appetizer yields a stunning baked brie en croûte with minimal effort – only 3 ingredients and about 20 minutes needed (Easy Crescent-Wrapped Fig Jam Baked Brie (Only 3 Ingredients!)).
Once baked, you cut into the flaky dough to reveal oozy, melty brie combined with luscious fig preserves. It’s a beautiful mix of savory and sweet, and it looks and tastes like something you’d get at a fancy party (yet so easy to do at home!).

Why It’s Great:
With just three ingredients (crescent dough, brie, and fig jam) this recipe is the definition of simple yet impressive (Easy Crescent-Wrapped Fig Jam Baked Brie (Only 3 Ingredients!)).
It’s quick to assemble and bakes fast, so you can have a gourmet appetizer on the table in under 20 minutes.
The contrast of flavors and textures is delightful: flaky, buttery crust; rich, creamy cheese; and fruity, slightly tart jam. It has that “wow” factor – people will rave about it wherever you bring it (Easy Crescent-Wrapped Fig Jam Baked Brie (Only 3 Ingredients!)).
Another plus: the crescent dough acts as the vessel, so you don’t even need crackers (just slice and serve). It’s a proven crowd-pleaser that can hold its own on a cheese board or be the star of an appetizer spread (Easy Crescent-Wrapped Fig Jam Baked Brie (Only 3 Ingredients!)).
Suitable For:
Excellent for holiday parties, wine nights, and any occasion that calls for a fancy-feeling appetizer without the fuss. Great for cheese lovers and those who entertain often but need quick tricks.
Also perfect for potlucks (it transports well – just rewarm on site) and as a pre-dinner appetizer to wow your guests.
Tips & Tricks:
- Use a crescent dough sheet if available (no perforations) to wrap the brie seamlessly (Easy Crescent-Wrapped Fig Jam Baked Brie (Only 3 Ingredients!)). If using regular crescent triangles, press the seams together well so no cheese leaks.
- Chill the brie in the freezer for 15 minutes before wrapping; a slightly firmer cheese is easier to handle and less likely to burst out while wrapping/baking.
- Seal the dough completely around the brie, pinching edges together underneath the wheel. Bake seam-side down so it doesn’t unwrap.
- For presentation, garnish the finished baked brie with rosemary sprigs or extra fig halves to dress it up (totally optional, but looks nice) (Easy Crescent-Wrapped Fig Jam Baked Brie (Only 3 Ingredients!)).
- Let it cool for about 5 minutes before cutting, so the cheese isn’t lava-hot (it will still be gooey and melty).
Possible Improvements:
- Swap fig jam with your favorite preserve – raspberry, apricot, or cranberry sauce all work wonderfully for different flavor profiles.
- Sprinkle some chopped nuts (pecans or walnuts) on top of the jam before sealing the dough for added crunch and flavor.
- Drizzle a little honey over the brie right after baking to enhance the sweet-savory balance.
- For a savory twist, omit jam and include a layer of pesto or garlic-herb butter with the brie, creating a garlic baked brie version.
Read the full recipe here: Kirsten Turk – 3-Ingredient Fig Jam Baked Brie (Easy Crescent-Wrapped Fig Jam Baked Brie (Only 3 Ingredients!)) (Easy Crescent-Wrapped Fig Jam Baked Brie (Only 3 Ingredients!))
8. Ham & Cheese Crescent Rolls – with Honey-Mustard Glaze
Description: Fluffy crescent rolls stuffed with slices of smoked ham and melty cheese, brushed with a homemade honey-mustard butter glaze that caramelizes as it bakes (Ham and Cheese Crescent Rolls – The Country Cook).
These come out of the oven as golden, savory rolls with a touch of sweetness on top.
Think of them as a cross between a hot ham & cheese sandwich and a pastry – super simple but elevated by that sticky honey-mustard topping. They’re satisfying, comforting, and highly addictive.

Why It’s Great:
This recipe is a no-brainer weeknight dinner or snack because it uses only a few ingredients you probably have: a can of crescents, deli ham, cheese, and pantry staples for the glaze (Ham and Cheese Crescent Roll-Ups Recipe – Allrecipes).
It’s easy (wrap and bake) yet delivers so much flavor. The honey-Dijon butter glaze really “takes these over the top,” giving a pop of sweet tangy flavor that sets them apart from ordinary ham & cheese roll-ups (Ham and Cheese Crescent Rolls – The Country Cook).
They’re also very versatile: great for using up leftover ham, customizable with any cheese, and suitable as an appetizer, lunch, or dinner alongside soup or salad.
Kids love them, adults love them – you really can’t go wrong with warm ham and gooey cheese in a buttery roll (Ham and Cheese Crescent Rolls – The Country Cook).
Suitable For:
Perfect for busy parents needing a quick meal, meal preppers (they can be made ahead and reheated), and anyone who loves comfort food with a gourmet twist.
Also ideal for after-holiday ham leftovers or to serve as a hearty party appetizer on game days. Basically, if you enjoy a good ham & cheese sandwich, you’ll go crazy for these.
Tips & Tricks:
- Use thinly sliced ham so it folds easily inside the crescent. You can use one or two slices per roll depending on thickness.
- Choose a cheese that melts well – cheddar, Swiss, provolone, or even pepper jack for a kick. Place cheese on the dough first, then ham on top, to keep the cheese from leaking out.
- Brush the honey-mustard butter generously on each roll before baking and again immediately after baking for maximum flavor (Ham and Cheese Crescent Rolls – The Country Cook). Don’t skip it – it’s the signature touch!
- For the glaze, Dijon mustard is recommended for a balanced flavor (not too sharp) (Ham and Cheese Crescent Rolls – The Country Cook). If you only have yellow mustard, use a bit less as it’s tangier.
- These taste best fresh, but you can assemble them ahead (without baking), refrigerate, and bake when ready to serve. If reheating, do so in the oven so the pastry stays crisp.
Possible Improvements:
- Swap the ham for turkey or roast beef, and use a complementary cheese (turkey + cheddar, beef + provolone) for different variations (Ham and Cheese Crescent Rolls – The Country Cook).
- Add a thin slice of apple or pear with the ham and cheese before rolling – it adds a touch of crunch and sweetness that pairs nicely with the honey mustard.
- Sprinkle some poppy seeds or everything bagel seasoning on top of the glaze before baking for an extra flavor boost (and they’ll look like fancy bakery rolls).
- Serve with extra honey-mustard on the side for dipping if you want even more sweet-spicy punch.
Read the full recipe here: The Country Cook – Ham and Cheese Crescent Rolls (Ham and Cheese Crescent Rolls – The Country Cook) (Ham and Cheese Crescent Rolls – The Country Cook)
9. Taco Crescent Ring – 5-Ingredient Fiesta Ring
Description: A taco-inspired crescent ring that’s as fun to make as it is to eat. Crescent roll triangles are arranged in a ring (like a sunburst), filled with seasoned taco meat and shredded cheese, then folded up and baked into a gorgeous wreath shape (Taco Crescent Ring Recipe – Pillsbury.com).
After baking, you get a ring of flaky crescents, each bite oozing with spiced beef and melted cheese.
It’s essentially all the goodness of a taco (meat, cheese, toppings) delivered in a soft, flaky crust instead of a tortilla. Truly a show-stopping centerpiece for casual dinners or parties.

Why It’s Great:
This iconic Pillsbury recipe is wildly popular for a reason – it looks impressive, tastes delicious, yet requires only 5 ingredients and is surprisingly easy (Taco Crescent Ring Recipe – Pillsbury.com) (Taco Crescent Ring Recipe – Pillsbury.com).
You get the bold flavors of tacos (thanks to taco seasoning and salsa/cheese) wrapped in that buttery crescent dough, which brings the comfort factor up a notch (Taco Crescent Ring Recipe – Pillsbury.com).
It’s a hit with families: kids think it’s cool, and adults appreciate that it’s not the same old taco night (Taco Crescent Ring Recipe – Pillsbury.com).
The ring shape also makes it perfect for serving a crowd; everyone just pulls a piece and tops it as they like. Plus, it’s versatile – serve it as a party appetizer or a fun weeknight dinner.
And did we mention it’s 5-star rated and one of the most popular recipes on Pillsbury? It’s a tried-and-true winner (Taco Crescent Ring Recipe – Pillsbury.com).
Suitable For:
Great for family dinners (spice level is easily adjustable), potlucks, and game day gatherings (it doubles as finger food).
Perfect for taco lovers who want a new twist, and for busy cooks who need a crowd-friendly dish with minimal ingredients.
It’s also a hit for Teenagers’ dinners or sleepovers – it feels fun and different.
Tips & Tricks:
- Lay out the crescent triangles in a ring with the wide ends inward, overlapping slightly, on a parchment-lined baking sheet. It should look like a sun with rays; this creates a place to spoon the filling.
- Drain the cooked taco meat well (use a lean ground beef or turkey) so the crescents don’t get soggy (Taco Crescent Ring Recipe – Pillsbury.com). A tip is to mix the meat with cheese and let it cool slightly so it’s more solid when filling – easier to handle.
- When folding the dough over the filling, tuck the points under the ring to secure them. It doesn’t have to be perfect – as it bakes, it will fuse together.
- Bake until deep golden brown so the dough is fully cooked in the center of the ring. If the top is browning too fast, you can cover loosely with foil for the last few minutes.
- Serve with classic taco toppings on the side: shredded lettuce, diced tomatoes, olives, jalapeños, sour cream, salsa, guacamole – let people customize their slice like a taco bar (Taco Crescent Ring Recipe – Pillsbury.com).
Possible Improvements:
- Add a layer of refried beans or black beans under the meat for extra heft (and fiber).
- Use ground chicken or turkey with green enchilada sauce for a different flavor (kind of a verde chicken ring).
- Sprinkle chopped cilantro and a squeeze of lime on the hot baked ring for a fresh finish.
- Make mini individual taco crescents instead of a ring by wrapping seasoned meat and cheese in each triangle and baking – same idea in bite-size form.
Read the full recipe here: Pillsbury – Taco Crescent Ring (Taco Crescent Ring Recipe – Pillsbury.com) (Taco Crescent Ring Recipe – Pillsbury.com)
10. Creamy Chicken Crescent Bundles – 30-Minute Comfort Dinner
Description: Also known as “chicken pillows” or “chicken roll-ups,” these bundles are flaky crescent pockets filled with a creamy chicken filling.
Shredded chicken is mixed with cream cheese, a touch of ranch or Italian seasoning, and sometimes a spoon of soup, then wrapped in crescent dough and baked until golden (Pillsbury Crescent Roll Chicken Bundles Recipe (+VIDEO) | Lil’ Luna) (Pillsbury Crescent Roll Chicken Bundles Recipe (+VIDEO) | Lil’ Luna).
Often served with a creamy gravy or sauce drizzled on top, they are warm, comforting, and downright delicious – like individual chicken casseroles you can hold in your hand.

Why It’s Great:
This recipe has been passed around by home cooks for years (a true family favorite), and for good reason.
It’s quick to make – about 30 minutes from start to finish – and uses convenient ingredients (canned dough and even canned soup) to create something that tastes like a labor of love (Pillsbury Crescent Roll Chicken Bundles Recipe (+VIDEO) | Lil’ Luna).
The crescent rolls bake up buttery and soft, encasing the savory, creamy chicken inside so it stays moist. It’s the definition of comfort food – hearty, creamy, and filling.
Even picky eaters are won over by these “chicken crescents,” as each bundle is approachable and familiar (chicken + bread).
They’re also quite versatile: you can change up the filling with different herbs or veggies. This dish proves you can have an impressive, home-cooked chicken dinner on the table with minimal effort on a weeknight.
Suitable For:
Perfect for busy weeknight dinners for the family, meal trains or bringing dinner to someone in need (travels well), and potlucks (it’s unique and crowd-pleasing).
Great for kids (they love the creamy chicken and soft pastry) and anyone seeking cozy comfort food that’s easy to prepare. Also, leftover cooked chicken finds a happy home here, so it’s a win for meal preppers.
Tips & Tricks:
- Use softened cream cheese to mix with the shredded chicken – it blends easier. A packet of ranch or Italian dressing mix can be added for extra flavor in the filling (Pillsbury Crescent Roll Chicken Bundles Recipe (+VIDEO) | Lil’ Luna).
- If the recipe calls for a can of cream of chicken (or mushroom) soup in the mix or as a gravy, warming it with a bit of milk makes a nice pourable sauce. Reserve some to spoon on top of the baked bundles for extra moisture.
- When wrapping the crescents, try to seal all edges around the filling. It helps to stretch each crescent triangle slightly larger before adding filling, so you have more dough to fold over.
- Bake until just lightly golden (around 9-12 minutes at 375°F) (Pillsbury Crescent Roll Chicken Bundles Recipe (+VIDEO) | Lil’ Luna). Overbaking can dry them out. They should be golden on top and you may see a little filling bubbling.
- These reheat well: to keep pastry flaky, reheat in the oven or air fryer rather than the microwave when possible.
Possible Improvements:
- Add some veggies to the filling like thawed frozen peas and carrots to mimic a mini chicken pot pie.
- Substitute half the cream cheese with Greek yogurt or sour cream for a slightly lighter tang.
- Use a flavored cream cheese (chive and onion, jalapeño) to automatically boost the seasoning.
- For a crispy topping, you can brush the tops with melted butter and sprinkle breadcrumbs or crushed croutons before baking (some versions do this for texture).
Read the full recipe here: Lil’ Luna – Crescent Roll Chicken Bundles (Pillsbury Crescent Roll Chicken Bundles Recipe (+VIDEO) | Lil’ Luna) (Pillsbury Crescent Roll Chicken Bundles Recipe (+VIDEO) | Lil’ Luna)
11. Sloppy Joe Crescent Casserole – Mess-Free Family Favorite
Description: This clever casserole turns sloppy joes into a fork-and-knife meal. A layer of crescent roll dough forms the crust (top and bottom) which encases a saucy sloppy Joe filling and cheddar cheese.
Baked together, it becomes a savory meat pie that delivers all the tangy, sweet beefy flavor of classic sloppy joes but without the mess – the crescent crust holds everything in (Easy Sloppy Joe Casserole Recipe With Crescent Rolls – Back To My Southern Roots).
The top is sprinkled with sesame seeds to echo a burger bun, and the slices can be served just like a casserole piece, no sloppy spills. It’s an innovative comfort dish that brings the family together around the dinner table.

Why It’s Great:
No more soggy buns or dripping filling! This casserole solves the main issue with sloppy joes by making it handheld (or at least contained) (Easy Sloppy Joe Casserole Recipe With Crescent Rolls – Back To My Southern Roots) (Easy Sloppy Joe Casserole Recipe With Crescent Rolls – Back To My Southern Roots).
Kids and adults alike love it – in fact, even known picky eaters often gobble this up and ask for seconds (or thirds!) (Easy Sloppy Joe Casserole Recipe With Crescent Rolls – Back To My Southern Roots).
It’s very easy to throw together, using crescent dough as a quick crust and either canned sloppy joe sauce or your homemade mix with ketchup, etc. The result is comfort food at its best: savory, cheesy, a little sweet, and very hearty.
Another benefit: it’s a great way to use common ingredients (ground beef, crescent rolls) in a new form, so if you’re stuck in a dinner rut this can pull you out.
This dish is also potluck-friendly and can sit out on a buffet without falling apart. In short, it’s family-friendly (less mess), super tasty, and weeknight-easy.
Suitable For:
Excellent for family dinners, especially with young kids – you get the fun sloppy Joe taste in a neater package. Great for busy weeknights and make-ahead meal prep (assemble earlier, bake when ready).
Also a hit at community potlucks or church suppers, where classic comfort casseroles shine. If you love burger or BBQ flavors, you’ll enjoy this twist.
Tips & Tricks:
- Use one tube of crescent dough for the bottom crust and one for the top. If you find crescent dough sheets, those work even better (no seams to pinch). If using perforated dough, press the seams together in the baking dish to form a solid layer (Easy Sloppy Joe Casserole Recipe With Crescent Rolls – Back To My Southern Roots).
- Cook the sloppy Joe filling with your preferred sauce (canned Manwich is convenient (Easy Sloppy Joe Casserole Recipe With Crescent Rolls – Back To My Southern Roots)). Make sure to simmer it down a bit so it’s thick and not too liquidy, which could make the crust soggy.
- Adding a cup of shredded cheddar or mozzarella on top of the meat (before the top crust) gives a delicious cheesy layer in the casserole.
- Vent the top crust with a few small knife slits to allow steam to escape and keep the dough from getting too soggy underneath.
- Bake until the crescent crust is golden brown. If the top is done but you worry about the bottom crust, you can cover the top with foil and bake a few extra minutes to ensure the bottom sets.
Possible Improvements:
- Swap ground beef for ground turkey or chicken for a lighter version (it works just as well with a good sauce) (Easy Sloppy Joe Casserole Recipe With Crescent Rolls – Back To My Southern Roots).
- Mix in some veggies with the meat – e.g., diced bell peppers or mushrooms – to boost the nutrition and flavor.
- For a BBQ twist, use a barbecue sloppy joe sauce and add a sprinkle of smoked paprika to the meat.
- If you like heat, add some chili flakes or a little hot sauce to the sloppy joe filling, and maybe pepper jack cheese.
Read the full recipe here: Back To My Southern Roots – Sloppy Joe Crescent Roll Casserole (Easy Sloppy Joe Casserole Recipe With Crescent Rolls – Back To My Southern Roots) (Easy Sloppy Joe Casserole Recipe With Crescent Rolls – Back To My Southern Roots)
12. Italian Crescent Casserole – Cheesy Deep-Dish Pizza Flavor
Description: A hearty casserole that tastes like a mash-up of lasagna and pizza in crescent roll form. The base is a flaky crescent crust pressed into a pie dish, then layered with a rich meaty tomato sauce and plenty of mozzarella.
A dollop of seasoned sour cream or ricotta often goes in for creaminess, and then more crescent dough is folded over the top, creating a stuffed pie.
Baked until bubbly and golden, you get slices of Italian-seasoned ground beef, melted cheese, and buttery crust – reminiscent of a deep-dish pizza or a simple meat lasagna, all in one pan (Easy and Delicious: The Italian Crescent Casserole Recipe).

Why It’s Great:
It combines classic Italian flavors (savory beef, garlic-tomato sauce, gooey cheese) with the comfort of a casserole and the convenience of crescent dough (Easy and Delicious: The Italian Crescent Casserole Recipe).
It’s easy to assemble and cuts down on the steps of making a from-scratch pie crust or pasta dish. The result is cheesy, saucy, and satisfying, with that flaky crescent topping that makes it feel a bit like a pot pie.
This dish is family-friendly and crowd-pleasing – it’s by far one of the most requested potluck casseroles because it’s universally loved (Appetizer Crescent Roll Veggie Pizza – Amanda’s Cookin’).
Even those who aren’t big on veggies will enjoy it, but you can sneak some in if you like. It’s also adaptable; you can change meats, sauces, or cheeses to your liking (making it time and again without boredom).
If you want the vibe of pizza or lasagna night with half the work, this recipe’s for you.
Suitable For:
Great for family dinner rotations, especially when you need a break from routine spaghetti. Perfect for potlucks and parties – think game day or a neighbor’s get-together – since it travels well and fills people up.
Also, ideal for new cooks or college students who want to impress with an Italian dish without having to boil pasta. If you love comfort casseroles or anything with pizza vibes, you’ll love this.
Tips & Tricks:
- Brown the ground beef with Italian seasoning or a bit of onion for extra flavor, and drain off any grease before adding sauce (prevents a greasy casserole).
- You can use a store-bought pasta sauce to save time. Choose one you love, since it will define the flavor. A meat sauce or marinara with garlic and herbs works well. Simmer the sauce with the beef until slightly thick.
- Spreading a thin layer of sour cream or ricotta on top of the meat (under the top crust) adds a creamy element that’s divine – it’s an old trick in some versions of this recipe (Easy and Delicious: The Italian Crescent Casserole Recipe). Mix a little garlic powder into it for even more flavor.
- Lay the crescent triangles in a “spoke” pattern in your pie dish for the bottom crust (points hanging over the rim) (Easy and Delicious: The Italian Crescent Casserole Recipe). Press together to form a solid base. Reserve a few triangles (or use a second can) to place over top of the filling, or simply fold over the overhanging dough to mostly cover the top.
- Let the casserole rest 5-10 minutes after baking before slicing. This helps it set up so each serving holds together.
Possible Improvements:
- Use ground Italian sausage (or half sausage, half beef) for an even more flavorful filling (Easy and Delicious: The Italian Crescent Casserole Recipe).
- Add veggies like chopped zucchini or spinach into the sauce to make it a true one-dish meal (the kids might not even notice!).
- Swap the mozzarella for a mix of provolone and Parmesan for a sharper cheese profile. You could also dot some pepperoni on top of the meat layer for a more “pizza” feel.
- If you prefer a biscuit-like topping, you could substitute Pillsbury Grands biscuits for the top layer (but crescents give a lighter, flakier texture).
Read the full recipe here: Real Mom Kitchen – Italian Crescent Casserole (Easy and Delicious: The Italian Crescent Casserole Recipe) (Easy and Delicious: The Italian Crescent Casserole Recipe)
13. Vegan Apple Cinnamon Crescents – 5-Ingredient, 30-Minute Fall Treat
Description: A sweet treat that’s completely plant-based! These apple crescent rolls feature tender slices of cinnamon-spiced apples wrapped in crescent dough and baked to golden perfection (Apple Crescent Rolls – Plant-Based on a Budget).
Thanks to the magic of accidentally-vegan crescent roll dough, you get a buttery-tasting, flaky pastry without any dairy. As the rolls bake, the apples become soft and pie-like. It’s like mini apple pies or apple turnovers made super easy.
With just 5 ingredients (crescent dough, apples, vegan butter, sugar, cinnamon), you can enjoy a heavenly apple pastry that’s perfect for breakfast, brunch, or dessert.

Why It’s Great:
It’s simple to make (ready in under 30 minutes) and uses everyday ingredients (Apple Crescent Rolls – Plant-Based on a Budget), yet the outcome is cozy and impressive.
This recipe highlights how versatile crescent dough is – even those on a vegan diet can enjoy a flaky pastry because most refrigerated crescent doughs contain no animal products.
The flavor is classic cinnamon-apple, which is a hit anytime, especially in the fall (Apple Crescent Rolls – Plant-Based on a Budget). It’s a family-friendly recipe: fun to bake with kids (they can help roll up the crescents) (Apple Crescent Rolls – Plant-Based on a Budget).
And even non-vegans won’t miss anything – these rolls are that good. They make your kitchen smell like an apple pie is baking, but they’re much quicker and easier than pie. Plus, each crescent is a convenient individual portion, great for serving a crowd.
Suitable For:
Perfect for vegans and vegetarians looking for a delightful sweet pastry. Great for breakfast or brunch gatherings (everyone loves apple goodies), afternoon snacks with coffee/tea, or a light dessert after dinner.
Also a smart choice for anyone who wants a dairy-free or egg-free recipe – perhaps to accommodate an allergy – without compromising on taste. Essentially, if you love apple pie flavors and want them fast, this is for you.
Tips & Tricks:
- Use a firm, tart apple like Granny Smith for the best flavor; it holds up well during baking and balances the sweetness.
- Toss the apple slices in a mixture of brown sugar and cinnamon (and a pinch of salt to enhance flavor) before rolling them up (Apple Crescent Rolls – Plant-Based on a Budget). This creates a lovely spiced caramel inside the crescents.
- Don’t overfill: 1-2 apple slices per crescent triangle is sufficient. Too many apples can burst through the dough.
- You can melt a little vegan butter and brush it on top of the rolls before baking for extra richness and to help them brown.
- For extra sweetness, drizzle a simple glaze (powdered sugar + almond milk + vanilla) over the top after baking, or dust with powdered sugar.
Possible Improvements:
- Add chopped walnuts or pecans inside each crescent for a nutty crunch that pairs with the apples.
- Include a few raisins or dried cranberries with the apple filling for an apple strudel-like twist.
- Spice it up further with a dash of nutmeg or allspice in the apple mixture for deeper autumn flavor.
- Serve warm with a scoop of dairy-free vanilla ice cream or coconut whipped cream to turn it into a plated dessert.
Read the full recipe here: Plant-Based on a Budget – Apple Crescent Rolls (Vegan) (Apple Crescent Rolls – Plant-Based on a Budget) (Apple Crescent Rolls – Plant-Based on a Budget)
14. Mountain Dew Apple Dumplings – Magical 5-Ingredient Dessert
Description: An old-fashioned apple dumpling recipe with a modern twist (and a secret ingredient!). Crisp apple slices are wrapped in crescent roll dough, placed in a baking dish, then doused with a heavenly mixture of melted butter, sugar, and cinnamon.
The surprise? A can of Mountain Dew soda is poured around the dumplings before baking (Best Apple Dumplings Recipe – How to Make Apple Dumplings) (Best Apple Dumplings Recipe – How to Make Apple Dumplings).
In the oven, the soda combines with the butter and sugar to create a thick, caramelized sauce that is absolutely to-die-for.
The dumplings come out tender and sweet, with a golden, slightly crisp top and a soft, cinnamon-y center. Serve with ice cream and you have a rustic dessert that people will rave about.

Why It’s Great:
It’s basically “magic” in a pan – ordinary ingredients turn into one of the best desserts ever (Best Apple Dumplings Recipe – How to Make Apple Dumplings). This recipe has a cult following because it is astonishingly easy (only 5 ingredients) yet yields a complex-tasting dessert.
The Mountain Dew is the secret to a self-basting sauce that keeps the dumplings moist and flavorful (don’t worry, you don’t distinctly taste the soda – it just creates an amazing buttery-citrus caramel) (Best Apple Dumplings Recipe – How to Make Apple Dumplings).
The result is a rich, buttery, cinnamon-apple treat that’s like individual apple pies with a gooey cobbler-like bottom. It’s perfect for fall or anytime you crave a cozy dessert.
Another bonus: your house will smell incredible (like apples and cinnamon) while this bakes.
And if the simplicity and flavor aren’t enough, this recipe is tried, tested, and loved by many – an internet-famous dessert that lives up to the hype (Best Apple Dumplings Recipe – How to Make Apple Dumplings).
Suitable For:
Ideal for fall gatherings, holiday dinners (great alternative or addition to pie), and potlucks (it can be made in big batches easily).
Fantastic for beginner bakers or anyone who claims they “can’t bake” – this will change your mind.
Also a hit with kids, who will be intrigued that there’s soda in their dessert, and with grandparents, who appreciate the nostalgic, homemade taste. Basically, anyone who loves warm apple desserts will be smitten.
Tips & Tricks:
- Use Granny Smith apples or another tart variety so the end result isn’t overly sweet. Peel and core the apples, then cut into eighths (each dumpling uses a nice thick slice).
- Wrap each apple slice in a crescent triangle, rolling from the wide end to the point. It’s okay if it doesn’t cover the apple completely – gaps are fine. Place them in the baking dish with a little space between.
- When making the butter-brown sugar-cinnamon mixture, ensure the butter is fully melted and sugar slightly dissolved. Pour this sugary butter over the dumplings first, then pour the Mountain Dew around the edges of the pan (not directly over the tops, which helps them brown) (Best Apple Dumplings Recipe – How to Make Apple Dumplings).
- Bake uncovered until the dumplings are puffed and the sauce is bubbling thickly – the tops will turn wonderfully golden and slightly crisp, while the bottoms soak up that sauce.
- Serve warm and spoon the sauce from the pan over each dumpling (and over any ice cream you serve it with) – this sauce is pure gold, don’t waste a drop (Best Apple Dumplings Recipe – How to Make Apple Dumplings)!
Possible Improvements:
- Sprinkle chopped pecans or walnuts over the dumplings before baking for a nutty crunch.
- Add a splash of vanilla extract or a pinch of cloves to the butter sauce for extra depth.
- If you don’t want to use Mountain Dew, a similar lemon-lime soda or even apple cider can work, though the classic recipe’s charm is in the Dew.
- For presentation, drizzle a little honey or maple syrup over the dumplings when serving to echo that syrupy sauce, and maybe a tiny pinch of sea salt to accentuate the caramel flavors.
Read the full recipe here: Pioneer Woman – “Best Apple Dumplings” (Mountain Dew Apple Dumplings) (Best Apple Dumplings Recipe – How to Make Apple Dumplings) (Best Apple Dumplings Recipe – How to Make Apple Dumplings)
15. Sopapilla Cheesecake Bars – 6-Ingredient Cinnamon-Sugar Delight
Description: A Tex-Mex inspired dessert that’s unbelievably easy: it has layers of crescent roll dough with a sweet cream cheese filling in between, all topped with melted butter, cinnamon, and sugar, then baked.
These sopapilla cheesecake bars come out like a heavenly cross between a cheesecake and a churro.
The bottom crescent crust is tender, the cream cheese center is sweet and creamy, and the top crust gets slightly crisp from the cinnamon-sugar butter that caramelizes as it bakes (Sopapilla Cheesecake (+VIDEO) – The Girl Who Ate Everything) (Sopapilla Cheesecake (+VIDEO) – The Girl Who Ate Everything).
Once out of the oven, you can drizzle a bit of honey on top (just like authentic sopapillas) for an extra decadent touch. They are cut into squares for serving – finger-friendly, yet rich and satisfying.

Why It’s Great:
This dessert is deceptively simple – it uses mostly pantry/fridge staples (canned dough, cream cheese, sugar, butter, cinnamon, vanilla) and takes just a few minutes to assemble, but the end result tastes like it came from a bakery.
In fact, it’s one of those beloved “easy desserts” that people often can’t stop at one piece of. The contrast of textures (flaky dough, creamy center, crunchy cinnamon sugar top) makes it special (Sopapilla Cheesecake (+VIDEO) – The Girl Who Ate Everything).
It’s also very versatile: fantastic warm out of the oven or chilled from the fridge (the texture firms up like a cheesecake when cold). It’s a crowd favorite at potlucks and parties – expect recipe requests whenever you serve it.
And if you’re intimidated by baking cheesecakes, this is a no-fuss way to get those flavors.
Essentially, it delivers maximum yumminess with minimal effort – a sweet, cinnamon-y treat that proves not all delicious desserts have to be complicated (Sopapilla Cheesecake (+VIDEO) – The Girl Who Ate Everything).
Suitable For:
Great for potluck desserts, Cinco de Mayo celebrations, or any time you need a quick sweet for a crowd. Perfect for beginner bakers (hard to mess up) and busy hosts – you can make it ahead, and it travels well.
Anyone who loves churros, cinnamon rolls, or cheesecake will adore this. It’s also a hit with kids – it’s finger-friendly and sweet, without being messy.
Tips & Tricks:
- Make sure your cream cheese is softened to room temp so it mixes smoothly with the sugar and vanilla (no lumps in the filling).
- Unroll one crescent sheet (or crescents with seams pinched) into the bottom of a greased 9×13-inch pan for the base. Spread the cream cheese mixture evenly on top, then cover with the second sheet of dough.
- Pour or brush the melted butter over the top dough, then generously sprinkle cinnamon-sugar to cover the entire surface (Sopapilla Cheesecake (+VIDEO) – The Girl Who Ate Everything). This topping is what gives the bars that signature sopapilla-like crust, so don’t skimp.
- Bake until the top is deep golden and puffed – usually about 30 minutes at 350°F (Sopapilla Cheesecake (+VIDEO) – The Girl Who Ate Everything). The center might still jiggle a tiny bit because of the cream cheese; it will set as it cools.
- Let it cool at least 20 minutes before cutting (if serving warm, it’ll be softer and gooey). For neat squares, refrigerate for a couple hours after cooling – then cut and either serve chilled or let them come to room temp.
Possible Improvements:
- Drizzle warm honey over the top right after baking (or just before serving) to mimic traditional sopapillas even more – the honey-soaked cinnamon sugar is divine.
- If you love spice, add a pinch of nutmeg to the cinnamon-sugar mix, or use a splash of almond extract in the cream cheese for a different flavor note.
- Top each square with a dollop of whipped cream or a scoop of vanilla ice cream if serving as a plated dessert.
- For a festive look, you can mix a bit of cocoa powder with the cinnamon for a chocolatey hint on top, or even fold a couple tablespoons of dulce de leche into the cream cheese filling for a caramel twist.
Read the full recipe here: The Girl Who Ate Everything – Sopapilla Cheesecake (Sopapilla Cheesecake (+VIDEO) – The Girl Who Ate Everything) (Sopapilla Cheesecake (+VIDEO) – The Girl Who Ate Everything)
16. Nutella & Marshmallow Crescents – 3-Ingredient Ooey-Gooey Treat
Description: A super simple sweet breakfast or dessert: each crescent roll is spread with a spoonful of Nutella (chocolate-hazelnut spread) and a couple of mini marshmallows, then rolled up and baked.
The result? Buttery, flaky rolls with molten chocolate and gooey marshmallow inside – think of a s’more meets a chocolate croissant! They come out lightly golden and can be topped with a dusting of powdered sugar for extra appeal.
With just three ingredients needed, this is a treat you can make even before you’ve had your morning coffee (Nutella Crescent Rolls are the Perfect Easy Breakfast) (Nutella Crescent Rolls are the Perfect Easy Breakfast).

Why It’s Great:
It’s hard to believe something so delicious is this easy. These crescents are ready in under 20 minutes and require minimal effort, making them an ideal last-minute sweet fix (Nutella Crescent Rolls are the Perfect Easy Breakfast).
The flavor combo of Nutella and marshmallow is nostalgic and indulgent – it often brings back “campfire dessert” memories but in a warm, flaky pastry form.
They’re perfect for breakfast or brunch because they’re not overly sweet; they strike a nice balance with the richness of Nutella.
Plus, the recipe is almost too easy to be true: just 3 ingredients, no mixing or heavy prep required (Nutella Crescent Rolls are the Perfect Easy Breakfast).
This means even kids or non-cooks can whip these up (the author jokes it’s easy even if you’re half-asleep in the morning (Nutella Crescent Rolls are the Perfect Easy Breakfast)).
Whether you serve them as a weekend treat or a quick dessert, they are guaranteed to disappear fast.
Suitable For:
Great for busy mornings when you want a special breakfast (think weekend treats, or surprise for the kids before school). Also fantastic for dessert lovers who want something quick and portion-controlled.
These are vegetarian-friendly (no gelatin if using standard marshmallows) and will delight Nutella fans and chocolate enthusiasts of all ages.
Essentially, if you appreciate a good pastry hack or need a fast party sweet that looks cute, this is for you.
Tips & Tricks:
- Use mini marshmallows (about 2 per crescent) as they roll up more easily and melt evenly. If you only have big marshmallows, cut them into smaller pieces.
- Place the Nutella and marshmallows on the wider end of the crescent triangle and roll toward the point. Pinch the ends slightly to help seal in the gooey filling (some may still ooze out, and that’s okay – those caramelized bits are yummy). (Nutella Crescent Rolls are the Perfect Easy Breakfast)
- For easier spreading, you can warm the Nutella jar in a bowl of hot water for a few minutes so it’s more pourable.
- Bake at 350°F for about 10–12 minutes until lightly golden (Nutella Crescent Rolls are the Perfect Easy Breakfast). Don’t overbake; you want the marshmallow to melt but not completely evaporate.
- These are best enjoyed warm while the center is soft. If they cool, you can reheat them for a few seconds in the microwave or a couple minutes in a low oven to regain that ooey-gooey texture.
Possible Improvements:
- Add some sliced banana inside along with the Nutella for a banana-Nutella twist (you may need to secure the ends well, as banana releases a bit of moisture).
- Swap marshmallows with a spoon of marshmallow creme/fluff if you have that on hand – it stays gooey and contained.
- Sprinkle chopped hazelnuts or almonds inside or on top of the rolls before baking to add crunch and enhance the nutty flavor.
- For presentation, drizzle melted chocolate or a simple icing over the top after baking, or dust with powdered sugar to make them look like they came from a bakery.
Read the full recipe here: Hungry Blonde – Nutella & Marshmallow Crescent Rolls (Nutella Crescent Rolls are the Perfect Easy Breakfast) (Nutella Crescent Rolls are the Perfect Easy Breakfast)
17. Easy Cream Cheese Crescent Danish – Flaky Bakery-Style Pastry
Description: A clever shortcut to a cheese danish! This recipe uses crescent roll dough as the puff pastry and a sweetened cream cheese mixture as the filling.
You press two triangles together to form rectangles, fill with a simple cream cheese, sugar, and vanilla blend, then fold or braid the dough over the filling. Bake until puffy and drizzle with icing.
The result is warm, sweet, and flaky soft danishes that taste like they came from the corner bakery (Easy Cheese Danish – Lauren’s Latest) (Easy Cheese Danish – Lauren’s Latest).
They’re buttery and rich thanks to the crescent dough, with that classic vanilla cream cheese center and a light powdered sugar glaze on top.

Why It’s Great:
It blows your socks off how easy and delicious this is (Easy Cheese Danish – Lauren’s Latest)!
Traditional danish pastry can be time-consuming, but this hack yields a very similar taste and texture with a fraction of the work.
Crescent dough provides that tender, layered texture we love in danishes (since it’s essentially a simplified puff pastry itself) (Easy Cheese Danish – Lauren’s Latest).
The recipe is highly customizable too – you can add fruit preserves on the cheese or change up the flavor – making it a versatile base for many breakfast pastries (Easy Cheese Danish – Lauren’s Latest).
It’s great that you can make it the night before (the author notes you can prep it ahead for a special breakfast) (Easy Cheese Danish – Lauren’s Latest).
In short, you get a bakery-quality treat with minimal effort, which is a huge win for busy mornings or when guests drop by.
It’s also “kid-approved” – who doesn’t like a glazed danish? – and “company-worthy” – people will be impressed you made these at home.
Suitable For:
Perfect for brunch gatherings, morning meetings, or a weekend breakfast when you want something a step above ordinary muffins. Great for holiday mornings (make a batch for Christmas or Easter brunch).
Also ideal for those who love pastries and coffee – this is your at-home coffee shop treat. If you have a sweet tooth and love cinnamon rolls or strudels, this quick danish will hit the spot.
Tips & Tricks:
- Keep the crescent dough chilled until you’re ready to use it – it’s easier to handle and less sticky. When unrolled, press the seams of two triangles together to make a rectangle (use a little water to pinch if needed).
- You can make individual danishes by cutting dough into smaller squares, adding filling, and folding the corners in, or make one big braided danish and slice it. Both work!
- Cream cheese filling: ensure the cream cheese is softened and beat it with sugar and a bit of vanilla (and even a squeeze of lemon for brightness). It should be smooth. Don’t overfill the pastries; a couple tablespoons of filling per danish is plenty.
- If adding fruit preserves or pie filling on top of the cream cheese, use just a teaspoon or two so it doesn’t overflow.
- Bake until golden brown (usually 15-18 minutes at 375°F). Let them cool slightly before drizzling icing so it doesn’t completely melt off. The icing is just powdered sugar with a little milk (and vanilla or almond extract), mixed to a drizzle consistency.
Possible Improvements:
- Try other flavors: add a spoonful of cherry, blueberry, or apricot jam on the cream cheese before baking to make fruit danishes.
- Sprinkle sliced almonds on top of the danishes before baking (especially if you do an almond extract glaze) for a nice crunch and look.
- Mix a bit of cinnamon into the cream cheese filling for a hint of spice, or swirl Nutella into it for a chocolatey cheese danish.
- For a savory twist, omit the sugar in the cream cheese and add chives and smoked salmon after baking for a fun brunch appetizer (a totally different take, but shows how flexible crescents are!).
Read the full recipe here: Lauren’s Latest – Easy Cheese Danish with Crescent Rolls (Easy Cheese Danish – Lauren’s Latest) (Easy Cheese Danish – Lauren’s Latest)
18. Cinnamon Sugar Crescent Rolls – 20-Minute Flaky Mini-Cinnis
Description: Think of these as shortcut cinnamon rolls: crescent roll triangles are spread with a mix of butter, brown sugar, and cinnamon, then rolled up and baked until golden (EASY Cinnamon Sugar Crescent Rolls (20 minutes!) – I Heart Naptime).
After baking, they’re drizzled with a simple sweet glaze. The result is flaky, buttery crescents with a ribbon of cinnamon-sugar swirled inside and a light icing on top – all the joy of a cinnamon roll with far less work and in a cute, small size.
They’re a delightful breakfast treat or dessert, delivering warm cinnamon goodness in every bite.

Why It’s Great:
These dessert crescents are touted as the perfect quick treat when you’re craving something sweet but don’t want to spend hours baking (EASY Cinnamon Sugar Crescent Rolls (20 minutes!) – I Heart Naptime).
They truly come together in about 20 minutes from start to finish (EASY Cinnamon Sugar Crescent Rolls (20 minutes!) – I Heart Naptime).
Despite the ease, they taste incredible – sweet, flaky, and comforting, just like a cinnamon bun or churro, especially when eaten warm.
They’re also kid-friendly both to make and eat: children can help spread the filling and roll the dough, and they absolutely love eating them (the original author noted her kids begged for seconds) (EASY Cinnamon Sugar Crescent Rolls (20 minutes!) – I Heart Naptime).
Another plus is the ingredient list is very short (mostly pantry items), and you can make small or large batches as needed.
This recipe proves that you don’t need to be a pro baker to whip up a pastry-like treat; it’s approachable and consistently delicious. It’s also versatile – great plain, or you can dress it up with nuts or chocolate chips if desired.
Suitable For:
Perfect for a quick dessert fix on a weeknight or a spontaneous weekend breakfast addition. Great for sleepover mornings or brunches where you want a little something sweet on the table without a lot of work.
These are also a nice make-and-take treat for office potlucks or classrooms, since they transport easily. Anyone who loves cinnamon toast, snickerdoodles, or cinnamon rolls will devour these happily.
Tips & Tricks:
- Mix the filling thoroughly: soft butter, brown sugar, and cinnamon should form a spreadable paste (EASY Cinnamon Sugar Crescent Rolls (20 minutes!) – I Heart Naptime) (EASY Cinnamon Sugar Crescent Rolls (20 minutes!) – I Heart Naptime). If it’s too thick, a tiny drizzle of vanilla or honey can loosen it.
- Spread the cinnamon-butter evenly on each crescent triangle, going almost to the edges. Roll up the dough starting at the wide end. For extra neatness, you can tuck the ends in slightly to keep the filling from leaking.
- Bake on a parchment-lined sheet at 375°F for ~10 minutes or until lightly golden (EASY Cinnamon Sugar Crescent Rolls (20 minutes!) – I Heart Naptime). They bake fast! Keep an eye as ovens vary – you want that light golden color.
- Whisk together a quick glaze of powdered sugar, a splash of milk, and a drop of vanilla. Drizzle it over the crescents once they’ve cooled for a few minutes (if too hot, the glaze will soak in and run off) (EASY Cinnamon Sugar Crescent Rolls (20 minutes!) – I Heart Naptime).
- If you prefer, you can skip the glaze and just sprinkle a bit of extra cinnamon sugar on top of the rolls before baking for a sparkly finish.
Possible Improvements:
- Add mini chocolate chips or finely chopped pecans on top of the cinnamon filling before rolling for an extra indulgent touch (EASY Cinnamon Sugar Crescent Rolls (20 minutes!) – I Heart Naptime).
- If you have it, spread a thin layer of Nutella or peanut butter under the cinnamon sugar for a fun twist (chocolate-cinnamon or peanut-cinnamon rolls – yum!).
- For a caramel flavor, use brown sugar for the filling (as it calls for) and you could even drizzle a little caramel sauce over the top instead of classic glaze.
- Turn them into “apple pie” crescents by adding very thin slices of apple (or a spoon of apple butter) with the cinnamon filling – just don’t overstuff, or they won’t roll tightly.
Read the full recipe here: I Heart Naptime – Cinnamon Sugar Crescent Rolls (EASY Cinnamon Sugar Crescent Rolls (20 minutes!) – I Heart Naptime) (EASY Cinnamon Sugar Crescent Rolls (20 minutes!) – I Heart Naptime)
19. Cinnamon Crescent Monkey Bread – Ooey-Gooey Pull-Apart Breakfast
Description: A shareable monkey bread (pull-apart bread) made super simply with crescent roll dough.
Instead of using biscuit dough, this recipe cuts crescent dough into pieces, tosses them in cinnamon sugar, and bakes them in a bundt pan with a brown sugar-butter glaze that caramelizes everything together (Cinnamon Monkey Bread with Crescent Rolls (Pull-Apart Bread) – Wellness by Kay).
The finished monkey bread is sticky, oozing with cinnamon-caramel, and incredibly soft – each bite can be pulled off easily. It’s like having a giant mound of mini cinnamon rolls that everyone can tear and enjoy.
This particular version is often cited as dangerously delicious and bound to become a family favorite (Cinnamon Monkey Bread with Crescent Rolls (Pull-Apart Bread) – Wellness by Kay) (Cinnamon Monkey Bread with Crescent Rolls (Pull-Apart Bread) – Wellness by Kay)!

Why It’s Great:
It’s hard to beat 5 ingredients that create something so impressive and delicious (Cinnamon Monkey Bread with Crescent Rolls (Pull-Apart Bread) – Wellness by Kay).
Using crescent rolls makes the bread extra flaky and tender, and saves time because you don’t have to make dough from scratch.
The butter-brown sugar glaze ensures every piece is coated in buttery cinnamon syrup, giving that signature sticky monkey bread experience (Cinnamon Monkey Bread with Crescent Rolls (Pull-Apart Bread) – Wellness by Kay).
It’s an ooey-gooey delight – truly comfort food for breakfast or brunch. Monkey bread is always a hit for gatherings because it’s interactive and fun; people love pulling off the pieces.
And with this easy method, it’s not just for special occasions – you could whip it up any weekend.
Plus, the smell that fills your kitchen – rich cinnamon and caramel – is practically the best air freshener ever. This dish embodies indulgence and is perfect when you want to treat yourself and others to something special.
Suitable For:
Ideal for holiday breakfasts (Christmas morning, anyone?), brunch parties, or a weekend when you want to surprise the family with a sweet start. It doubles as a dessert, so it’s great for potlucks or church gatherings too.
If you have a sweet tooth or love cinnamon buns and sticky buns, this will be your jam. It’s also fantastic for kids’ sleepovers or birthday mornings – it feels like a celebration food.
Tips & Tricks:
- Use a 10-inch bundt pan (or any tube pan). Grease it very well with butter or cooking spray – this is important so the sticky goodness releases from the pan.
- Unroll the crescent dough and cut it into small pieces (one tube yields about 16 pieces if you cut each triangle into 2–3). They don’t need to be uniform. Roll those pieces into balls or just toss as-is in a bag of cinnamon sugar to coat generously.
- Layer the coated dough bits in the pan. If adding extras like nuts (optional), sprinkle them among the dough pieces.
- Make the glaze by melting butter with brown sugar (and a splash of vanilla or pinch of cinnamon). Pour this evenly over the dough in the pan (Cinnamon Monkey Bread with Crescent Rolls (Pull-Apart Bread) – Wellness by Kay). It will seep down and around, coating everything during baking.
- Bake at 350°F for about 25-30 minutes until puffed and deeply golden. When done, carefully invert it onto a plate while warm (within 5-10 minutes out of the oven) so the gooey sauce runs over the bread.
Possible Improvements:
- Add chopped pecans or walnuts into the mix for a nutty crunch and praline-like vibe (great if you enjoy sticky buns with nuts).
- Drizzle a simple vanilla glaze over the top after it’s inverted for extra sweetness and a pretty presentation.
- For an autumn twist, mix a little pumpkin pie spice into the cinnamon sugar, or even toss in a few small apple chunks among the dough pieces to get pockets of baked apple (like mini apple fritters in there).
- If you want to make it slightly lighter, you can reduce the butter-sugar mixture a bit, but… let’s be honest, monkey bread is meant to be indulgent! Best to enjoy in all its glory.
Read the full recipe here: Wellness by Kay – Crescent Roll Monkey Bread (Cinnamon Monkey Bread with Crescent Rolls (Pull-Apart Bread) – Wellness by Kay) (Cinnamon Monkey Bread with Crescent Rolls (Pull-Apart Bread) – Wellness by Kay)
20. Cold Crescent Veggie Pizza – Colorful, Crowd-Pleasing Appetizer
Description: A classic party appetizer that’s as pretty as it is tasty.
It starts with a baked crescent roll crust (usually pressed into a sheet pan) that is cooled, then spread with a creamy ranch-seasoned spread, and topped with a generous amount of fresh diced veggies and shredded cheese (Appetizer Crescent Roll Veggie Pizza – Amanda’s Cookin’).
Common toppings include broccoli, carrots, bell peppers, and cherry tomatoes – giving it a rainbow of colors. It’s served cold, cut into squares.
The combo of the pillow-soft crescent crust, the cool ranch cream cheese, and the crisp veggies makes it addictive. It’s like a veggie platter meets pizza, all in one bite.

Why It’s Great:
This veggie pizza is a tried-and-true fan favorite at gatherings (Appetizer Crescent Roll Veggie Pizza – Amanda’s Cookin’).
Even people who aren’t big on veggies find themselves reaching for another piece, thanks to the allure of that buttery crescent crust and flavorful cream cheese layer (Appetizer Crescent Roll Veggie Pizza – Amanda’s Cookin’).
It’s ultra-easy – only a few ingredients and very adaptable to what veggies you have on hand.
Plus, it’s served cold or room temp, so you can make it ahead and it actually gets better as it sits (the flavors mingle).
It’s also one of those appetizers that provides a lighter, refreshing option on a table often filled with heavy dips and fried things – a welcome contrast. And visually, it’s stunning: all those vibrant veggies on a cream cheese “canvas” really pop, often making it the first thing to go at potlucks.
Adaptable, beloved, and easy – no wonder this recipe gets requested over and over (Appetizer Crescent Roll Veggie Pizza – Amanda’s Cookin’).
Suitable For:
Perfect for potlucks, cookouts, and holiday parties, or as a starter before a game day feast. It’s a hit at bridal or baby showers too, offering a fresh bite among richer foods.
Great for vegetarians (just skip any meat-based garnishes) and a clever way to get kids and adults alike to enjoy veggies.
If you need a make-ahead appetizer that travels well, this is your go-to. Also, those who love ranch flavor (ranch fans unite!) will particularly enjoy this.
Tips & Tricks:
- Pre-bake the crust: Unroll crescent dough onto a sheet pan and press seams together. Bake it according to package (typically 10 min at 375°F) until lightly golden, then cool completely (Appetizer Crescent Roll Veggie Pizza – Amanda’s Cookin’). A tip: use crescent dough sheets or seamless dough if available to make it even easier.
- The spread: Mix softened cream cheese with a bit of sour cream or mayo and a packet of ranch dressing mix (or your own blend of dill, garlic powder, onion powder, etc.). This makes a flavorful “sauce.” Spread it generously on the cooled crust.
- Finely chop the veggies so that you get a little of everything in each bite. Broccoli, cauliflower, carrots, red/yellow bell peppers, green onions – all work well (Appetizer Crescent Roll Veggie Pizza – Amanda’s Cookin’). Pat veggies dry if they’re wet, so the pizza doesn’t get watery.
- For the cheese topping, use finely shredded cheddar or a cheddar-jack blend. It adds color and flavor but is optional if you want to keep it lighter.
- Chill the assembled veggie pizza for at least 30 minutes before cutting. Use a pizza cutter or sharp knife to cut into small squares or triangles. It’s easiest to cut when very cold.
Possible Improvements:
- Change up the flavor by mixing herb & garlic cream cheese (softened) with a touch of ranch powder – gives even more herb flavor. Or use a veggie cream cheese and skip the ranch for a milder base.
- Create patterns with the veggies for holiday themes (like a tree shape with broccoli for Christmas, or a flag design for July 4th with tomatoes and cauliflower). This can be a fun centerpiece.
- Add other toppings like black olives, sliced mushrooms, or halved cherry tomatoes to vary textures.
- If you want a bit of protein, you could sprinkle some chopped cooked bacon or cubed ham on top – though the traditional recipe doesn’t include meat, it could turn it into more of a complete lunch dish.
Read the full recipe here: Amanda’s Cookin’ – Appetizer Veggie Pizza (Appetizer Crescent Roll Veggie Pizza – Amanda’s Cookin’) (Appetizer Crescent Roll Veggie Pizza – Amanda’s Cookin’)
In conclusion, refrigerated crescent rolls are a fantastic staple to keep on hand for whipping up impressive and satisfying dishes on the fly.
Their flexibility in both sweet and savory applications means you’re never far from a delicious meal or snack, whether it’s a cozy family breakfast or a party platter for guests.
From gooey cinnamon sugar desserts to hearty dinner casseroles and clever appetizers, crescent rolls prove to be the home cook’s trusty ally, delivering convenience without sacrificing homemade flavor.
Give some of these recipes a try – you’ll quickly see why crescent rolls are celebrated as a shortcut to warm, tasty, and memorable creations in the kitchen!