
Oats are one of the most versatile and nutritious grains, earning a place at every meal from sunrise to sunset. In this post, we explore 20 completely unique oat-based recipes that showcase oats in sweet breakfasts, hearty snacks, decadent desserts, and savory main courses.
Whether you’re craving a fiber-rich start to your day or looking for creative ways to add whole grains to dinner, these recipes have you covered. Oats bring heart-healthy fiber, plant-based protein, and a comforting texture to any dish.
From high-protein overnight oats that taste like dessert to savory oat risotto that can replace rice, you’ll discover how adaptable this humble ingredient can be.
Read on for delicious ideas to incorporate oats into breakfast bowls, energy bites, breads, crisps, cookies, global dishes, and more – each from a different source and brimming with unique benefits. Get ready to transform your menu with the power of oats!

Key Takeaways
- Oats for Every Meal: You’ll find oat recipes for breakfast, snacks, desserts, and mains, proving you can enjoy oats all day in totally different forms.
- Sweet & Savory Variety: From sweet baked oatmeal and cookies to savory oat bowls, risottos, and breads, these recipes highlight oats’ versatility in both flavor profiles.
- Health Benefits: Many recipes offer high protein, high fiber, or gluten-free options. Oats are known for promoting heart health and providing long-lasting energy.
- Easy & Accessible: Each dish uses common ingredients and simple steps, making whole-grain goodness attainable. Several are make-ahead or quick-prep – perfect for busy lifestyles.
- Creative Twists: Discover innovative ideas like using oats in place of rice for risotto or as a crust for chicken. These unique twists keep meals exciting while adding nutrition.
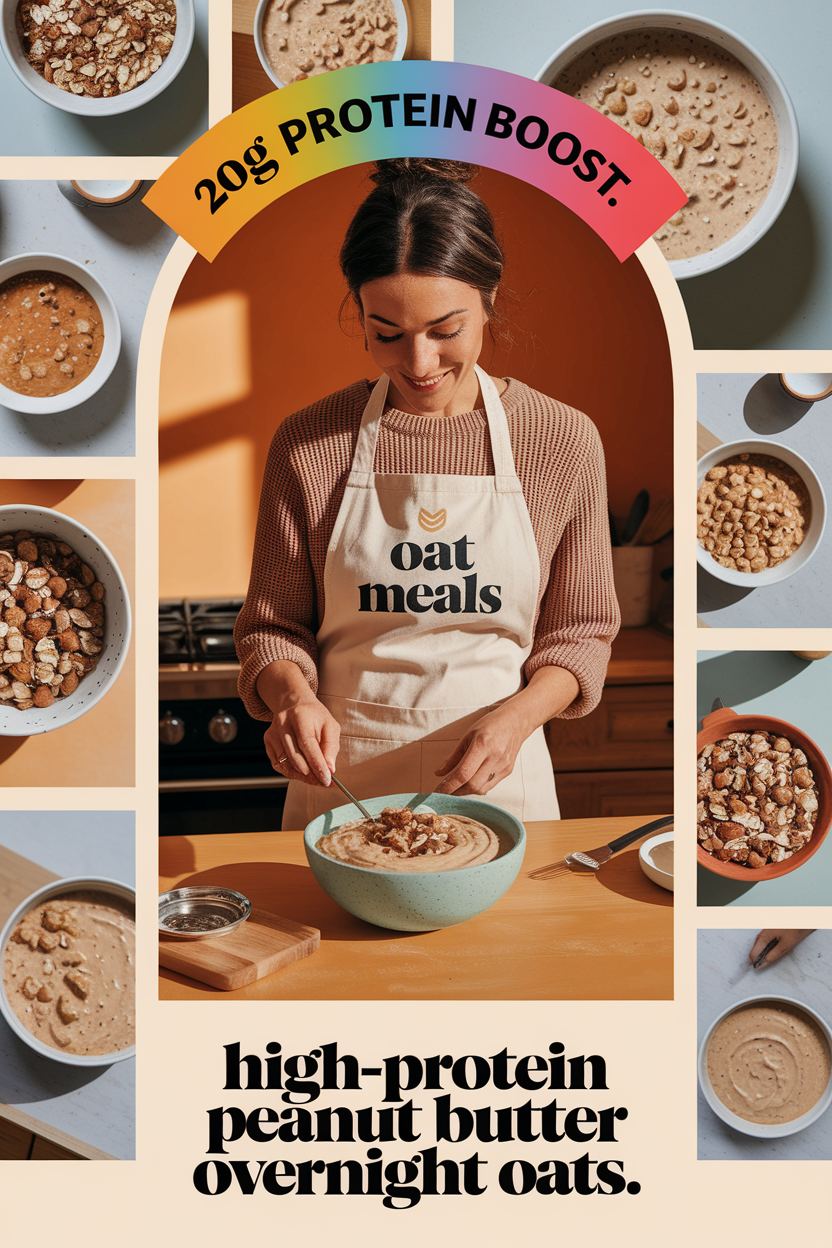
1. High-Protein Peanut Butter Overnight Oats (20g Protein Boost)
Description: A chilled, no-cook oatmeal that tastes like dessert for breakfast. Old-fashioned oats are soaked overnight with Greek yogurt, milk, chia seeds, and a swirl of peanut butter, then topped with a “magic” chocolate-peanut butter shell.
The result is a thick and creamy jar of oats reminiscent of a peanut butter cup – but packed with nutrients. It’s an ultimate make-ahead morning treat that feels indulgent but is incredibly nourishing.
Why It’s Great:
- Protein-Packed & Filling: Delivers about 20 grams of protein plus nearly 10 grams of fiber, keeping you full and energized (High Protein Peanut Butter Overnight Oats | Ambitious Kitchen) (High Protein Peanut Butter Overnight Oats | Ambitious Kitchen).
- Tastes Like a Treat: The chocolatey peanut butter topping makes it feel like you’re eating dessert for breakfast – a satisfying way to start the day without the guilt.
- No-Cook Convenience: Requires zero cooking – just assemble the night before. Ideal for busy mornings or anyone who wants a grab-and-go meal.
- Easily Customizable: Simple to swap in dairy-free yogurt or milk for a vegan option (High Protein Peanut Butter Overnight Oats | Ambitious Kitchen). You can add fruits, swap nut butters, or include mix-ins to suit your taste.
Suitable For:
- Fitness enthusiasts and athletes looking for a protein-rich breakfast to support muscle recovery.
- Busy professionals, students, or parents who need a quick, make-ahead morning meal.
- Peanut butter and chocolate lovers seeking a healthier way to enjoy their favorite flavors.
- Vegetarians (and adaptable for vegans) wanting a high-protein option without protein powders.
Tips & Tricks: Use a mason jar or any portable container to prepare individual portions. After stirring together oats, yogurt, milk, and chia seeds, let it chill at least 3 hours (or overnight) so the oats soften.
For the “magic shell” topping, melt a bit of dark chocolate with peanut butter and coconut oil, then pour over the cold oats and freeze for 5-10 minutes – it hardens into a candy-like shell (High Protein Peanut Butter Overnight Oats | Ambitious Kitchen).
Sprinkle a pinch of flaky salt on top for a sweet-salty kick. If using plain Greek yogurt, add a touch of honey or maple syrup for sweetness (High Protein Peanut Butter Overnight Oats | Ambitious Kitchen).
Possible Improvements: Try almond or cashew butter instead of peanut butter to change the flavor profile. Layer in sliced bananas or berries for extra fiber and natural sweetness.
You can also double the batch to meal-prep multiple breakfasts at once (High Protein Peanut Butter Overnight Oats | Ambitious Kitchen) – the oats keep well refrigerated for a couple of days. For even more protein, stir in a scoop of your favorite protein powder or a spoonful of flaxseed.
Read the full recipe here: High Protein Peanut Butter Cup Overnight Oats – Ambitious Kitchen
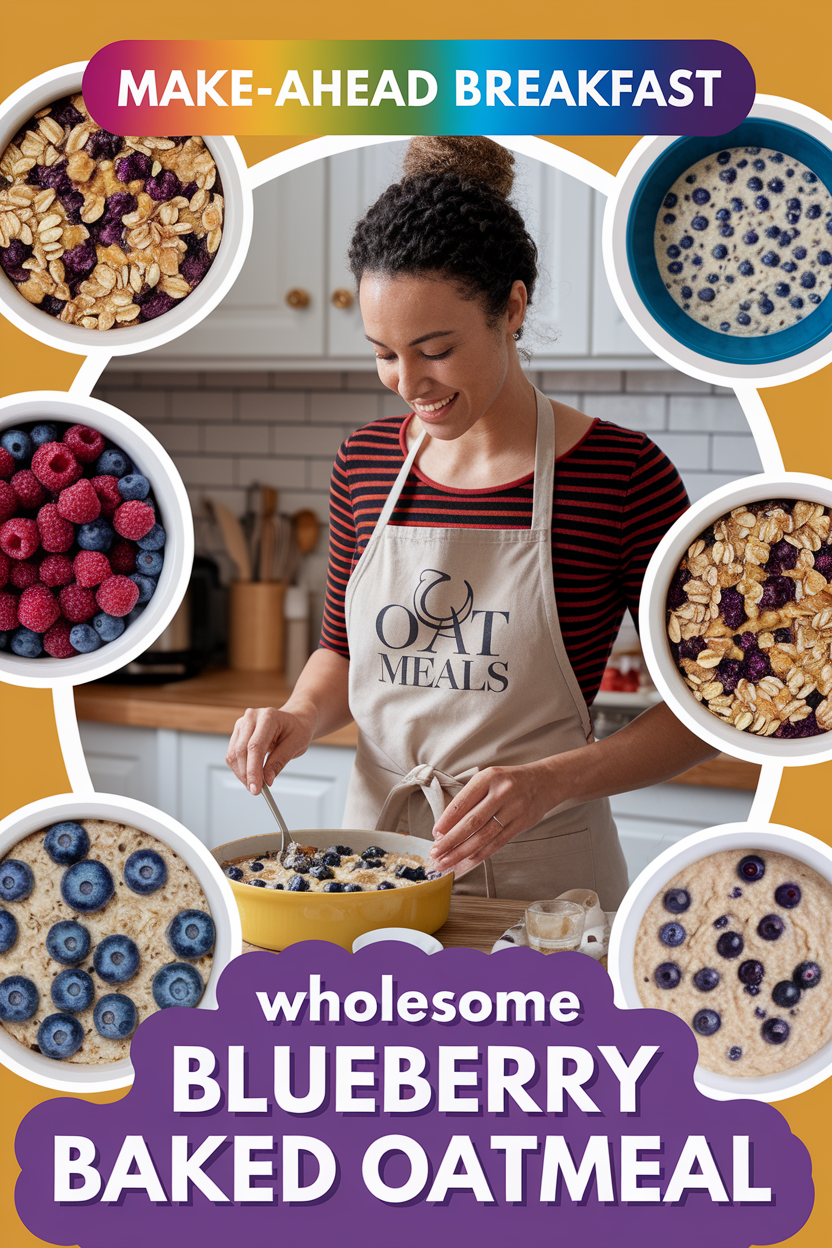
2. Wholesome Blueberry Baked Oatmeal (Make-Ahead Breakfast)
Description: A warm, casserole-style oatmeal studded with juicy blueberries and crunchy nuts. This baked oatmeal combines rolled oats, milk, eggs, and a touch of cinnamon and vanilla, all lightly sweetened with maple syrup.
It’s baked until golden, yielding sliceable squares that are soft inside with a slightly crisp top. Naturally sweet and filled with fruit, it’s a breakfast that tastes like a cozy cross between oatmeal and a fruit cobbler. Bake a batch and enjoy hearty oatmeal all week.
Why It’s Great:
- Heart-Healthy Ingredients: Loaded with whole grain oats, nuts, and fresh berries for fiber and antioxidants (Baked Oatmeal Recipe with Blueberries – Cookie and Kate) (Baked Oatmeal Recipe with Blueberries – Cookie and Kate). It’s a nourishing choice that supports heart health and stable energy levels.
- Naturally Sweetened: Uses maple syrup or honey instead of refined sugar, letting the sweetness of the fruit shine through (Baked Oatmeal Recipe with Blueberries – Cookie and Kate). No sugar crash – just wholesome goodness.
- Make-Ahead Convenience: Bake once and get breakfast for several days. It reheats well, so busy mornings are easier when you have this ready to go (Baked Oatmeal Recipe with Blueberries – Cookie and Kate) (Baked Oatmeal Recipe with Blueberries – Cookie and Kate).
- Customizable: Extremely adaptable – swap in seasonal fruits (apple, banana, raspberries) or different nuts/seeds to suit your taste (Baked Oatmeal Recipe with Blueberries – Cookie and Kate). It’s easy to tweak with what you have on hand.
Suitable For:
- Families and meal preppers – an excellent batch recipe for feeding multiple people or saving leftovers for later in the week.
- Those looking for a healthy alternative to sugary pastries or cereal, as it’s high in fiber and free of refined sugar.
- Anyone following gluten-free or dairy-free diets (simply use certified GF oats and a non-dairy milk to accommodate).
- People who “forget to eat breakfast” – this is a grab-and-reheat option that will entice you to start your day right.
Tips & Tricks: Assemble the mixture in the evening and let it soak overnight in the fridge if you want an even softer texture and shorter bake time in the morning.
Use frozen berries straight from the freezer – no need to thaw, just fold them in; they will bake up juicy (you may need a few extra minutes bake time if using frozen) (Baked Oatmeal Recipe with Blueberries – Cookie and Kate).
For a bit of crunch and visual appeal, sprinkle a spoonful of raw sugar on top before baking to create a lightly crisp lid (Baked Oatmeal Recipe with Blueberries – Cookie and Kate).
Serve warm with a dollop of Greek yogurt or a drizzle of milk to make it extra creamy (Baked Oatmeal Recipe with Blueberries – Cookie and Kate) (Baked Oatmeal Recipe with Blueberries – Cookie and Kate).
Possible Improvements: Change up the flavors by adding mix-ins: stir in chopped apples and walnuts with a dash of nutmeg for a fall twist, or mashed ripe banana and peanut butter for a banana-bread-inspired oatmeal.
To make it vegan, use flax “eggs” (ground flaxseed + water) in place of eggs and a plant-based milk – it still bakes up nicely (Baked Oatmeal Recipe with Blueberries – Cookie and Kate).
If you prefer extra sweetness, a handful of dark chocolate chips can turn it into a more indulgent brunch treat.
Read the full recipe here: Blueberry Baked Oatmeal – Cookie and Kate
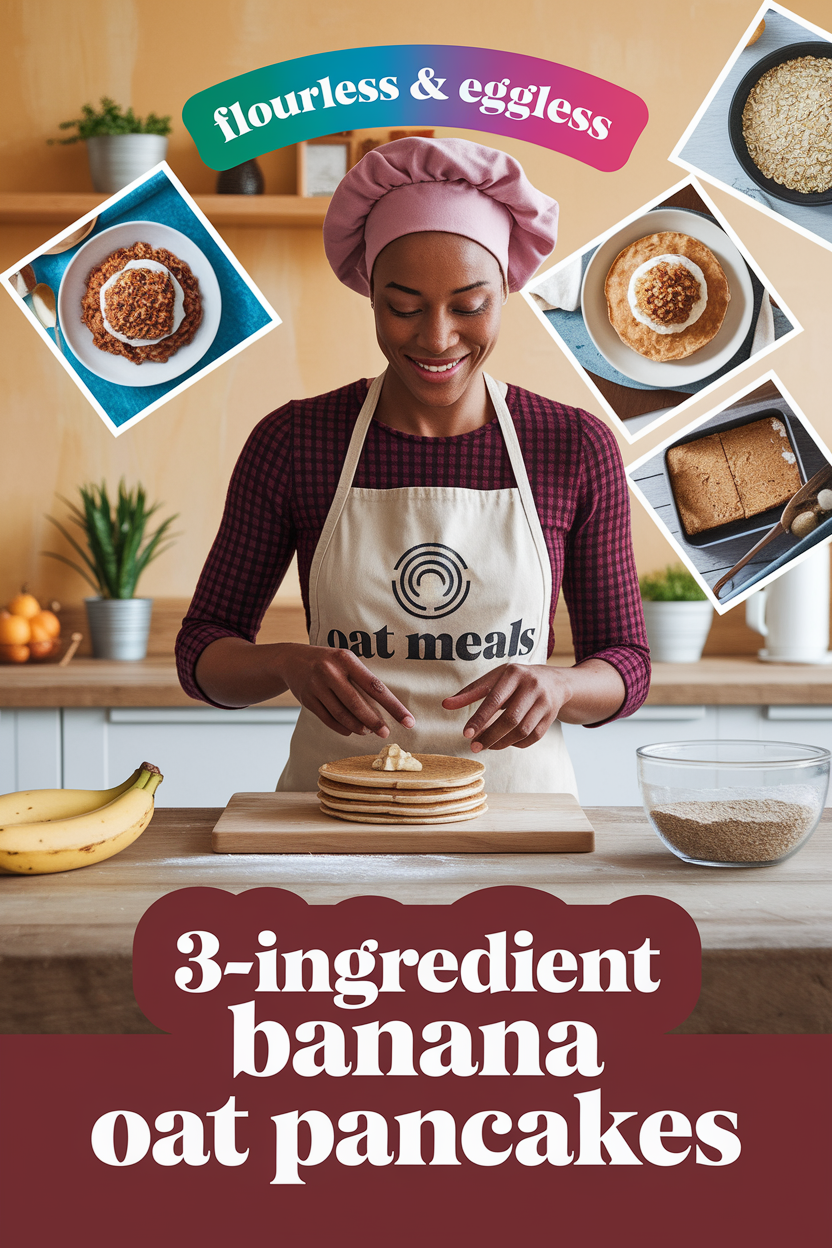
3. 3-Ingredient Banana Oat Pancakes (Flourless & Eggless)
Description: Fluffy pancakes made with nothing but oats, ripe banana, and milk – you won’t believe these golden stacks contain no flour, no eggs, and no added sugar.
The batter blends rolled oats with banana and almond milk (plus a pinch of baking powder for lift) to create tender pancakes that are naturally sweet and satisfying.
They cook up thick and soft, perfect for soaking in a bit of maple syrup. With just three main ingredients, these pancakes redefine “simple and healthy” for breakfast.
Why It’s Great:
- Ultra-Simple & Allergy-Friendly: Only 3 staple ingredients are needed, making this recipe accessible and budget-friendly. It’s naturally gluten-free (using GF oats), dairy-free, and egg-free, suiting many dietary needs (Healthy Oatmeal Pancakes {3 Ingredients} – The Big Man’s World ®) (Healthy Oatmeal Pancakes {3 Ingredients} – The Big Man’s World ®).
- Wholesome Sweetness: Mashed banana not only sweetens the pancakes without sugar but also adds potassium and moisture. There’s no refined flour – just whole grain oats for a high-fiber start.
- Quick Prep: A total prep time of mere minutes – blend ingredients, pour batter, and cook. Great for busy mornings when you want pancakes without the usual fuss (Healthy Oatmeal Pancakes {3 Ingredients} – The Big Man’s World ®) (Healthy Oatmeal Pancakes {3 Ingredients} – The Big Man’s World ®).
- Freezer-Friendly: These pancakes store and freeze well. You can make a batch and freeze extras, then simply reheat for instant homemade breakfast on demand (Healthy Oatmeal Pancakes {3 Ingredients} – The Big Man’s World ®).
Suitable For:
- Anyone seeking a healthier pancake that still tastes delicious – kids and adults alike love them, especially picky eaters who won’t notice the absence of sugar or flour.
- Vegans or those with egg allergies who typically miss out on pancakes – this recipe needs no egg substitute, the banana does the binding.
- Athletes or busy individuals who want a light yet energizing pre-workout meal (these pancakes provide carbs and some protein, especially if paired with nut butter).
- Home cooks with limited ingredients – perfect for using up overripe bananas and that jar of oats in the pantry.
Tips & Tricks:
Let the blended batter sit for about 5 minutes before cooking (Healthy Oatmeal Pancakes {3 Ingredients} – The Big Man’s World ®) (Healthy Oatmeal Pancakes {3 Ingredients} – The Big Man’s World ®).
This allows the oats to absorb liquid and thicken, yielding fluffier pancakes. Cook on medium heat and cover the pan while the first side cooks – trapping the heat helps them puff up nicely (Healthy Oatmeal Pancakes {3 Ingredients} – The Big Man’s World ®).
Look for bubbles on the surface before flipping, and then cook until both sides are lightly browned.
If you want even fluffier results, you can blend in 1 teaspoon of baking powder (Healthy Oatmeal Pancakes {3 Ingredients} – The Big Man’s World ®). For easier flipping, make smaller pancakes (about 1/4 cup of batter each).
Possible Improvements:
Add a dash of cinnamon or vanilla to the batter for extra flavor without complicating the ingredient list. You can also customize by blending in a spoonful of peanut butter or cocoa powder for peanut butter or chocolate banana pancakes.
Stir in blueberries or chocolate chips after blending for bursts of flavor. If you don’t have a blender, you can use oat flour in equal measure to the oats. Top the finished pancakes with Greek yogurt and fruit for a protein boost, or with chopped nuts for healthy fats.
Read the full recipe here: Healthy Oatmeal Pancakes – The Big Man’s World
4. Creamy Oatmeal Cookie Smoothie (Dessert for Breakfast)
Description: A thick and creamy smoothie that tastes just like a classic oatmeal raisin cookie in a glass. Blending oats with frozen banana, milk, Greek yogurt, cinnamon, vanilla, and a few raisins creates a cool, silky drink with cozy spice flavor.
It’s like drinking a milkshake, yet it’s packed with nourishing ingredients – whole grains, fruit, and protein. Quick to whip up, this smoothie is an easy on-the-go breakfast that delivers the familiar comfort of oatmeal in refreshing form.

Why It’s Great:
- Indulgent Flavor, Healthy Ingredients: Despite tasting like a treat (cinnamon, vanilla, and raisins give it that oatmeal cookie vibe (Creamy Oatmeal Smoothie | Healthy Delicious)), it’s full of good-for-you components: fiber from oats and fruit, and protein from yogurt (Creamy Oatmeal Smoothie | Healthy Delicious). No ice cream needed for that milkshake-like richness!
- Satisfying Texture: The ground oats make the smoothie extra creamy and thick – a milkshake consistency that feels indulgent (Creamy Oatmeal Smoothie | Healthy Delicious). It keeps you fuller longer than a typical fruit smoothie would.
- Quick and Easy: Just toss 5 ingredients into a blender. In under 5 minutes you have a nutritious breakfast or snack. Perfect for busy mornings or an afternoon energy boost.
- Adaptable to Diets: Easily made vegan by using plant-based milk and yogurt. It’s naturally free of eggs or wheat, and you can omit the added sweetener if you prefer no extra sugar.
Suitable For:
- Breakfast skippers who want a light meal – this goes down easy but still provides substance to fuel your morning.
- Kids and adults who have a sweet tooth but want a healthier alternative to donuts or pastries in the morning.
- Those following high-fiber or heart-healthy diets: it’s a fun way to drink your oatmeal and benefit from beta-glucans (which can help lower cholesterol).
- Anyone needing a post-workout refuel – the mix of protein and carbs aids recovery, and it’s hydrating and cool.
Tips & Tricks:
Blend the oats first into a fine powder before adding other ingredients (Healthy Oatmeal Smoothie – Five Heart Home) (if you don’t have a high-speed blender). This ensures there are no chewy bits and gives the smoothie its signature silky texture.
Use a frozen ripe banana to sweeten and chill the drink without watering it down – you likely won’t need any extra sugar. A pinch of salt and an extra dash of cinnamon can enhance that cookie-like taste.
For an extra protein boost, throw in a spoonful of peanut butter or almond butter, which also complements the oatmeal cookie flavor nicely.
Possible Improvements:
Customize the mix-ins: add a handful of spinach for extra nutrients (you won’t taste it over the cinnamon and vanilla), or swap raisins for dates if you prefer a different natural sweetener.
If you’re a chocolate lover, a little cocoa powder can turn this into a “chocolate chip oatmeal cookie” smoothie.
For a thinner consistency, splash in more milk; for even more creaminess, use a scoop of vanilla protein powder or a bit of soaked cashews. Top your smoothie with a sprinkle of granola or crushed walnuts to give it a fun crunchy contrast.
Read the full recipe here: Creamy Oatmeal Smoothie – Healthy Delicious
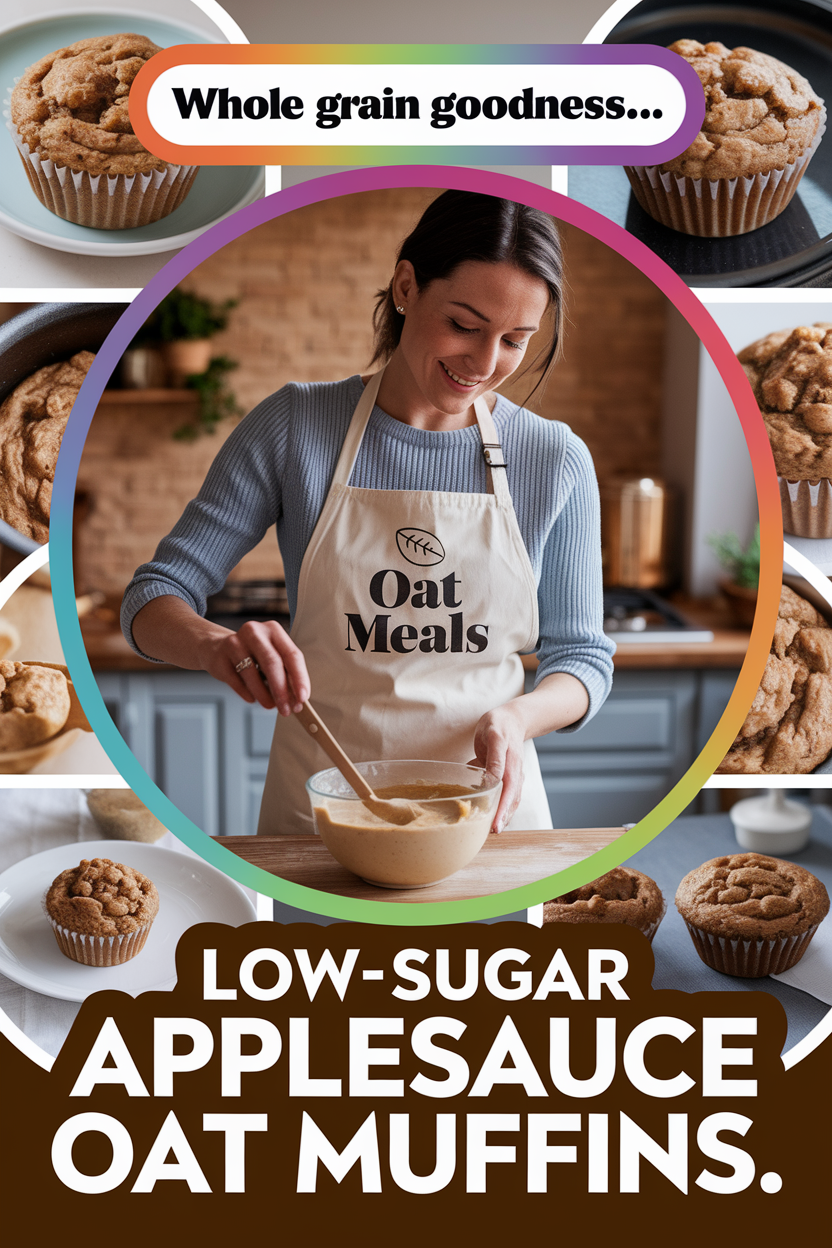
5. Low-Sugar Applesauce Oat Muffins (Whole Grain Goodness)
Description: Soft, fluffy muffins made with a blend of whole grain oats and whole wheat flour, naturally sweetened with applesauce and a touch of honey. These golden-brown muffins are studded with warm cinnamon and so tender you’d never guess they’re healthy.
Each bite offers the comforting flavors of apple and oats. With minimal sugar and lots of fiber, they make a perfect grab-and-go breakfast or wholesome snack. These muffins have been a family favorite for years, proving that simple ingredients can yield big taste.
Why It’s Great:
- Low in Sugar: Relying on unsweetened applesauce and just a bit of added sweetener, these muffins skip the excessive sugar found in typical bakery muffins (Applesauce Muffins {Simple and Healthy} | Mel’s Kitchen Cafe). You get natural sweetness and moisture from fruit instead.
- 100% Whole Grain: Made with oats and whole wheat flour, so they’re packed with fiber and nutrients. This means longer-lasting energy and a muffin that’s actually fueling your body.
- Proven & Popular: With hundreds of 5-star reviews, this recipe has been tested and loved by many home bakers (Applesauce Muffins {Simple and Healthy} | Mel’s Kitchen Cafe). It’s a reliable, no-fail recipe – truly “grandma approved” wholesome baking.
- Highly Adaptable: The batter welcomes additions like chopped nuts, raisins, or even chocolate chips. Readers have successfully made them dairy-free, gluten-free, etc., showing how flexible the recipe is (Applesauce Muffins {Simple and Healthy} | Mel’s Kitchen Cafe).
Suitable For:
- Health-conscious individuals and parents – these muffins are kid-friendly and an easy way to sneak more whole grains into a child’s diet (they’ll just taste the cinnamon and subtle sweetness).
- Anyone looking for a heart-healthy baking option – the oats contribute beta-glucan fiber known for lowering cholesterol.
- Busy mornings or meal preppers: bake a batch and freeze some. They thaw quickly for a quick breakfast or snack that’s much better than store-bought muffins.
- Those with moderate dietary restrictions: the recipe can accommodate dairy-free (swap milk and butter for plant-based options) or even egg-free (using flax egg) without losing its charm, according to maker’s notes.
Tips & Tricks:
Soak the oats in milk for a few minutes before mixing the batter, if time permits – this softens them and makes for an even fluffier texture. Do not overmix the batter; stir until just combined to avoid tough muffins.
Fold in extras like raisins, cranberries, or walnuts at the end for added texture and flavor (the recipe creator notes that adding chocolate chips or dried fruit is a very good idea! (Applesauce Muffins {Simple and Healthy} | Mel’s Kitchen Cafe)).
After baking, let the muffins cool completely if you plan to store them – they keep well in an airtight container for 3-4 days, or freeze up to 3 months.
Possible Improvements:
For a fun twist, you can divide the batter and mix in different add-ins: make half apple-cinnamon raisin muffins by stirring in diced apples and raisins, and half banana-nut by swapping applesauce for mashed banana and adding chopped nuts.
If you prefer a little crunch on top, sprinkle some oats or a cinnamon streusel before baking. To increase protein, replace part of the whole wheat flour with almond flour or add a scoop of protein powder (you may need a bit more liquid in that case).
Lastly, consider using applesauce of different varieties – if you use cinnamon applesauce or one with berries, it can subtly change the flavor of the muffins.
Read the full recipe here: Healthy Applesauce Oat Muffins – Mel’s Kitchen Cafe
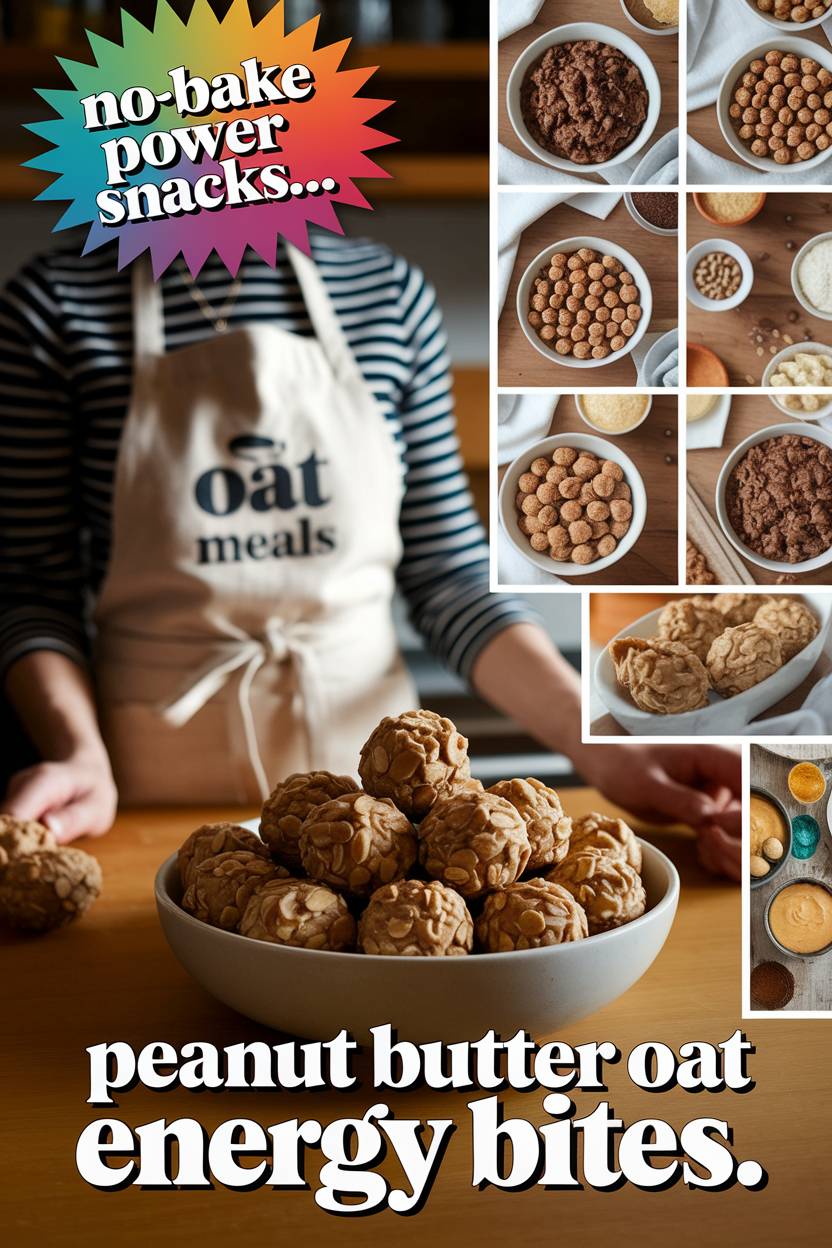
6. Peanut Butter Oat Energy Bites (No-Bake Power Snacks)
Description: Bite-sized energy balls packed with peanut butter, oats, flax, chia seeds, and a hint of honey and chocolate. These no-bake snacks come together in one bowl – just mix, roll, and chill.
Each ball is chewy and slightly sweet, with the rich flavor of peanut butter and a satisfying crunch from seeds.
They’re often called “energy bites” for good reason: with protein, healthy fats, and complex carbs, they provide a quick boost of sustained energy. Store them in the fridge or freezer for a convenient snack anytime.
Why It’s Great:
- Nutrient-Dense: Every ingredient contributes nourishment. Oats for fiber, peanut butter for protein and healthy fat, plus superfood seeds (chia & flax) for omega-3s – it’s a small snack with big nutrition (Peanut Butter No-Bake Energy Bites | Simply Quinoa) (Peanut Butter No-Bake Energy Bites | Simply Quinoa).
- Quick and Easy (10 Minutes): No oven needed and no lengthy prep. In around 10 minutes you can stir these together and form the bites (Peanut Butter No-Bake Energy Bites | Simply Quinoa) (Peanut Butter No-Bake Energy Bites | Simply Quinoa). Great for those who want homemade snacks without a hassle.
- Tastes Like a Treat: The combo of peanut butter, honey, and a few chocolate chips makes these resemble a dessert more than a “health food.” They’re reminiscent of peanut butter cookies or granola bars, which means kids and adults love them.
- Travel-Friendly: They hold their shape well and can be kept refrigerated or frozen. Perfect for on-the-go – toss a couple in your bag for a post-workout bite or midday pick-me-up.
Suitable For:
- Busy schedules: Students, office workers, hikers, travelers – anyone who needs a portable snack to keep hunger at bay.
- Those looking to avoid processed snacks and granola bars. These bites are gluten-free and can easily be made vegan (swap honey for maple syrup), so they suit clean-eating lifestyles.
- Kids’ lunchboxes – a fun, finger-food snack that’s much healthier than cookies or candy, yet still feels like a treat.
- Pre- or post-workout nibble: the balance of carbs and protein can fuel a workout or aid recovery afterward.
Tips & Tricks:
If the mixture is too sticky to roll, chill it for 20–30 minutes first so it firms up, then form into balls. Conversely, if it’s too dry (sometimes oats can vary), add a spoonful more peanut butter or a drizzle of extra honey.
Customize at will: you can sub any nut butter (almond, cashew) or even sunflower seed butter for nut-free bites. For added flavor, consider a splash of vanilla or a pinch of salt to enhance the sweetness.
When rolling, using slightly damp hands can prevent sticking. Store the finished bites in an airtight container in the fridge – they’ll stay fresh for over a week (if they aren’t devoured sooner!).
Possible Improvements:
Tailor these to your cravings: add dried fruits like cranberries or chopped apricots for a fruity twist, or protein powder if you want an even higher protein content (you may need to adjust the wet ingredients to compensate).
For a cocoa energy bite, replace some of the oats with unsweetened cocoa powder and use almond butter – it’ll taste like a chocolatey peanut butter cup.
You could also roll the finished balls in shredded coconut, crushed nuts, or sesame seeds to create a fun outer coating and extra texture.
Read the full recipe here: Peanut Butter Oatmeal Energy Bites – Simply Quinoa
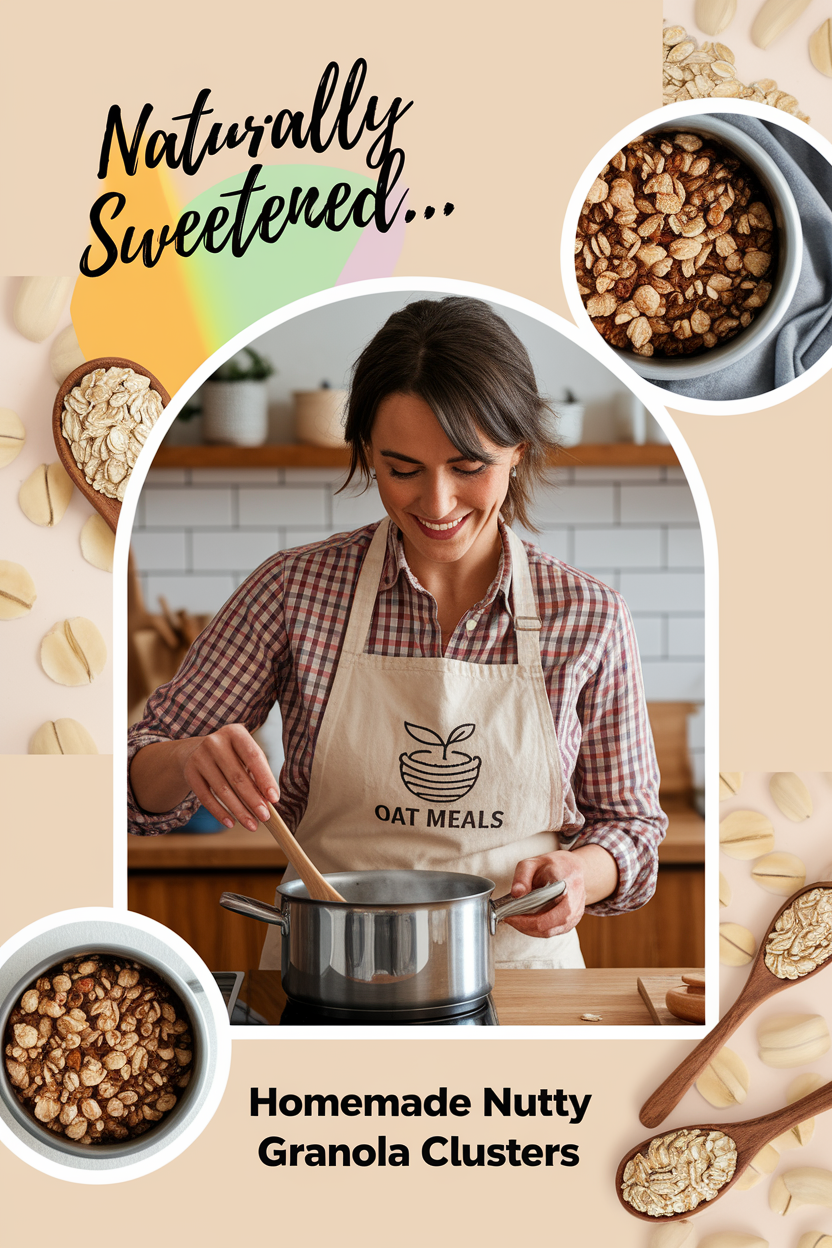
7. Homemade Nutty Granola Clusters (Naturally Sweetened)
Description: A crunchy homemade granola full of toasted oats, nuts, and coconut, bound together by maple syrup and a touch of almond butter. This granola bakes into irresistible clusters – the kind you’ll find yourself eating by the handful.
Flavored with cinnamon and vanilla, it has warm, cozy notes and just the right amount of sweetness. As it bakes, your kitchen will smell amazing.
Enjoy it with milk or yogurt for breakfast, or as a snack straight from the jar. Once you try this easy oven-baked granola, store-bought cereal won’t compare.
Why It’s Great:
- Whole Ingredients: Made from simple pantry staples – oats, nuts, seeds, and dried fruit – with no refined sugar. It’s sweetened with a modest amount of maple syrup and uses heart-healthy fats like coconut oil or olive oil (Homemade Granola Recipe – Love and Lemons) (Homemade Granola Recipe – Love and Lemons). You get all the benefits of whole foods with none of the preservatives.
- Big Clusters & Great Texture: A scoop of almond butter in the mix helps form those coveted big clusters (Homemade Granola Recipe – Love and Lemons) (Homemade Granola Recipe – Love and Lemons). The result is a granola that’s delightfully chunky and crunchy, perfect for snacking.
- Customizable & Fun: This recipe is really a template – you can customize the nuts, spices, and dried fruits to your liking (Homemade Granola Recipe – Love and Lemons) (Homemade Granola Recipe – Love and Lemons). Once you have the base down, the flavor possibilities (think cranberry-pecan or tropical mango-coconut) are endless.
- Cost-Effective: Buying granola can be pricey, especially for high-quality kinds with nuts. Making it at home in bulk saves money and lets you control the quality.
Suitable For:
- Busy folks who want a make-ahead breakfast – bake a batch on the weekend and you have delicious cereal or yogurt topper for weeks.
- Those aiming to eat healthier cereals. This granola is vegan and gluten-free (if using GF oats), accommodating people with dietary restrictions who still crave something crunchy with their morning coffee.
- Hikers or travelers: pack it as a trail mix; it’s lightweight, energizing, and satisfying during outdoor activities.
- Gift-givers – a jar of homemade granola makes a wonderful homemade gift for foodies or hosts, showing thoughtfulness and care.
Tips & Tricks:
Press the granola mixture firmly into the baking sheet before baking – this encourages clumping so you get clusters. Bake low and slow (around 300°F/150°C) and avoid stirring too much if you want larger pieces.
Let the granola cool completely on the tray without touching it; it will crisp up as it cools and then you can break it into chunks of your desired size.
For extra cluster action, some recipes suggest adding a lightly beaten egg white to bind (if you don’t need it vegan). Store granola in an airtight container to keep it crunchy; it stays fresh for a couple of weeks.
Possible Improvements: Switch up the mix-ins and flavorings: for example, add cacao nibs or a handful of dark chocolate chips after it cools for a chocolate granola. Use pumpkin pie spice instead of just cinnamon for a spiced autumnal version.
If you prefer oil-free, you can replace the oil with applesauce (though it may be a bit less crispy).
Add a pinch of salt to contrast the sweet – it really elevates the flavor. And don’t forget a sprinkle of seeds like pumpkin or sunflower seeds for extra nutrients.
Read the full recipe here: Homemade Granola – Love and Lemons
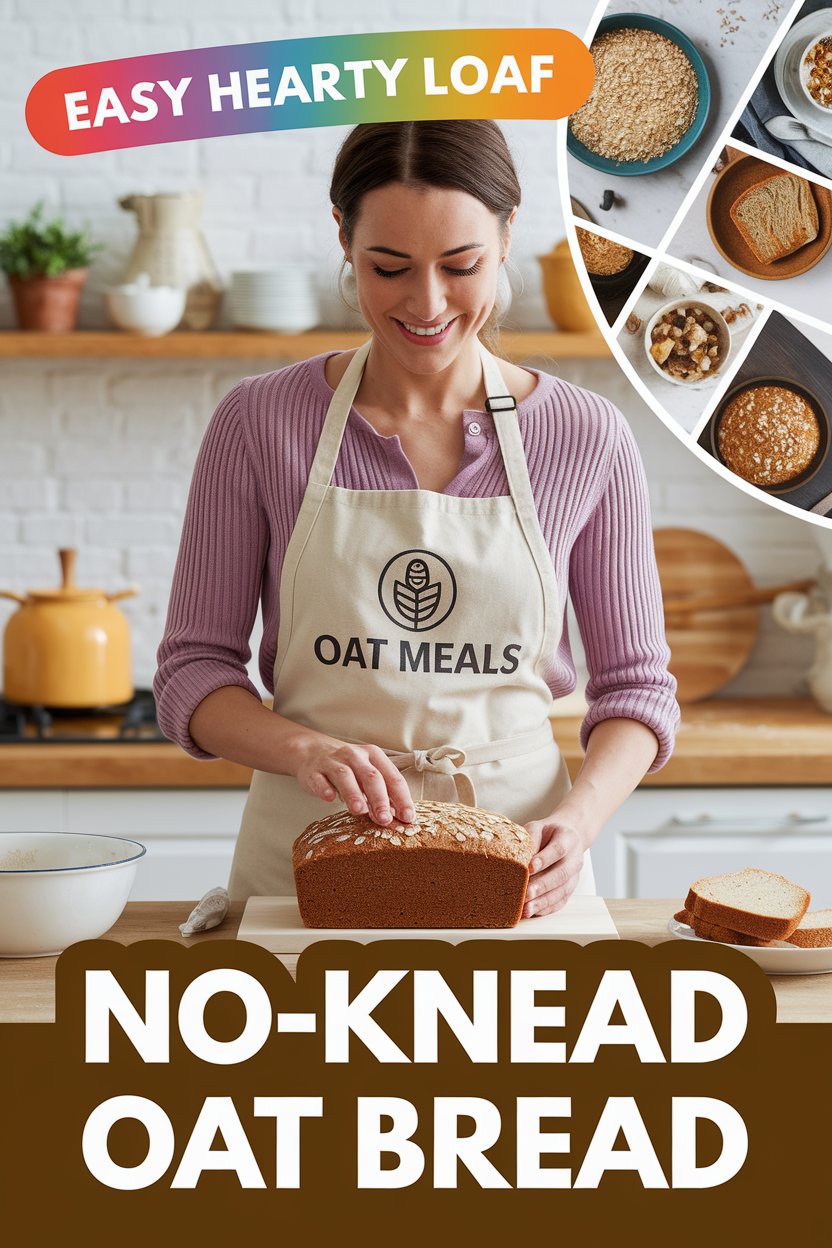
8. No-Knead Honey Oat Bread (Easy Hearty Loaf)
Description: A rustic yeast bread with a chewy interior and slight sweetness, this loaf is made with a mix of bread flour and oats, and lightly sweetened with honey. Despite its artisanal appearance and flavor, it requires no kneading.
You simply mix the dough and let it rise slowly, allowing time to develop the structure. The baked bread has a soft, springy crumb and a tender crust that softens after cooling.
Each slice has notes of honey and oats – fantastic for toast, sandwiches, or just slathering with butter. It’s a beginner-friendly bread that delivers bakery-worthy results.
Why It’s Great:
- Fuss-Free Baking: The recipe is designed to be straightforward and beginner-friendly, with minimal hands-on work. Most of the “work” is the dough resting and rising on its own (No-Knead Honey Oat Bread – Sally’s Baking Addiction) (No-Knead Honey Oat Bread – Sally’s Baking Addiction). There’s no intensive kneading or special equipment needed, making home bread-baking approachable.
- Wonderful Texture & Flavor: The oats in the dough give the bread a slightly nutty, earthy flavor and keep it moist. Honey adds a gentle sweetness and a golden color. The texture is chewy yet soft – described as “spongey” (in a good way) and springy (No-Knead Honey Oat Bread – Sally’s Baking Addiction). This bread is both hearty and crowd-pleasingly tasty (even kids will enjoy the hint of honey).
- Hands-Off Rise: It leverages an overnight rise for flavor development and ease. You can mix it at night, let it ferment slowly (which improves digestibility and taste), and bake it the next day. This timing is convenient for fitting into a busy schedule.
- Versatile Use: The finished loaf is quite versatile – it’s slightly sweet, but not overly so, meaning it works for PB&J or with savory toppings like eggs and avocado (No-Knead Honey Oat Bread – Sally’s Baking Addiction). It also makes excellent French toast due to the hearty texture.
Suitable For:
- First-time bread bakers or those who find yeast breads intimidating. This recipe builds confidence with its no-knead, low-effort method and forgiving nature.
- Health-conscious individuals who want a homemade bread with whole grain oats and without the preservatives of store-bought bread. Using some whole wheat flour (optionally) and oats provides more nutrients than plain white bread.
- Anyone craving homemade comfort – there’s nothing like the smell of fresh bread. This recipe is great for weekends at home or holidays when you want that from-scratch touch.
- People with dairy or egg restrictions – this bread is naturally dairy-free and egg-free, relying on basic ingredients (flour, oats, yeast, honey, salt, water).
Tips & Tricks: Use bread flour for best structure (its higher protein gives a chewier, taller loaf), but you can replace up to 1 cup of it with whole wheat flour for extra flavor (No-Knead Honey Oat Bread – Sally’s Baking Addiction).
When mixing the dough, it will be sticky and shaggy – that’s normal for no-knead recipes. Instead of kneading, you’ll just fold it a couple times after the first rise. Let it rise at least 8–12 hours in a cool spot; if your kitchen is warm, you can reduce the time or refrigerate the dough to slow fermentation.
Before baking, sprinkle a few extra oats on top for a pretty finish. Bake in a preheated dutch oven or on a hot baking stone if possible – the added steam and heat give a better oven spring (rise). Allow the bread to cool before slicing to maintain its texture.
Possible Improvements:
For a seeded honey oat bread, add a handful of sunflower or pumpkin seeds to the dough for extra crunch and nutrition. You could also mix in a tablespoon of melted butter into the dough for a slightly richer crumb.
If you prefer rolls, this dough can be shaped into rolls and baked in a muffin tin or baking dish (you’ll get tender dinner rolls with honey-oat flavor).
And while the recipe is already fairly healthy, you can experiment with using all whole wheat flour (just expect a denser loaf). Storing tip: because it has no preservatives, it’s best eaten within 3 days or sliced and frozen for later use.
Read the full recipe here: No-Knead Honey Oat Bread – Sally’s Baking Addiction
9. Healthy Apple Crisp (Gluten & Dairy Free, Naturally Sweetened)
Description: A lightened-up version of the classic apple crisp dessert. Sliced apples are tossed with cinnamon and a touch of maple syrup, then baked under a crispy oat-pecan topping made with oats, almond flour (or whole wheat), coconut oil, and just a bit of brown sugar or maple.
The result is tender, fragrant cinnamon apples with a golden, crunchy streusel that’s much lower in sugar and fat than traditional crisps. It’s comfort food without the compromise – warm, sweet, and perfectly spiced, yet made with nourishing ingredients. Serve it warm, and you won’t even miss the pie crust or excess sugar.

Why It’s Great:
- Lighter & “Better-for-You”: This recipe transforms a typically indulgent dessert into a healthier treat. It’s naturally gluten-free and dairy-free, using coconut oil instead of butter and oats + almond flour instead of refined flour (Healthy Apple Crisp | The Clean Eating Couple) (Healthy Apple Crisp | The Clean Eating Couple). It’s also only sweetened with maple syrup – no cups of white sugar here (Healthy Apple Crisp | The Clean Eating Couple) (Healthy Apple Crisp | The Clean Eating Couple). You still get the dessert experience with far fewer calories and less sugar.
- Quick to Make: Ready in under 30 minutes (Healthy Apple Crisp | The Clean Eating Couple), this is faster than pie and great for a last-minute dessert. There’s no dough to roll out – just mix and sprinkle the oat topping. Perfect for when you want something sweet and homemade on a weeknight.
- Full of Flavor: Using a mix of sweet apples and spices (cinnamon, nutmeg, ginger) means every bite is bursting with flavor. The topping includes nuts and gets toasty and aromatic. You get the classic apple crisp taste – it’s been described as “so delicious” that you’d hardly know it’s healthy (Healthy Apple Crisp | The Clean Eating Couple).
- Crowd-Pleaser: It’s a dessert that caters to many diets without drawing attention to it. Even those not avoiding gluten or dairy will enjoy it, and those who are will be thrilled they can partake. It’s an all-around win for gatherings.
Suitable For:
- People following clean eating or lower-sugar diets who still want a satisfying dessert. This crisp lets you indulge smartly.
- Individuals with gluten or lactose intolerance – it’s completely gluten-free (just use certified GF oats) and dairy-free, so no one has to miss out on dessert.
- Weight-watchers or diabetics: while desserts should be enjoyed in moderation, this recipe has a much better nutritional profile (whole grains, less added sugar) than a typical crisp, making it a smarter choice for blood sugar control when a sweet craving hits.
- Busy home cooks or beginners – it’s straightforward and forgiving (no precise pastry skills needed). A great choice for a holiday dessert when oven space and time are limited, too.
Tips & Tricks: Choose a good baking apple or a mix (such as Pink Lady, Honeycrisp, or Braeburn) for the best flavor and texture – they should be a little tart and hold shape when baked (Healthy Apple Crisp | The Clean Eating Couple) (Healthy Apple Crisp | The Clean Eating Couple).
If your apples are very sweet, you can reduce the maple syrup in the filling. Don’t skip tossing the apple slices in spices and a bit of oil; this ensures they’re tasty all the way through.
Spread the oat topping evenly but don’t pack it down – leaving it loose allows maximum crispiness. Bake until the fruit is bubbling at the edges and the topping is nicely browned.
For an extra crisp topping, you can briefly broil the dish for a minute at the end (watch closely!). Let it cool for a few minutes before serving – it allows the juices to thicken slightly.
Possible Improvements:
Feel free to add other fruits or berries with the apples – pears or cranberries mix well and add variety. You can also play with the topping: try adding unsweetened shredded coconut or using walnuts instead of pecans.
If you prefer using butter instead of coconut oil, you can, but then it won’t be dairy-free (it will taste great, though).
For serving, this “healthy” crisp can still be paired with a scoop of vanilla ice cream or a dollop of Greek yogurt – a small indulgence that goes a long way.
Finally, if you want to make it fully vegan, ensure your sugar (if using) is vegan or stick to maple syrup, and consider a scoop of dairy-free ice cream on top.
Read the full recipe here: Healthy Apple Crisp – The Clean Eating Couple
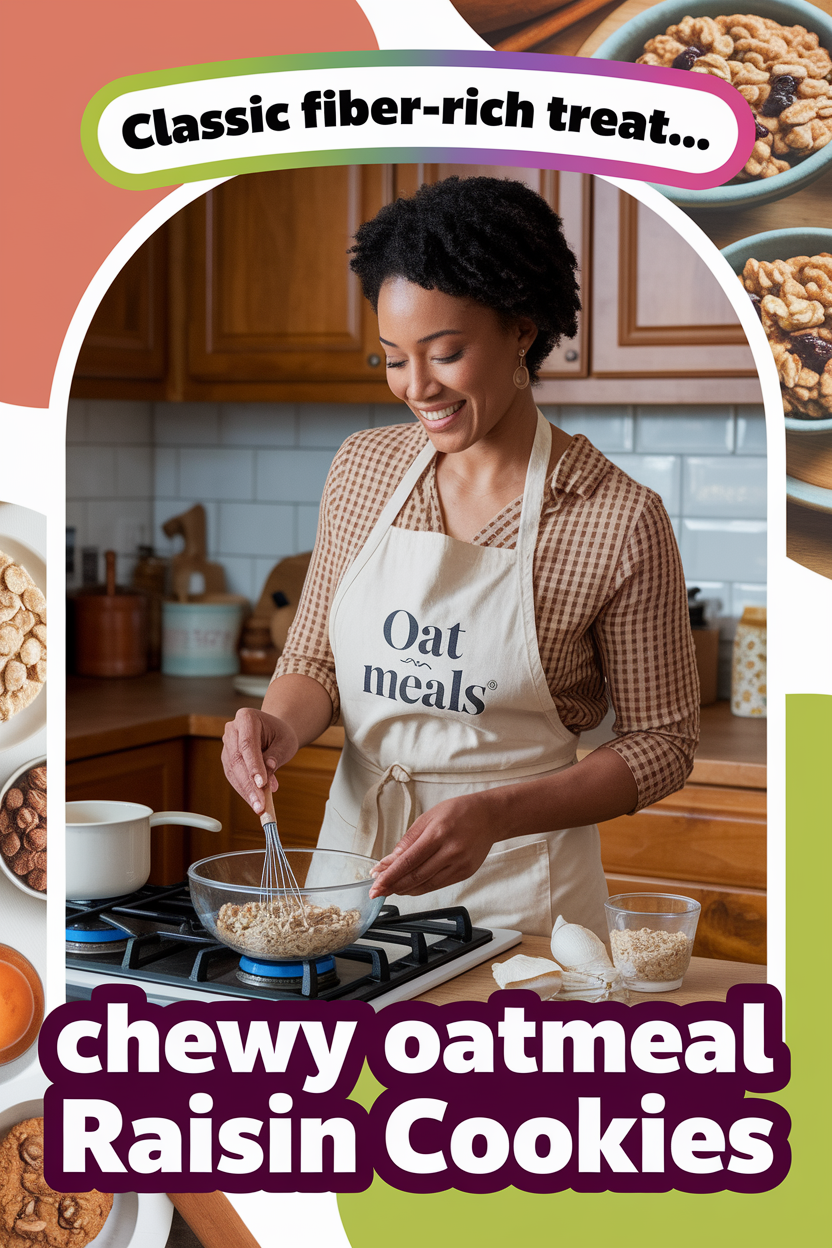
10. Chewy Oatmeal Raisin Cookies (Classic Fiber-Rich Treat)
Description: These are the quintessential old-fashioned oatmeal cookies – soft in the center, chewy throughout, with plump raisins in each bite and a hint of cinnamon. Made with butter, oats, brown sugar, and plenty of raisins, they bake up with slightly crispy edges and moist, chewy middles.
The oats give them a heartier texture than your average cookie, and a comforting, homey flavor. It’s the cookie jar favorite many of us grew up with, but also a treat you can feel a bit better about thanks to the whole grain oats. They’re delightful with a glass of milk or a cup of tea.
Why It’s Great:
- Timeless Flavor: Oatmeal raisin is a classic for a reason – the combination of sweet raisins and hearty oats with butter and vanilla creates a flavor that’s cozy and satisfying. These cookies have that “just like grandma’s” taste and texture (The Best Oatmeal Cookies Recipe) (The Best Oatmeal Cookies Recipe).
- Great Texture Contrast: The edges are slightly crisp while the centers remain tender and chewy, and the oats add a nice bite. Plus, the raisins bring a chewy burst of sweetness. There’s a reason this recipe is often called “The Best” – the texture is spot on (The Best Oatmeal Cookies Recipe) (The Best Oatmeal Cookies Recipe).
- More Fiber than Typical Cookies: Thanks to the cupfuls of oats in the dough, each cookie sneaks in some whole grain fiber. That means they’ll fill you up more than a plain sugar cookie – a small justification for having that extra cookie!
- Easy to Make & Adapt: The recipe is straightforward and forgiving. You can swap in add-ins (chocolate chips, nuts, or coconut) for the raisins if you like. Plus, one pro-tip from bakers is soaking the raisins in beaten egg or warm water before mixing – this plumps them up for extra juicy raisins in the final cookie (The Best Oatmeal Cookies Recipe).
Suitable For:
- Baking beginners: This recipe doesn’t require any fancy techniques. It’s a one-bowl, drop cookie – perfect for novice bakers or baking with kids.
- Those looking for a homemade treat that also packs some wholesome ingredients. It’s a treat, but with oats and dried fruit, it’s a bit more nutritious than a chocolate chip cookie.
- Anyone craving nostalgia – these cookies often bring back warm memories and are great for bake sales, care packages, or as a simple dessert for family gatherings.
- People who prefer a less sweet cookie. Oatmeal raisin cookies tend to be a touch less sweet than frostings or chocolate-heavy cookies, making them enjoyable even for those who don’t love overly sugary desserts.
Tips & Tricks:
For the chewiest cookies, don’t overbake them – take them out of the oven when they just start to turn golden at the edges. They may look a tad underdone in the center, but they’ll set as they cool and stay soft.
Soak the raisins in hot water (or even in the vanilla extract and beaten eggs as some recipes suggest) for 10 minutes before mixing into the dough (The Best Oatmeal Cookies Recipe) – this yields plump, moist raisins that make a big difference in texture.
You can also chill the dough for 30 minutes before baking to prevent excessive spread and concentrate the flavors. If you like a spice boost, add a pinch of nutmeg or use a bit of molasses for a deeper flavor (some “spicy” oatmeal cookie recipes do this).
Lastly, store them with a slice of bread in the container to keep cookies soft longer – the cookies will draw moisture from the bread slice.
Possible Improvements:
While the classic combination is hard to beat, you can certainly riff on it. For Oatmeal Chocolate Chip Cookies, replace raisins with chocolate chips (or do half and half for “oatmeal trail mix cookies”).
Add chopped walnuts or pecans for crunch and healthy omega-3 fats, which pair wonderfully with oats and raisins. If you want to cut down on sugar, you can try using half brown sugar and half a natural sweetener like coconut sugar (the flavor will be less sweet, more caramel-like).
Another idea is to use quick oats vs. old-fashioned oats: quick oats will yield a more uniform, softer cookie, while old-fashioned give a heartier texture – you can choose based on your preference.
Finally, a drizzle of icing made with maple syrup or a cream cheese glaze on top can dress them up for special occasions.
Read the full recipe here: The Best Oatmeal Cookies – Allrecipes
11. Anzac Biscuits (Crispy Oat Coconut Cookies with History)
Description: Crunchy, golden oat cookies originating from Australia/New Zealand, Anzac biscuits are made from rolled oats, flour, desiccated coconut, sugar, butter, and golden syrup.
They are egg-free and known for their remarkable shelf life and delicious toffee-like flavor. These biscuits bake up crisp and buttery, with a caramelized oat taste and a coconut aroma.
They were originally made to send to soldiers abroad (the oats and lack of eggs helped them keep longer). Today, they’re enjoyed with tea or coffee as a not-too-sweet, dunkable treat that proudly showcases the flavor of oats.

Why It’s Great:
- Wonderful Crunch & Flavor: Anzac biscuits are all about that crispy, crunchy texture – they practically snap when you bite them (unless you bake slightly less for a chewy center, which some prefer) (Anzac Biscuits – RecipeTin Eats) (Anzac Biscuits – RecipeTin Eats). The flavor is rich with butter and golden syrup, giving a toffee/caramel note that makes them irresistible (Anzac Biscuits – RecipeTin Eats) (Anzac Biscuits – RecipeTin Eats).
- Simple, Pantry Ingredients: These were born from wartime rationing – you only need basic pantry items (oats, sugar, flour, syrup, butter). No eggs, which is great for those with egg allergies or when you’re out of eggs. Despite the simplicity, the result is truly delicious.
- Long Shelf Life: They were designed to last – these cookies stay fresh and crunchy for weeks if stored properly (Anzac Biscuits – RecipeTin Eats). In fact, an Anzac biscuit can remain crunchy for a week and still be tasty for another week even as it softens slightly. They’re a great make-ahead treat or gift for shipping.
- Cultural Significance: Baking and enjoying Anzac biscuits is a tradition (especially on ANZAC Day). There’s something special about making a recipe that has over a century of history – it connects you to a broader story. And it’s a neat conversation starter if you share them with friends (“Did you know these were made for soldiers in WWI?”).
Suitable For:
- Fans of British/colonial style biscuits – if you enjoy digestive biscuits or Hobnobs, these will be right up your alley with their oaty, not-too-sweet profile.
- Those who like a crunchy cookie to dunk in tea or coffee. Anzacs hold up well to dunking and have that satisfying firm texture.
- Egg-free diets or times when baking ingredients are scarce – this recipe is quite accommodating and hard to mess up, even for novice bakers.
- Anyone who loves coconut and caramel flavors combined with oats. Even if you’ve never had an Anzac, if that flavor combo sounds good, you’ll likely love these biscuits.
Tips & Tricks:
Do not substitute golden syrup unless you must – it’s key to the authentic flavor. If you can’t find it, a combination of light molasses and honey can mimic it (Anzac Biscuits – RecipeTin Eats), but the classic Lyle’s Golden Syrup is ideal.
When mixing the dough, it may seem crumbly; that’s okay – it comes together when you press it into balls.
If it’s too dry to hold shape, add a tiny bit of water. Bake until golden brown – watch closely because the high sugar content can make them go from golden to too dark quickly.
For a chewier cookie, bake a couple minutes less; for traditional crisp, bake until nicely browned.
Cool them on the sheet for a few minutes before moving, as they firm up upon cooling. Also, consider making a double batch – they disappear fast, and you’ll want extras!
Possible Improvements:
Purists might say “don’t change a thing,” but you can experiment. If you prefer a slightly softer cookie, add a tablespoon of corn syrup along with golden syrup or a tad more butter.
For flavor variations, a pinch of ground ginger can add a warm spice note. Drizzling or dipping one side in dark chocolate is not traditional, but let’s be honest – it tastes fantastic and can turn them into a more decadent dessert.
Lastly, you can make gluten-free Anzac biscuits by using a 1:1 gluten-free flour blend and GF-certified oats – since the recipe doesn’t rely on gluten structure much, it adapts well.
Read the full recipe here: Anzac Biscuits – RecipeTin Eats
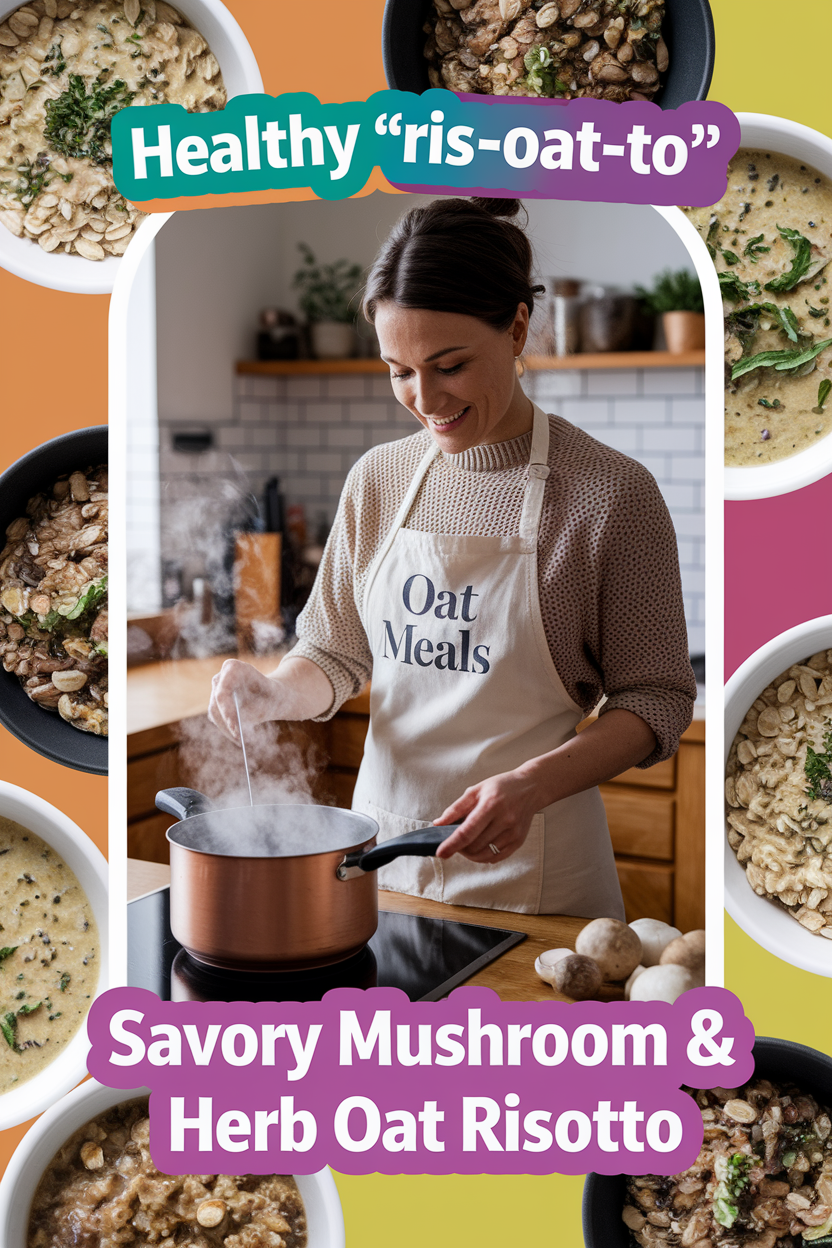
12. Savory Mushroom & Herb Oat Risotto (Healthy “Ris-Oat-to”)
Description: A savory risotto-style dish made with steel-cut oats instead of rice. It’s cooked slowly with broth, white wine, sautéed mushrooms, herbs like thyme and sage, and finished with a bit of parmesan cheese.
The steel-cut oats become creamy and tender, similar to Arborio rice, but with a subtle nuttiness and extra texture.
This inventive side dish (or vegetarian main) is thick, comfortingly creamy, and earthy from the mix of mushrooms and herbs. It delivers the satisfaction of traditional risotto with the bonus of whole-grain goodness.
Why It’s Great:
- Healthy Twist on a Classic: By swapping rice with fiber-rich oats, this “risotto” is much healthier – more fiber, more protein, and it can even be friendlier to blood sugar. Yet it’s every bit as creamy and flavorful as the original (Savory Mushroom and Herb Steel Cut Oat Risotto Recipe on Food52) (Savory Mushroom and Herb Steel Cut Oat Risotto Recipe on Food52). Diners often can’t tell the difference in deliciousness!
- Earthy, Gourmet Flavor: The combination of mushrooms, garlic, and fresh herbs infuses deep umami flavor. Reviewers describe it as an “earthy, mushroom-filled side dish that’s every bit as delicious as traditional risotto” (Savory Mushroom and Herb Steel Cut Oat Risotto Recipe on Food52) (Savory Mushroom and Herb Steel Cut Oat Risotto Recipe on Food52). The oats take on all those savory flavors beautifully.
- Good for You and the Planet: Oats aren’t just healthy for us – they are a sustainable crop that’s good for soil (often used in crop rotation to enrich fields). So you can feel good about the environmental aspect too (Savory Oat Risotto Recipe) (Savory Oat Risotto Recipe). This dish was even created with the idea of using climate-friendly ingredients while feeding a family well.
- Satisfying Texture: Steel-cut oats retain a slight chew (al dente bite) that makes the texture of this risotto really satisfying, almost like a barley risotto. It’s not mushy – it’s creamy with a little bite, which contrasts nicely with tender mushrooms.
Suitable For:
- Vegetarians (if using veggie stock) or anyone looking to include more plant-based meals. This risotto is meatless yet hearty, and can be a main course on its own or with added protein like beans or a fried egg.
- Foodies and adventurous cooks – it’s a fun recipe for those who like trying new twists on classics. Serve it at a dinner party and intrigue your guests with the fact it’s made from oats!
- People managing cholesterol or heart health: the beta-glucan fiber in oats can help lower cholesterol. Enjoying oats in a savory format is a great way to incorporate them beyond breakfast.
- Those who love risotto but want to avoid refined carbs or simply don’t want to stand stirring a pot forever. (While you do stir this dish, oats are a bit more forgiving than rice and you don’t need to be quite as vigilant.)
Tips & Tricks:
Use steel-cut oats (Irish oatmeal), not rolled oats, for this recipe – steel-cut will give the proper risotto-like texture (rolled oats would turn too porridge-like).
Start by toasting the oats in a little butter or olive oil after sautéing the onions/garlic – this deepens the flavor (just as you would toast rice for risotto) (Savory Oat Risotto Recipe) (Savory Oat Risotto Recipe).
Add warm broth a ladle at a time and stir frequently; the stirring helps release the starches from the oats, making it creamy. If you find the oats are still too firm at the end of cooking, just add a bit more broth and cook a tad longer.
Finish with a generous handful of parmesan and a small pat of butter for gloss and richness, and don’t forget a sprinkle of fresh parsley on top for color and freshness.
Possible Improvements: Feel free to build on this template – for example, stir in some spinach or kale near the end for extra greens, or swap mushrooms for diced butternut squash and sage for a fall-inspired version (as one recipe variation does) (Steel-Cut Oat “Risotto” with Butternut Squash and Kale) (Steel-Cut Oat “Risotto” with Butternut Squash and Kale).
You can also make it vegan by using vegetable stock and omitting the cheese (try a spoon of nutritional yeast for a cheesy hint). For added protein, top it with a poached egg or fold in some cooked lentils or chickpeas.
If you like a tangy finish, a squeeze of lemon juice or a drizzle of truffle oil on top can take the flavors to the next level. This dish is also excellent served alongside roasted chicken or pork, if you’re not vegetarian.
Read the full recipe here: Savory Mushroom and Herb Steel-Cut Oat “Risotto” – Food52
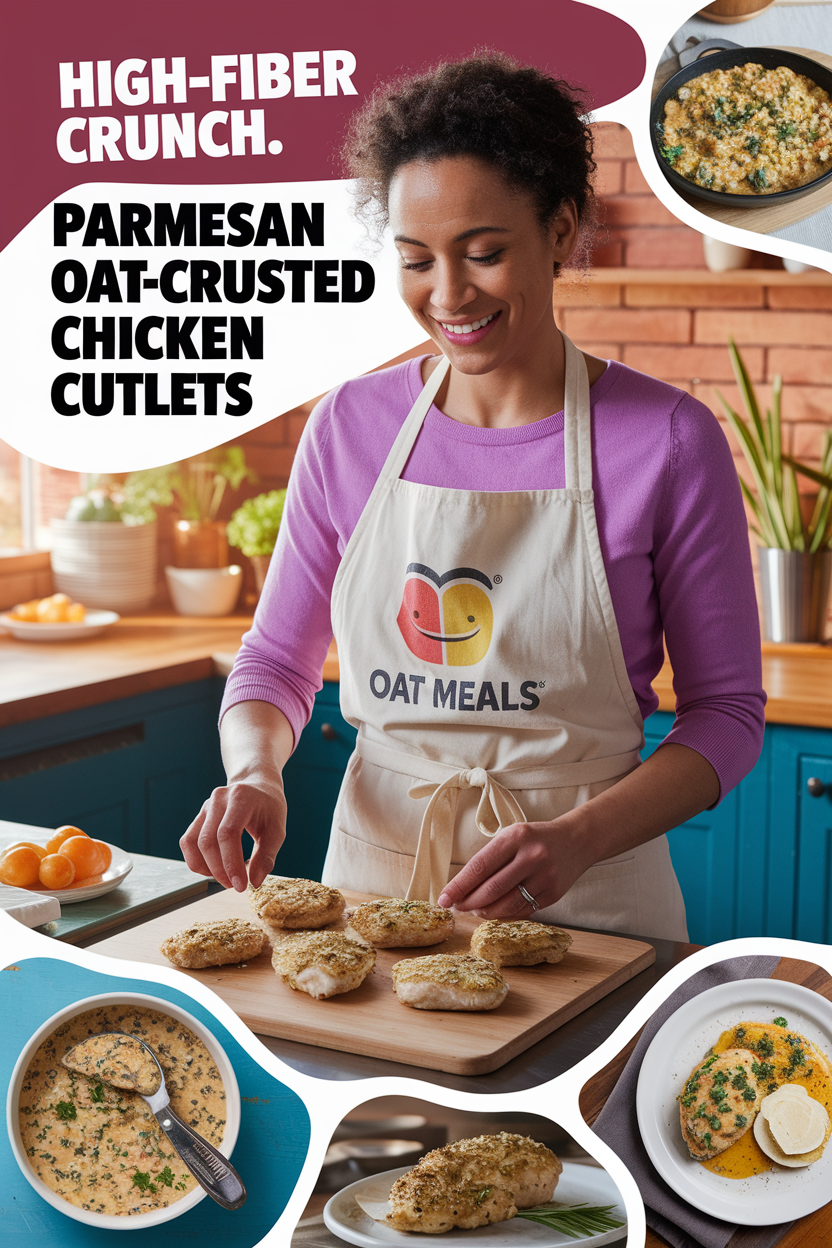
13. Parmesan Oat-Crusted Chicken Cutlets (High-Fiber Crunch)
Description: Juicy chicken breasts with a crispy oat and cheese coating, pan-fried to golden perfection. Instead of bread crumbs, these cutlets use rolled oats (lightly ground) mixed with grated Parmesan and herbs as the breading.
The outcome is a delightful crust that’s nutty and savory, adding extra fiber to your typical chicken cutlet.
Olive oil is used for pan-frying, keeping it lighter. In about 30 minutes, you get chicken that’s tender inside with a crunchy, flavorful outside – excellent served with a side salad or veggies for an easy weeknight dinner.
Why It’s Great:
- Whole Grain Upgrade: Replacing refined bread crumbs with oats makes this a more wholesome dish – you’re getting the benefits of whole grains (fiber, vitamins) in your “fried” chicken. It’s a smart twist that doesn’t sacrifice taste or texture (Oat-Crusted Chicken Cutlets Recipe) (Oat-Crusted Chicken Cutlets Recipe). In fact, the oats give a heartier crunch and a pleasing rustic look.
- Flavor-Packed Crust: Mixing Parmesan and parsley with the oats adds umami and freshness to the crust (Oat-Crusted Chicken Cutlets Recipe) (Oat-Crusted Chicken Cutlets Recipe). As the cheese crisps up in the pan, it lends a salty, savory punch. Reviewers note the coating is so flavorful that even picky eaters enjoy it as much as traditional breaded chicken.
- Quick Cook & Weeknight Friendly: Using thin chicken cutlets means each piece cooks in about 5-6 minutes (Oat-Crusted Chicken Cutlets Recipe). You get that satisfying crispy chicken dinner in well under 30 minutes total, making it practical for busy nights. And since it’s pan-fried with a modest amount of oil, it’s less mess and lighter than deep-frying.
- Gluten-Free Option: By nature, using oats (ensure they are certified gluten-free oats) makes this recipe easy to adapt for those who can’t have regular bread crumbs due to gluten. It’s a yummy gluten-free breaded chicken that doesn’t rely on expensive specialty flours.
Suitable For:
- Kids and adults who love chicken tenders or schnitzel – this is a more nutritious spin on a favorite, and great for family dinners. Kids likely won’t notice the difference, and adults will appreciate the extra flavor from the Parmesan.
- Home cooks looking to cut down on refined carbs. Paired with veggies or a salad, this makes for a balanced meal that’s lower in carbs but still very satisfying.
- Those on a budget – oats and a bit of cheese are inexpensive compared to store-bought breading or lots of nuts (some healthy coatings use almond meal; this uses cheaper oats).
- Anyone bored of plain chicken breast – this is an easy way to make it exciting again, with a nice crunch and seasoning.
Tips & Tricks:
Pulse the oats in a food processor just a few times to break them into a coarse meal (about the texture of quick oats or slightly finer) (Oat-Crusted Chicken Cutlets Recipe).
This helps them adhere better to the chicken. Pound the chicken to an even thinness (~1/2 inch) so they cook uniformly and stay juicy (Oat-Crusted Chicken Cutlets Recipe).
When breading, press the oat mixture onto the oiled chicken firmly to ensure it sticks. Let the coated chicken rest for 5 minutes before frying; this helps the coating set.
Cook in a hot skillet with enough oil to coat the bottom – wait for the oil to shimmer before adding chicken so it crisps instead of soaking up oil. Work in batches to avoid overcrowding (which can make it steam).
If you prefer baking over frying, you can bake them on a wire rack at 400°F (205°C) until cooked through, though they won’t brown quite as much.
Possible Improvements: Add your own flair to the oat coating – a pinch of garlic powder, paprika, or Italian seasoning can complement the Parmesan and parsley for different flavor profiles.
You could also mix in ground nuts (like almond flour or crushed pecans) with the oats for an even richer crust. For a spicy kick, add a dash of cayenne or chili flakes to the oat mixture.
Serving ideas: slice these and add to a salad for a high-protein topping, or use in a sandwich with a smear of mustard or pesto. If you have leftovers, reheat them in the oven or air fryer to regain crispness (microwaving will make them soggy).
And don’t discard any leftover oat crumbs – you can sprinkle them on a salad and toast them briefly for a crunchy topping!
Read the full recipe here: Oat-Crusted Chicken Cutlets – Martha Stewart
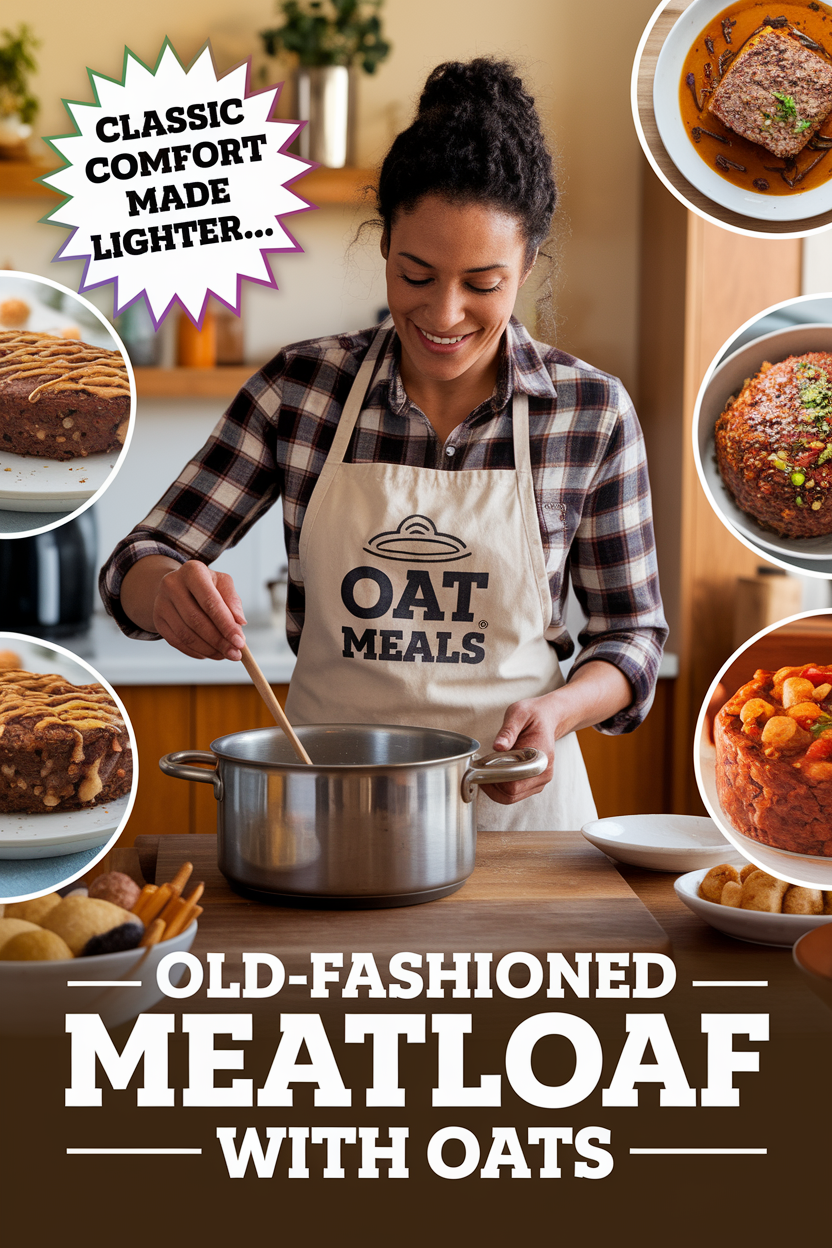
14. Old-Fashioned Meatloaf with Oats (Classic Comfort Made Lighter)
Description: A homestyle meatloaf that uses rolled oats in place of bread crumbs as the binder. This tender loaf is made with lean ground beef (or a beef/pork mix), finely chopped onion, egg, and seasonings, with oats absorbing the juices to keep it moist.
It’s topped with a tangy ketchup or BBQ glaze that caramelizes as it bakes. The oats blend in so you barely notice them, yet they add a subtle hearty texture and make the meatloaf more wholesome.
It’s an easy, one-bowl recipe yielding a savory, sliceable meatloaf that is just like the one mom or grandma made, but with a whole-grain twist.
Why It’s Great:
- Pantry-Friendly & Economical: This recipe comes together with basic pantry staples – using oats means you don’t need special bread crumbs and it stretches the meat further (great for feeding a family on a budget). It’s a true “recipes with what you have” kind of dish, originally from a time when using oatmeal was an economical way to bulk up meatloaf (Grandma’s Quaker Oats Meatloaf Recipe) (Grandma’s Quaker Oats Meatloaf Recipe).
- Moist and Tender: Oats are wonderful at retaining moisture. The meatloaf comes out juicy, not dry, because the oats and milk/egg mixture keep it from getting tough (Southern Meatloaf Recipe – The Seasoned Mom). Many find that an oat-based meatloaf is softer in texture than ones with bread crumbs, which can sometimes turn out dense.
- Classic Taste with a Healthy Twist: Despite the healthier swap, it still has that familiar comfort-food flavor – savory meat, a hint of onion and garlic, and that sweet-savory glaze on top. In fact, some might not even realize there are oats inside. Meanwhile, you’ve snuck in extra fiber and made the dish slightly lower in carbs.
- Quick Prep, Hands-Off Cook: Mixing the meatloaf takes about 10 minutes or less (just combine everything and shape it). Then it bakes on its own. It’s an easy weeknight entree because you can set it in the oven and prepare your sides (or relax) while it cooks. Plus, leftovers make fantastic meatloaf sandwiches!
Suitable For:
- Families craving a hearty, kid-friendly dinner. Kids usually love meatloaf, and they won’t detect the oats. It’s a smart way to include whole grains in a form they already enjoy.
- Anyone on a moderate diet or looking to cut down on refined flour – this meatloaf eliminates the need for bread fillers and can be made with lean meat, aligning with healthier eating goals without giving up comfort foods.
- People who need to avoid soy or certain additives – many store-bought bread crumbs have extra ingredients; using plain oats keeps the meatloaf pure and simple.
- Meal prep enthusiasts – a meatloaf can be assembled ahead of time and refrigerated until ready to bake. It also freezes well (either raw or cooked), making future dinners a breeze.
Tips & Tricks:
Don’t overwork the mixture – mix just until combined to keep the texture tender. Let the oats soak in the milk (or broth) for a few minutes before mixing with the meat; this can help them integrate more smoothly.
If you like vegetables in your meatloaf, finely grate some carrot or zucchini into the mix – oats will help absorb that extra moisture. Use a light touch when shaping the loaf; too compact and it can become dense.
Partway through baking, you can spoon off any excess fat that’s gathered in the pan if using a higher-fat meat.
For the glaze, mixing ketchup with a bit of Worcestershire sauce or mustard adds depth (Southern Meatloaf Recipe – The Seasoned Mom). Once it’s baked, let the meatloaf rest 5-10 minutes before slicing to prevent it from crumbling.
Possible Improvements: This is a basic template, so feel free to dress it up: add Italian herbs and a bit of parmesan for an Italian-style meatloaf, or chili powder and cheddar for a Tex-Mex take.
If you want to sneak in even more healthfulness, use half ground turkey and half beef – the oats will keep it from drying out.
You can also make individual mini meatloaf “muffins” by baking the mixture in a muffin tin; kids adore these and they cook faster.
If you’re watching sodium or sugar, use a low-sodium ketchup or BBQ sauce for the topping, or even a homemade tomato glaze.
Lastly, remember meatloaf sandwiches are legendary – a slice between whole-grain bread with a little extra ketchup or mayo is a next-day lunch to look forward to!
Read the full recipe here: Grandma’s Quaker Oats Meatloaf – The Seasoned Mom
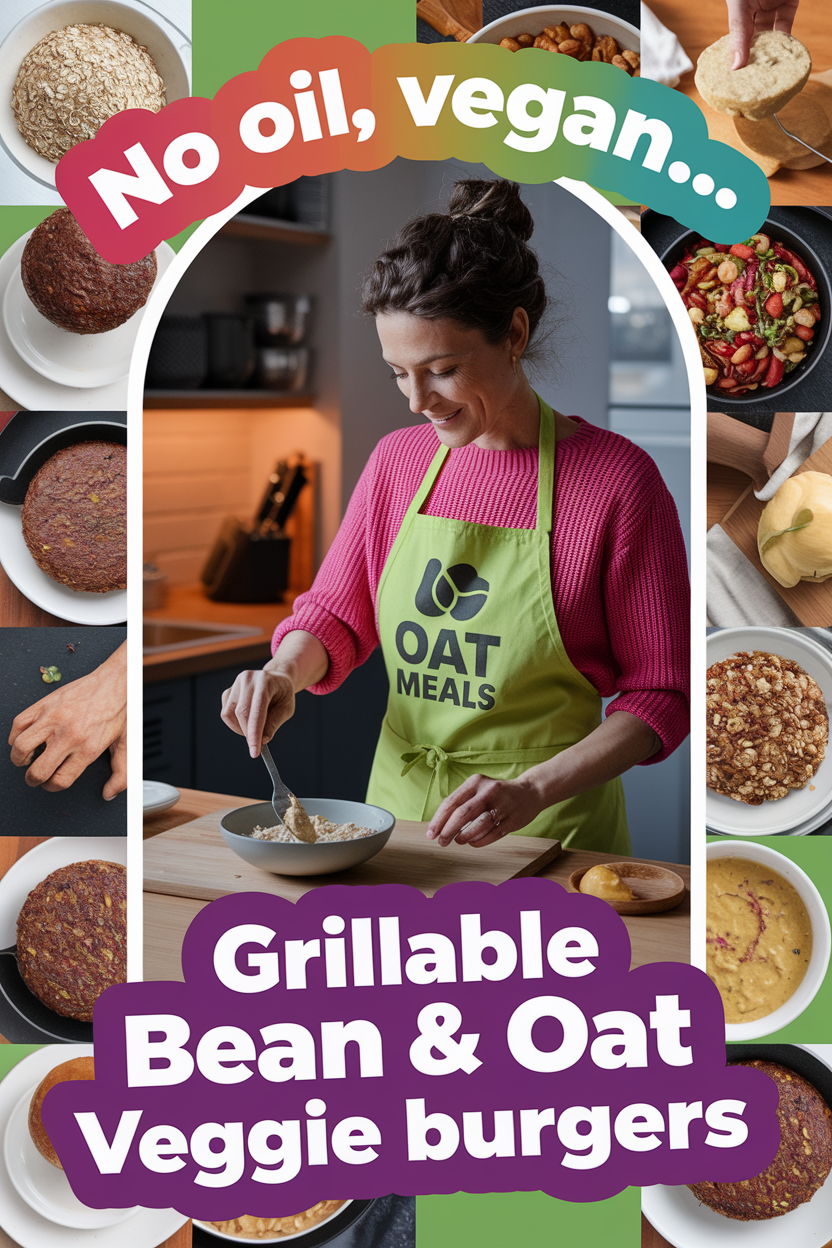
15. Grillable Bean & Oat Veggie Burgers (No Oil, Vegan)
Description: A hearty veggie burger patty made from a mix of oats, beans (like pinto and kidney beans), grated carrots, and spices – all with no added oil. These burgers are packed with plant protein and fiber, yet they hold together firmly, even on a grill.
The mixture is pulsed and formed into patties that bake or pan-sear into a satisfying burger with a slight crust.
The flavor is savory (thanks to garlic, onion, and cumin or smoky spices) and the texture is moist but not mushy, with oats giving it some body. It’s a nutritious alternative to meat burgers that actually leaves you full and happy.
Why It’s Great:
- Super Nourishing: Each patty is a little nutrition bomb – you get protein from the beans, complex carbs and fiber from oats and veggies, and lots of vitamins from the carrots and any other veggies added (Vegan Bean and Oats Burger – Holy Cow Vegan) (Vegan Bean and Oats Burger – Holy Cow Vegan). And with no oil or animal products, it’s very low in saturated fat. It’s basically a balanced meal in burger form.
- Holds Up on the Grill: Many homemade veggie burgers fall apart, but these are specifically designed to be “grill-worthy” and sturdy (Vegan Bean and Oats Burger – Holy Cow Vegan) (Vegan Bean and Oats Burger – Holy Cow Vegan). The combination of oats and the starch in beans binds the patty, so you can flip them on a grill or skillet without crumbling. That means you get that nice char and grill flavor if you cook them outdoors.
- Delicious and Hearty: Flavored with spices and herbs, these patties are anything but bland. They have a satisfying heft and “bite” to them, making them as fulfilling as a traditional burger. Many who try them are surprised at how tasty and satisfying they are for a vegan burger – some say it’s the best they’ve had (Vegan Bean and Oats Burger – Holy Cow Vegan).
- Allergy-Friendly & Versatile: They contain no dairy, no eggs, and can be made gluten-free by using GF oats. Also nut-free. This makes them suitable for a wide range of eaters. Plus, you can vary the beans or spices to change up the flavor (black beans for a Southwest vibe, chickpeas for a Mediterranean twist, etc.).
Suitable For:
- Vegans, vegetarians, or anyone trying to eat more plant-based. It’s an excellent recipe for Meatless Monday or to serve to a mixed crowd (meat-eaters often enjoy them too because of the great texture and flavor).
- Those following a whole-food, plant-based diet (WFPB) or avoiding processed veggie burgers. These are made from 100% whole foods you recognize – no weird soy isolates or additives that some store-bought vegan burgers have.
- People looking to reduce calories or fat: since there’s no oil, these burgers are relatively low-calorie for their size, yet high in fiber and protein, which is great for weight management.
- Anyone with an egg allergy who finds most burgers or meatloaf recipes off-limits. Oats and beans do the binding here, so no egg needed.
Tips & Tricks:
Mash or pulse the mixture enough so that it holds together (about 50-75% of the beans should be mashed, with some left whole for texture).
If the mix seems too wet, add a few more oats; if too dry, a tablespoon of water or aquafaba (bean liquid) can help. Let the mixture sit for a few minutes so the oats absorb moisture – this firms up the patties.
When shaping, compress the patties firmly with your hands. You can make them ahead and refrigerate for an hour or two (or even overnight); this also helps them set. Cook on a well-heated, lightly oiled surface to get a nice brown crust.
If baking, turn them once during baking to brown both sides. Freeze extras: they freeze beautifully, separated by parchment paper – perfect for future quick meals.
Possible Improvements: Mix and match add-ins: swap one of the bean types for black beans and add corn and chili powder for a southwest burger, or use lentils and add curry spices for an Indian-inspired burger.
You can also finely dice mushrooms and sauté them with the onions to add an even meatier flavor (just watch moisture levels). If you don’t mind a little oil, you could brush them with a bit of olive oil before baking or grilling for an even crisper exterior.
As for serving, treat it like any burger – load it up with lettuce, tomato, avocado, vegan cheese, or special sauces.
One popular combo is topping these with a slice of vegan cheese and barbecue sauce for a hearty BBQ bean burger. Finally, you can crumble leftover patties into a salad or a wrap – it’s multi-purpose!
Read the full recipe here: Vegan Bean and Oats Burger – Holy Cow Vegan
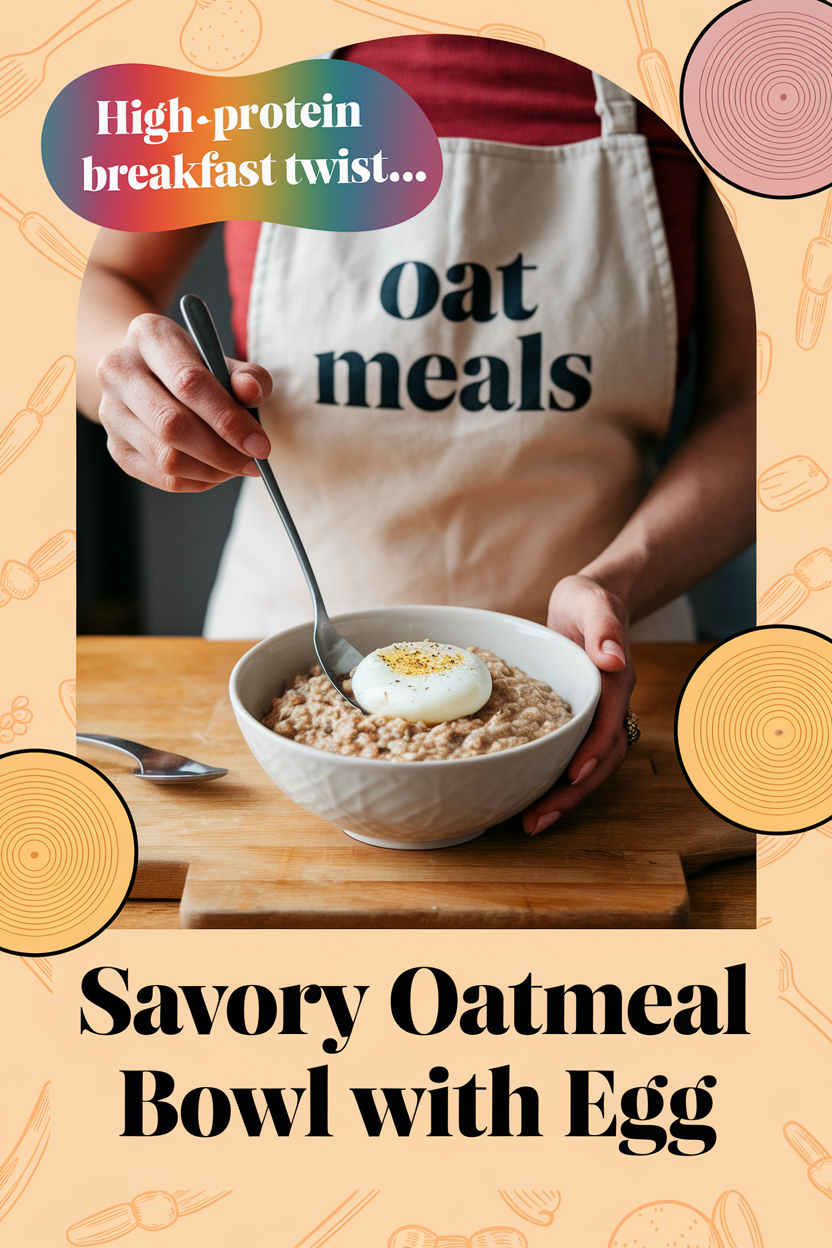
16. Savory Oatmeal Bowl with Egg (High-Protein Breakfast Twist)
Description: A savory spin on oatmeal that turns it into a complete breakfast bowl. Instead of cooking oats with sugar, we cook them with a pinch of salt and stir in a bit of parmesan cheese for creaminess and flavor (Savory Oatmeal with Egg Breakfast – Feel Good Foodie) (Savory Oatmeal with Egg Breakfast – Feel Good Foodie).
The oatmeal is then topped with sautéed veggies (such as spinach, mushrooms, and shallots) and crowned with a fried egg. The runny yolk mingles with the cheesy oats, creating a rich sauce.
Finished with herbs like chives and perhaps a dash of hot sauce, this bowl is comforting, umami-rich, and very satisfying. It’s like a cross between a porridge and a breakfast risotto – and it’s ready in minutes.
Why It’s Great:
- Hearty & Balanced: This dish has it all – whole grain carbs from oats, protein from the egg and cheese, and micronutrients from the veggies. It’s a balanced meal that will keep you full through lunchtime. If you’re used to sweet oatmeal, this savory version is a game-changer for keeping breakfast interesting.
- Quick (Under 10 Minutes): It’s as fast as making regular oatmeal. In less than 10 minutes, you have a gourmet-feeling breakfast ready (Savory Oatmeal with Cheddar and Fried Egg). Perfect for busy mornings when you want something warm and homemade but can’t spare much time.
- Easily Customizable: You can top the savory oats with whatever you like or have on hand – think avocado slices, bacon bits, roasted cherry tomatoes, or different cheeses. The base of cheesy oats + egg is a blank canvas for your favorite savory toppings. It’s also easy to make multiple bowls and customize each for family members.
- Great for Sweet Breakfast Avoiders: Not everyone likes sugary foods in the morning. For those who prefer savory breakfasts (like toast, eggs, or leftovers), this provides the warmth and comfort of oatmeal without any sweet taste (Savory Mushroom and Herb Steel Cut Oat Risotto Recipe on Food52). It’s a novel way to enjoy oats for people who usually skip them because they associate oats only with sweet flavors.
Suitable For:
- Vegetarians (just omit any meat toppings) – this bowl delivers protein without any meat, and can be made vegan by using plant-based milk, omitting cheese, and using tofu scramble instead of egg.
- Meal preppers: You can cook a big batch of plain oats and keep in the fridge. In the mornings, reheat a portion with a splash of water, then stir in cheese and add fresh toppings. A speedy hot breakfast with minimal effort daily.
- Those following a lower sugar or lower GI diet – this savory oatmeal has no added sugars and the fiber + protein will slow digestion, likely keeping blood sugar stable.
- Anyone bored with their breakfast routine. It’s an excellent way to add variety and sneak extra veggies into your first meal of the day. Also, if you love grain bowls or congee (rice porridge), you’ll probably love this too.
Tips & Tricks:
Use old-fashioned rolled oats for a creamy yet textured result. Cooking them in half water, half milk (dairy or non-dairy) yields extra creamy oats (Savory Oatmeal with Egg Breakfast – Feel Good Foodie).
Stir the oats while cooking to prevent them from sticking and to break them down a bit. Season the oats base lightly with salt and pepper as you cook – since we’re going savory, a little seasoning at this stage helps (you can even cook them in chicken or veggie broth for more flavor).
Sauté your veggies in a separate pan while the oats simmer; that way everything finishes together. A fried or poached egg with a runny yolk works best for that silky effect, but you can also do soft-boiled.
Garnish is key: chopped chives or green onions, a grind of black pepper, and an extra sprinkle of parmesan or even a few drops of hot sauce or sriracha can really elevate the final bowl (Savory Oatmeal with Egg Breakfast – Feel Good Foodie).
Possible Improvements:
The beauty of this recipe is playing with variations. For example, make an “Italian” savory oatmeal by stirring in pesto instead of parmesan and topping with a soft-boiled egg and sun-dried tomatoes.
Or a “Southwestern” bowl with cheddar in the oats, black beans, salsa, and a poached egg on top. If you eat meat, crispy bacon or sausage crumbles can be added.
For a vegan version, top with a hearty helping of seasoned pan-fried tofu or roasted chickpeas for protein, and use nutritional yeast in the oats for a cheesy taste.
You can also experiment with the grain: try steel-cut oats for an even heartier texture (they will take longer to cook ~20 minutes, or you can use the quick-cooking steel-cut oats to cut time).
Lastly, a squeeze of lemon over the finished bowl can brighten up the flavors, especially if you include greens like spinach which love a bit of acid.
Read the full recipe here: Savory Oatmeal with Egg – Feel Good Foodie
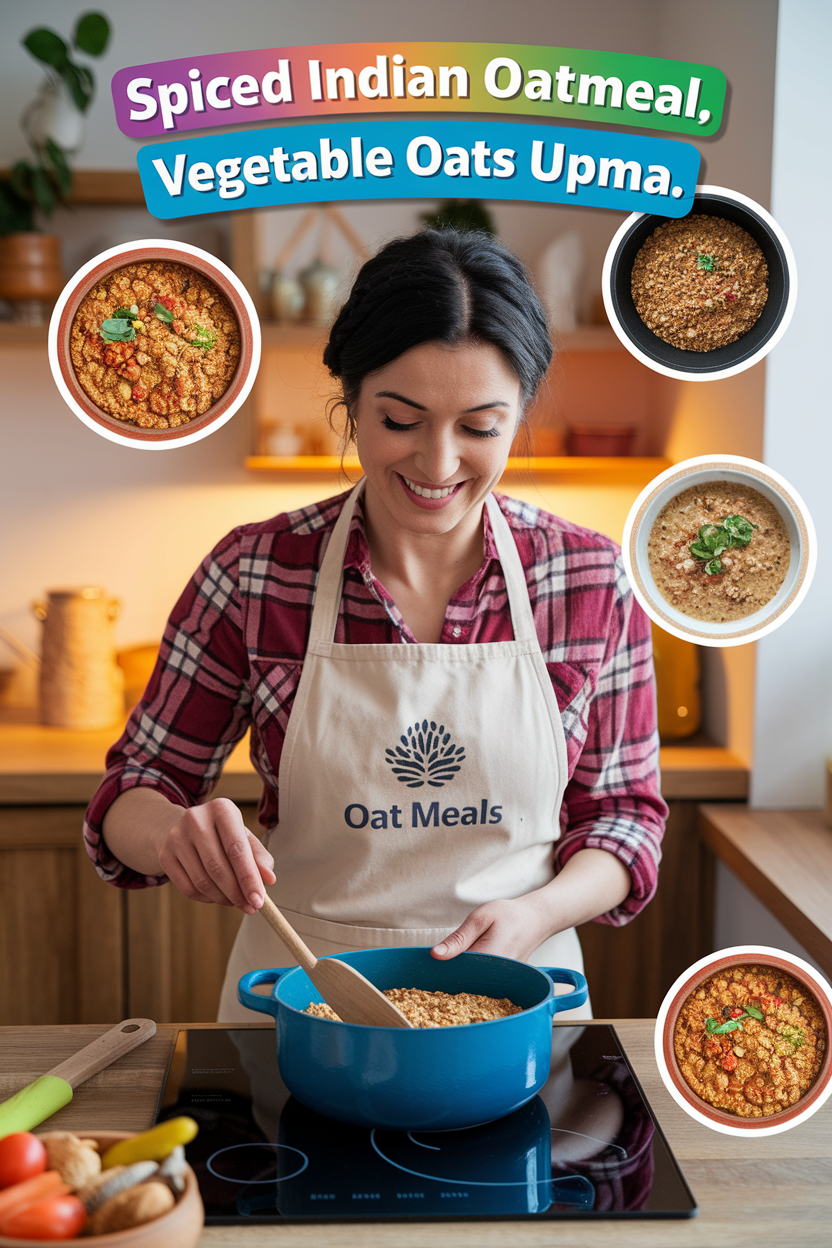
17. Vegetable Oats Upma (Spiced Indian Oatmeal)
Description: A savory Indian breakfast dish where oats take the place of the usual semolina. Oats upma is prepared by dry-roasting rolled oats, then cooking them with sautéed onions, ginger, curry leaves, vegetables (like peas, carrots, beans), and simple spices.
Water is added to simmer the oats until soft. The result is a flavorful, pilaf-like dish where the oats are tender and infused with the aromas of mustard seeds, cumin, and curry leaves.
Finished with a squeeze of lemon for brightness and optionally garnished with cilantro, this dish is comforting, warmly spiced, and an excellent way to start the day on a healthy note.
Why It’s Great:
- Healthy Twist on a Traditional Recipe: Upma is a common South Indian breakfast usually made with refined semolina (rava). Using oats instead makes it higher in fiber and nutrients while retaining all the beloved flavors of the original (Oats Upma Recipe (Healthy Savory Oats)) (Oats Upma Recipe (Healthy Savory Oats)). It’s a great example of adapting a traditional dish for modern health needs (diabetics and weight-watchers often prefer oats upma as it has a lower glycemic index).
- Quick & Easy One-Pot: From start to finish, it takes about 20–30 minutes and uses one pan. It’s mostly chopping a few veggies and then a straightforward cooking process. No fancy techniques – if you can make instant oatmeal, you can make this (with just a tad more effort for the tempering of spices).
- Flavorful and Light: Thanks to ingredients like ginger, cumin, mustard seeds, and vegetables, the dish is aromatic and flavorful, yet it feels light on the stomach. There’s no heavy sauce or cream – just the goodness of spiced oats and veggies. It’s the kind of breakfast that leaves you energized rather than weighed down.
- Very Customizable: You can use any veggies you like (or have leftover). From tomatoes to bell peppers, or even skip vegetables if in a rush – though the mix of peas, carrots, and beans is classic and adds color and nutrition (Oats Upma Recipe (Healthy Savory Oats)) (Oats Upma Recipe (Healthy Savory Oats)). It’s also easy to adjust spices to your taste. This flexibility makes it a practical, adaptable recipe.
Suitable For:
- Those who enjoy savory breakfasts or are looking to expand their morning options beyond sweet oatmeal or eggs. If you like dishes like poha (flattened rice) or savory porridges, you’ll love oats upma.
- Vegetarians and vegans – this recipe is inherently vegan (just oil and plant-based ingredients). It’s a great way to get a nutrient-dense meal without any animal products.
- Anyone aiming to incorporate more whole grains in traditional diets. If you’re used to Indian breakfasts like upma or dosa made with refined grains, this is a smooth transition to using oats.
- Busy individuals: this doubles as a quick lunch or dinner too, not just breakfast. And leftovers reheat well, potentially saving cooking time the next meal.
Tips & Tricks:
Dry roast the oats for a few minutes until they smell toasty and turn a light golden – this step really enhances the flavor and helps the final texture not turn too mushy (Oats Upma Recipe (Healthy Savory Oats)) (Oats Upma Recipe (Healthy Savory Oats)).
In a separate pan, do the tempering: heat oil, crackle mustard seeds, then add urad dal (split lentils) if you have for nuttiness, cumin, curry leaves, ginger, and a pinch of asafoetida (hing) if available – this builds a fantastic flavor base. Sauté the onions and veggies in this spiced oil.
Add hot water to cook the oats; adding boiling water makes the cooking faster and creamier. Stir the oats as they cook and add water in parts if needed until they reach your desired consistency (some like upma looser, some like it fluffier). Don’t forget to season with salt while cooking so the oats absorb it.
Finally, a squeeze of lemon juice at the end brightens the dish and is traditional for upma (Oats Upma Recipe (Healthy Savory Oats)). You can also sprinkle some roasted peanuts or cashews on top for crunch.
Possible Improvements: If you like heat, add a chopped green chili or a dash of chili powder when sautéing the onions. You can also incorporate a bit of garam masala or sambar powder for a different spice profile.
Using steel-cut oats instead of rolled oats can give a chewier texture, but you’ll need to adjust water and cook longer.
Another variation is to add a handful of lentils (like soaked moong dal) or sprouted beans to increase protein – they can cook along with the veggies.
For a South Indian authentic touch, serve it with a side of coconut chutney or a dollop of plain yogurt. And while it’s a breakfast dish, you can certainly serve it as a healthy dinner with a side of pickle or salad.
Read the full recipe here: Oats Upma – Veg Recipes of India
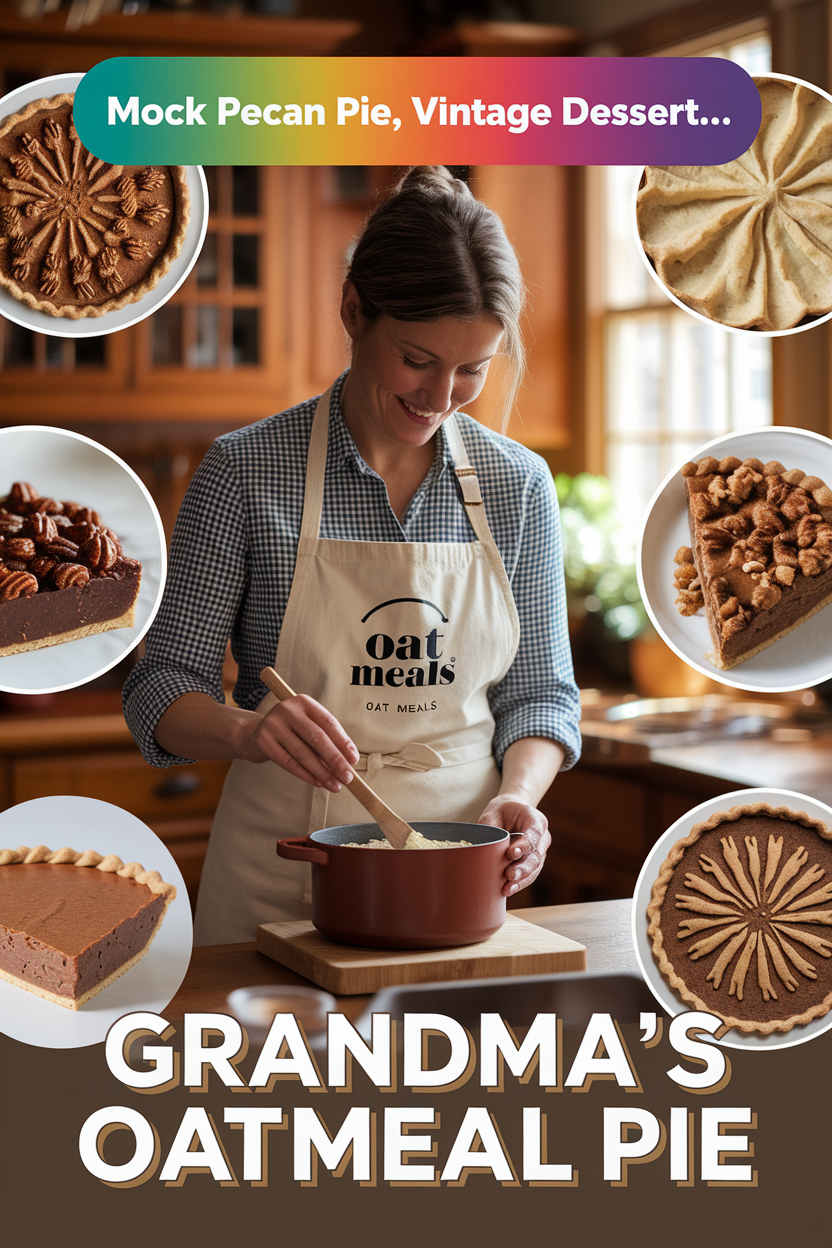
18. Grandma’s Oatmeal Pie (Mock Pecan Pie, Vintage Dessert)
Description: A vintage pie made with a filling of oats, eggs, butter, brown sugar, and corn syrup (or golden syrup) that bakes into a caramelized, slightly chewy custard surrounded by flaky pie crust.
Often called a “mock pecan pie,” this dessert was created when pecans were scarce or expensive – the oats magically form a nutty, sweet crust on top as the pie bakes (Oatmeal Pie II Recipe – Allrecipes) (Grandma’s Oatmeal Pie – The Country Cook).
The flavor is rich with molasses-like notes from brown sugar and syrup, and the texture is wonderfully chewy and gooey, similar to a pecan pie but without any nuts. It’s indulgent and comforting, especially when served with whipped cream or vanilla ice cream.
Why It’s Great:
- Old-Fashioned Charm: This recipe has been handed down through generations – it’s even won blue ribbons at fairs (Grandma’s Oatmeal Pie – The Country Cook). It’s a slice of history and nostalgia, which also happens to taste amazing. If you love pecan pie or chess pie, this oatmeal pie gives you those vibes with a fun twist.
- “Nutty” Flavor Without Nuts: Oats take on a toasty, nutty flavor in the oven, and develop a crunchy top layer that mimics nuts (Oatmeal Pie II Recipe – Allrecipes) (Grandma’s Oatmeal Pie – The Country Cook). This is fantastic for people with nut allergies or those who don’t like the texture of nuts but enjoy that caramelized pie filling flavor.
- Simple Ingredients: In tough times, folks made do with basics – this pie uses pantry staples (oats, sugar, eggs, syrup). It doesn’t require fancy ingredients, so you can whip it up without a trip to a specialty store. It’s a great recipe to have when you need a dessert and the cupboard is nearly bare.
- Long-Lasting & Stable: Oatmeal pie doesn’t weep or get soggy quickly. It actually sets up and slices cleanly, and leftovers keep well at room temperature for a couple of days. Some even say it tastes better the next day as the flavors deepen. It’s a good make-ahead holiday pie.
Suitable For:
- Holiday dessert tables – especially if you want an unexpected conversation piece. Everyone’s heard of pecan pie, but oatmeal pie? Once they try it, it often becomes a requested favorite.
- People with nut allergies who miss out on pecan pie can finally enjoy a very similar taste experience.
- Anyone who loves gooey pies like chess pie, sugar pie, or treacle tart. Oatmeal pie will hit that sweet, gooey, caramel note perfectly.
- Frugal bakers – the recipe was born from frugality and continues to be very budget-friendly. You get a luxurious-tasting pie from humble ingredients.
Tips & Tricks:
Use quick-cooking oats if possible – their finer texture integrates better and gives that faux-pecan top crust that’s easy to bite through (Grandma’s Oatmeal Pie – The Country Cook).
If you only have old-fashioned oats, you can pulse them once or twice in a blender. Be careful not to overbake; the filling should still have a slight jiggle in the center when you take it out – it will firm up as it cools.
Baking on a lower rack can help the crust brown nicely on the bottom (since the filling is quite wet). Let the pie cool completely before slicing or you’ll have a runny filling.
For added depth, some recipes include a bit of flaked coconut or a teaspoon of molasses – feel free to experiment if you like those flavors (one version includes coconut and it adds to the “crust” texture on top (Oatmeal Pie {Mock Pecan Pie} – Retro Potluck)).
If you find the pie too sweet (it is sweet, as pecan pie is), you can serve it with unsweetened whipped cream to balance it out.
Possible Improvements: You can make this pie your own by adding a sprinkle of cinnamon or nutmeg to the filling for a hint of spice. A splash of vanilla or a spoonful of bourbon can also compliment the caramel flavor beautifully.
If you’re not avoiding nuts, some modern versions add a handful of chopped pecans or walnuts alongside the oats for even more texture – though then it’s not the classic “mock” pecan pie anymore.
For presentation, you might reserve a tablespoon of oats and toast them separately to sprinkle on top after baking, highlighting that it’s an oatmeal pie.
Additionally, trying different syrups like sorghum syrup or golden syrup instead of corn syrup can impart a unique flavor (golden syrup makes it taste more like treacle tart, which is delicious).
Lastly, ensure to use a homemade or good quality pie crust; a buttery, flaky crust really elevates the whole experience of this pie.
Read the full recipe here: Grandma’s Oatmeal Pie – The Country Cook
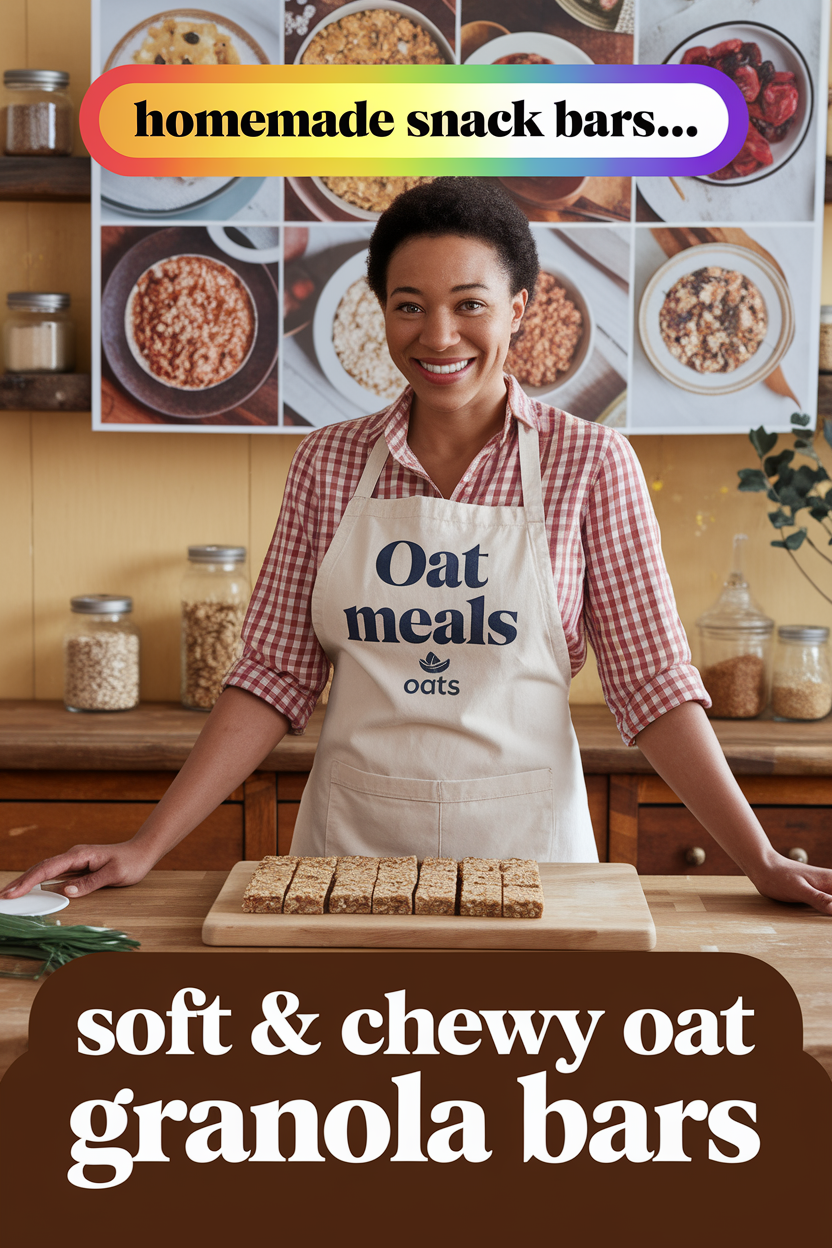
19. Soft & Chewy Oat Granola Bars (Homemade Snack Bars)
Description: Tender, chewy granola bars loaded with oats, nuts, and dried fruit, bound together with a honey-butter syrup. These bars are reminiscent of your favorite store-bought chewy granola bars but even better, because you can taste the toasted oats and real ingredients.
They hold together nicely in bar form yet have a pleasant softness (thanks to the honey and butter) that makes them easy to bite into – no hard, crumbly mess here.
Lightly sweet and very satisfying, these bars make a perfect breakfast on the go or an anytime snack, with the bonus of being highly customizable to your flavor preferences.
Why It’s Great:
- Homemade Goodness: By making your own granola bars, you avoid artificial additives and can trust every ingredient. These bars use rolled oats, your choice of nuts and dried fruits, a bit of butter, brown sugar, and honey – simple stuff, yielding delicious results (Soft and Chewy Granola Bars Recipe) (Soft and Chewy Granola Bars Recipe). They are healthier than many packaged bars which can be high in corn syrup or preservatives.
- Ideal Texture: Achieving the right texture is key for granola bars, and this recipe nails the coveted soft-yet-chewy consistency. They are sturdy enough not to fall apart (the technique of simmering the honey-butter “glue” helps them stick (Soft and Chewy Granola Bars Recipe) (Soft and Chewy Granola Bars Recipe)) but not so hard that you risk a tooth. It’s a Goldilocks balance of moist and chewy, often improved by tips like pressing the mixture firmly and cooling before cutting.
- Customizable & Fun to Make: You can treat the recipe as a base and add what you love – chocolate chips, coconut flakes, peanut butter, seeds, etc. It’s a fun kitchen project, possibly even for kids to help with (they’ll enjoy mixing and pressing the mixture into the pan). The result is a batch of bars tailored exactly to your liking, which is very satisfying.
- Portable Energy: These bars are packed with oats and nuts, meaning they provide fiber and slow-burning fuel. They’re excellent for a quick breakfast, a hiking snack, or tossing in a lunchbox. And since they’re homemade, they’re quite cost-effective compared to buying individual bars.
Suitable For:
- Busy individuals and students – instead of grabbing a pastry or skipping breakfast, you can grab one of these bars for a much more nutritious start.
- Parents looking for healthier snacks for kids – these are great because you control the sugar content and can sneak in things like flax or chia seeds. Kids also enjoy the chewy, cookie-like nature of the bars (especially if you include some mini chocolate chips).
- People looking to reduce waste – making bars at home means less packaging waste from individually wrapped store bars. Plus, you can cut them into reusable containers or wraps.
- Those with dietary tweaks: Need gluten-free? Use GF oats. Want vegan? Use a vegan butter substitute and brown rice syrup or maple instead of honey. Want high-protein? Add some protein powder or chopped protein-rich nuts. The recipe can accommodate these changes.
Tips & Tricks:
Lightly toast your oats and nuts in the oven first for 8-10 minutes (Soft and Chewy Granola Bars Recipe) (Soft and Chewy Granola Bars Recipe) – this deepens their flavor and makes the bars taste incredible (a step many recipes suggest and is worth it).
When heating the butter, honey, and brown sugar, stir until the sugar fully dissolves and the mixture bubbles for a minute; this creates a sticky syrup that binds well and helps prevent crumbling (Soft and Chewy Granola Bars Recipe) (Soft and Chewy Granola Bars Recipe).
After mixing wet and dry ingredients, press the mixture very firmly into your lined pan – really pack it down (you can use the bottom of a measuring cup or a glass to compress it).
This is crucial for bars that hold together. Let the pan cool at least 1–2 hours (or chill in the fridge) before slicing; cutting too soon can cause them to fall apart.
If adding chocolate chips, press them on top after patting the mixture in the pan (so they don’t melt from the warm syrup). Store bars wrapped individually or separated by parchment in an airtight container; they stay freshest and chewiest when not exposed to air.
Possible Improvements: Change up the flavor by experimenting with mix-ins: e.g., dried cranberries + white chocolate for a sweet-tart combo, or apricots + almonds + a bit of almond extract for a fruit-nut bar.
If you prefer a firmer bar, you can bake them for a short time (15 minutes at 325°F) after pressing in the pan – this can make them a bit crisper and more stable (though truly chewy lovers may skip this).
For a peanut butter granola bar, replace 2–3 tablespoons of butter with creamy peanut butter and add peanuts. You could also drizzle the finished bars with dark chocolate for a prettier presentation and extra treat factor.
Lastly, if you find the bars a bit sweet for your taste, you can reduce the sugar/honey a little, but keep in mind that the stickiness is what holds them together, so don’t cut too much.
A pinch of salt in the mix can also balance sweetness and highlight flavors, especially if your nuts were unsalted.
Read the full recipe here: Soft and Chewy Granola Bars – Inspired Taste
20. Traditional Scottish Oatcakes (Savory Oat Crackers)
Description: Crisp, savory biscuits made primarily of oats, Scottish oatcakes are like a cracker crossed with a biscuit. They consist of oat flour or finely ground oats mixed with a bit of fat (such as butter or lard), hot water, and salt, then rolled out and cooked on a griddle or baked.
They emerge as rustic, hearty rounds or triangles that are lightly browned and snap when broken. Oatcakes have a lightly toasted oat flavor, a touch of salt, and a satisfying crunch.
They’re historically a staple in Scotland, enjoyed with cheese, soup, or just as a snack with butter and jam. These simple crackers really let the nutty flavor of oats shine.
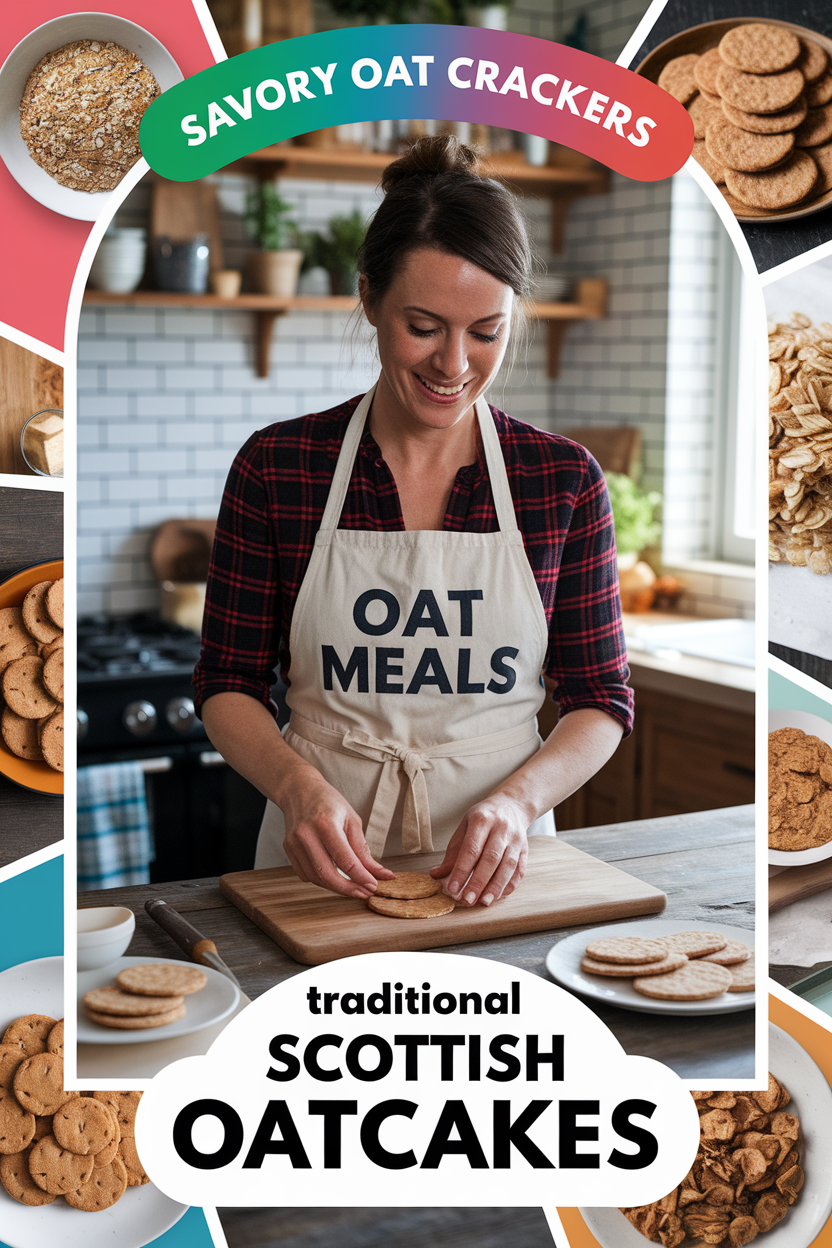
Why It’s Great:
- Just a Few Ingredients: Oatcakes showcase how delicious simplicity can be. With usually no more than 4 ingredients (oats, fat, salt, water – maybe a pinch of baking soda), they are super wholesome and free of additives (Scottish Oatcakes Recipe) (Scottish Oatcakes Recipe). Anyone can make these with basic pantry items, and they’re naturally high in whole grains.
- Healthy Snack Alternative: Instead of processed crackers, oatcakes offer a high-fiber, whole grain option. They’re quite filling for their size due to the fiber. Plus, they can be made even healthier by using heart-healthy fats like olive oil or an oil/butter mix (Scottish Oatcakes Recipe) (Scottish Oatcakes Recipe). Oats also have no gluten (though often cross-contaminated, you can use certified GF oats), making oatcakes a nice gluten-free cracker if made without any wheat flour.
- Authentic & Cultural: Eating oatcakes connects you to centuries of Scottish heritage. They were traditionally baked over the fire on a stone or griddle. Serving them can add a special touch to a cheese board, lending a rustic feel and a talking point (“these are traditional Scottish oatcakes made from an old recipe”).
- Long Shelf Life & Portable: Oatcakes, when completely dried and cooled, store well in tins for quite a while. They were carried by travelers and soldiers in the past. Even today, they’re great for hiking or traveling because they’re sturdy and won’t spoil quickly.
Suitable For:
- Cheese lovers – oatcakes are perfect with cheese. Their neutral, slightly nutty taste pairs beautifully with sharp cheddar, blue cheese, or a creamy brie. They won’t overshadow the cheese like some flavored crackers can.
- People following a low-sugar or high-fiber diet. These have zero sugar and are basically like eating oats in cracker form.
- Those with minimal ingredients at home or on camping trips – you can even make oatcakes on a camp skillet. They’re an easy bread substitute when you’re out of yeast or flour.
- Anyone who enjoys baking or experimenting with historical recipes. It’s fun to try your hand at these and realize how something so simple can be so tasty.
Tips & Tricks:
Grind your oats to a medium-fine meal if you don’t have oatmeal/porridge oats or oat flour. You can use a food processor – aim for a texture like coarse sand, not a complete powder (having some slightly larger bits of oat is fine and adds texture).
Mix the dry ingredients, then pour in hot water with melted fat; the hot liquid helps the oats soften and dough come together (Scottish Oatcakes Recipe) (Scottish Oatcakes Recipe).
You want a dough that’s not too sticky – add more oats if needed. Roll the dough between parchment paper to avoid sticking (Scottish Oatcakes Recipe) (Scottish Oatcakes Recipe), to about 1/4 inch (for thicker, heartier oatcakes) or thinner for crisper ones.
Cutting into traditional shapes: triangles (if you roll a circle and cut like a pie) or rounds using a cutter. If cooking on a griddle/skillet, use low heat and cook slowly so they dry out and crisp without burning – a few minutes each side.
If baking, an oven around 325-350°F works, until they’re firm and just golden at edges.
For maximum crispness, after initial baking or griddle cooking, you can let them dry out in a low oven for a little longer. Store completely cooled oatcakes in an airtight tin to keep them crunchy.
Possible Improvements: While traditional oatcakes are plain, you can certainly jazz them up if desired. A bit of black pepper or herbs (like rosemary, thyme) in the dough can add aroma, or even a small handful of grated cheddar for cheesy oatcakes.
For a touch of sweetness (to enjoy with tea), some people add a teaspoon of sugar or honey to make them more of a biscuit.
You can also experiment with the fat: butter gives a lovely flavor, but using bacon fat or duck fat as was sometimes done historically yields a really rich, savory depth (clarified butter or ghee is recommended for crispness and flavor (Scottish Oatcakes Recipe)).
Another trick from some recipes: a pinch of baking soda gives a lighter texture and helps browning (Scottish oatcakes recipe – BBC Good Food).
But even with enhancements, remember the charm of an oatcake is its simplicity – one bite and that toasty oat flavor shines. Serve them with anything from cheese and chutney to smoked salmon, or crumble them into soup like crackers. Slàinte mhath (to your good health)!
Read the full recipe here: Scottish Oatcakes – Serious Eats
Conclusion: Oats – The Ultimate Culinary Chameleon
From the sweet comforts of cookies and crisps to the savory delights of risottos and veggie burgers, oats have proven their incredible versatility in the kitchen.
These 20 unique recipes highlight how one humble ingredient can shape-shift into breakfasts, snacks, main courses, and desserts – each with its own distinct taste and texture.
Along the way, we’ve seen that cooking with oats isn’t just creative and delicious, but also adds a boost of nutrition (think fiber, protein, vitamins) to everyday meals.
Incorporating more oat-based dishes into your diet can mean heart-healthier, more satisfying meals without sacrificing flavor.
Whether you’re whipping up a high-protein peanut butter overnight oats jar for a quick morning commute, or savoring a hearty bowl of savory oatmeal with dinner toppings, you’re doing your body a favor while treating your taste buds.
Plus, oats are budget-friendly and naturally gluten-free (use certified GF oats if needed), making them accessible to many households and diets.
We hope this collection inspires you to get creative with oats in your own kitchen. Try a recipe or two from each category – maybe a chewy granola bar for snack and a crunchy oat-crusted chicken for dinner – and discover new favorites that will become regulars on your menu.
With oats on your side, you can enjoy comfort and wellness in every bite. Happy cooking, and here’s to reimagining the mighty oat in all its delicious forms!